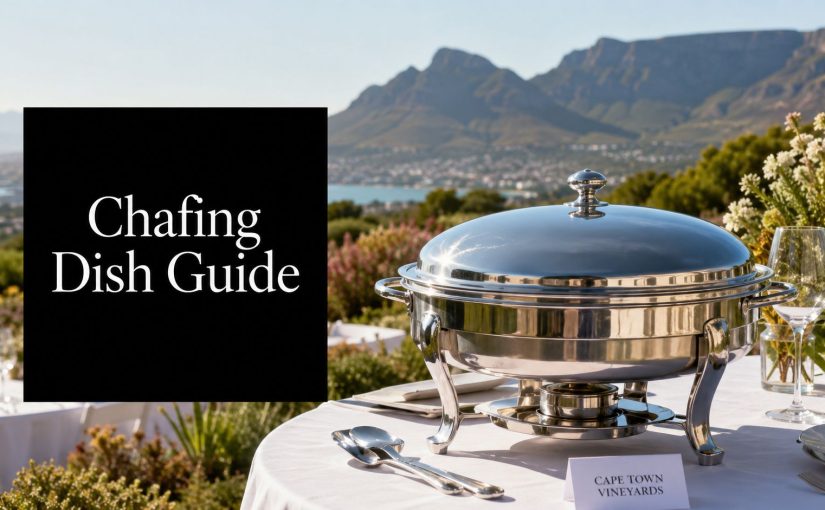
Round Chafing Dish Guide for Cape Town Events

You're standing at the buffet table in the Winelands, the food is ready, the photographer is waiting, and the only thing between a smooth service and a messy one is the equipment under those gleaming domes. A round chafing dish looks simple, but in event rental terms it's a very specific tool, and the wrong choice shows up fast in cold sauces, awkward table gaps, and guests queuing too slowly.

If you're planning a wedding, corporate function, matric dance, or formal school event in Cape Town or the Winelands, treat the round chafer as a service decision, not a décor decision. It's there to hold soups, sauces, sides, and desserts at buffet temperature with indirect heat, while still looking polished enough for a formal setting. For a useful broader hosting reference alongside buffet planning, the holiday gathering hosting tips from SouthShore Fine Linens are worth a look, because the same discipline around flow, timing, and presentation applies here.

What a Round Chafing Dish Does at Your Event

A round chafing dish is a portable food warmer built around four parts, a stand, a water pan, a food pan, and a lid. The water bath creates indirect heat, so the food sits above the flame or heat source instead of cooking directly on it. That matters because round chafers are usually hired for dishes that need steady warmth without scorching, especially soups, sauces, vegetable sides, desserts, and smaller buffet portions.

What you are really hiring

In plain English, you're hiring a compact hot-holding unit that's designed to look good on a buffet line and behave properly in service. In South African event-rental use, round models are typically specified at 4 to 7 quarts, which is why they suit medium-volume stations rather than bulk mains. A 7-quart unit holds about 6.6 litres, which is enough to keep a plated buffet station moving without taking up the footprint of a large rectangular pan, according to the historical and practical reference in the chafing dish overview on Wikipedia.

That compact form is why planners keep choosing round units for Cape Town weddings and school functions. They feel formal, they read well on the table, and guests can serve from them easily from either side. If you're building a buffet with mixed dishes, round chafers usually belong on the items that need elegance more than sheer volume.

Practical rule: use round chafers for the dishes guests take in smaller portions, not for the main item that disappears fastest.

Menu fit and service flow

Round chafers work best when you want presentation and access rather than maximum tray length. They suit soup stations, dessert buffets, sauce points, and side-dish clusters at intimate or medium-sized events. A good caterer uses them where the buffet needs visual softness, not where the line needs to absorb heavy traffic.

That's why they show up so often in Cape Town and Winelands settings. They make sense when the event has style, but they still have to earn their place through function. If you're unsure what to choose, keep reading for fuel choice, sizing, setup, and styling, because those decisions change how well the chafer performs on the day.

Why Round Chafing Dishes Became Standard Catering Kit

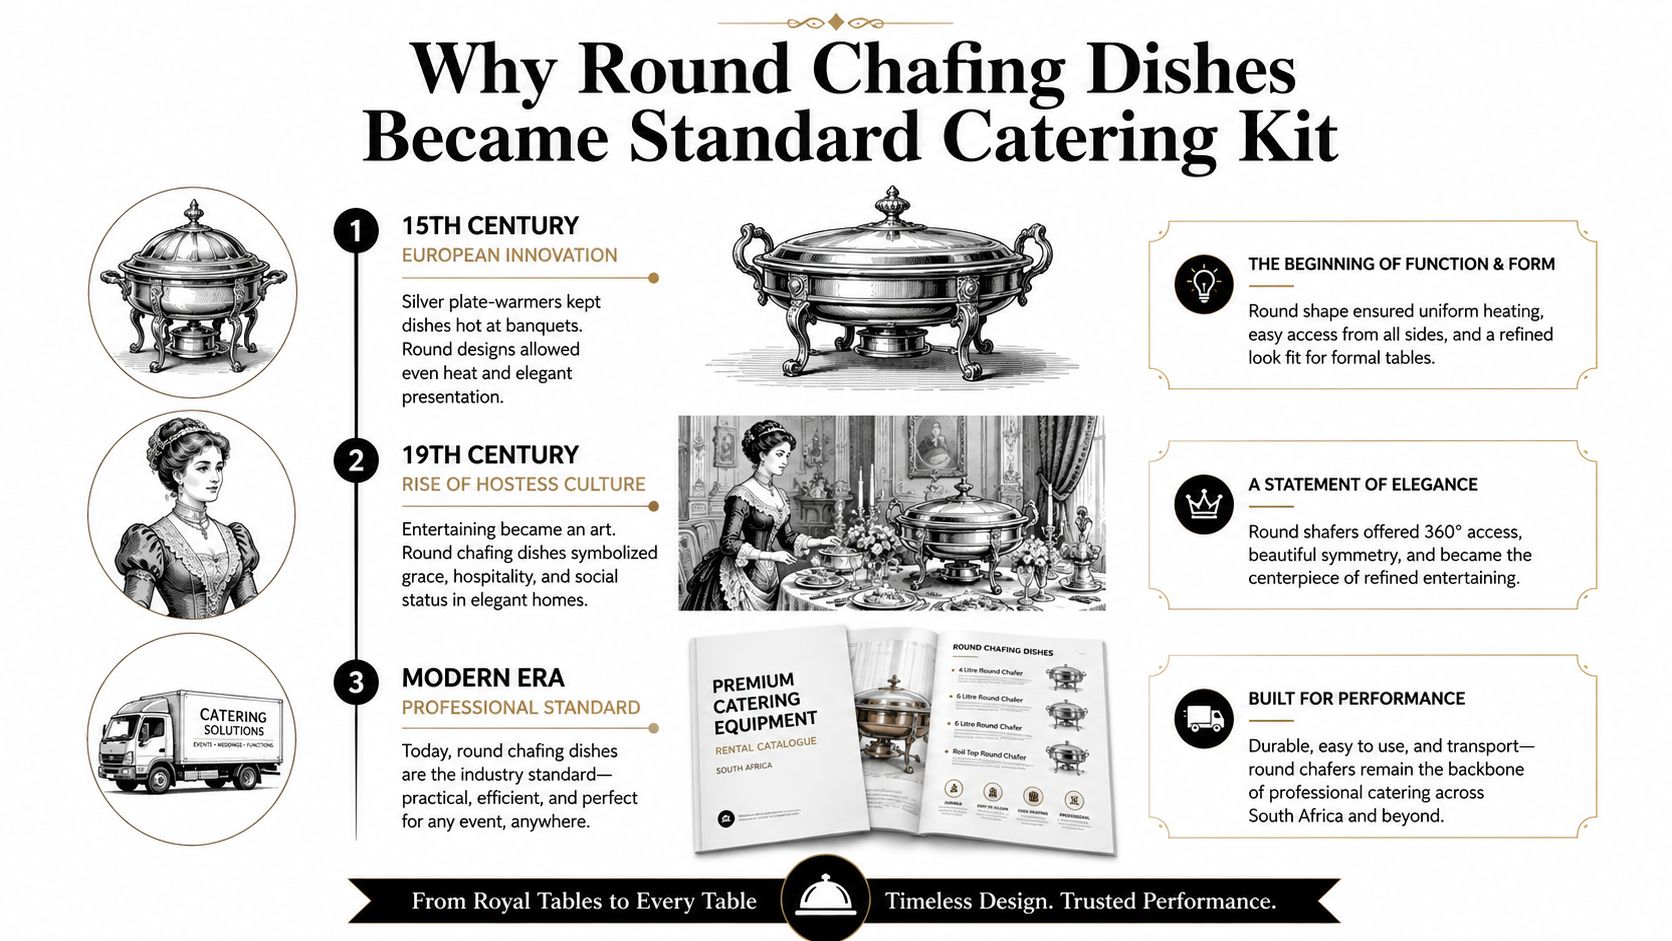
An infographic detailing the historical evolution and modern professional use of round chafing dishes in catering.

The round chafing dish did not appear because somebody wanted a prettier buffet. It grew out of a long catering tradition built around portability, hot holding, and controlled service. The form was already established in Europe by the 15th century, and by 1666 Samuel Pepys was ordering a silver chafing-dish for warming plates, according to the historical record in the FoodServiceNews archive article on the dish's history (FoodServiceNews).

From utility to presentation

By the late 19th and early 20th centuries, chafing dishes were described as being at a “near fever pitch” in popularity, and by the 1890s they had become indispensable to hostesses for luncheons, tea, and supper service, again in the historical account above. That matters because the round format kept its practical job while picking up a presentation role. It stopped being just a heating device and became service ware that also had to look right on the table.

That shift is exactly why the format still fits Cape Town weddings and formal hospitality. You're not just keeping food warm. You're trying to make the buffet look considered, coordinated, and expensive without making service awkward. The round dome does that well when the menu is compact and the visual standard is high.

The same historical source also notes modern experimental work on Byzantine-style chafing dishes, where a tested maximum water temperature of 380°C was recorded, with candles producing the highest average temperatures. That doesn't mean you need that level of heat in event service, but it does show why the basic engineering of a chafer has lasted so long, it's built around reliable warming, not novelty.

Why the round format still wins

For South African event work, the round chafer is now a refined, food-service-grade tool. It works because it gives you enough capacity for medium-volume service while staying compact enough for buffet styling and transport. It also signals a formal service standard, which is why it remains a staple in rental catalogues for weddings, corporate events, and school formals.

The point is simple. Round chafers stayed because they solve a real buffet problem, and they do it with a better visual finish than most bare service pans. That's why they still matter in today's hospitality market, especially where appearance and timing have to work together.

Choosing the Right Fuel and Heat Source

A round chafer only works properly when the heat source fits the venue. In Cape Town and the Winelands, that usually means choosing between gel fuel, wick or spirit lamps, electric warming plates, and induction. Get this wrong and service turns messy fast. Food cools, lids stay open too long, and staff spend the whole event fighting the setup instead of serving guests.

Match the fuel to the venue, not the other way round

Outdoor receptions are the toughest test. Wind will beat open flame every time if the setup is exposed, so gel, wick, and spirit options need shelter, a steady surface, and sensible placement, as general food-service guidance notes in the chafing dish buying guide. For an indoor reception with controlled ventilation, gel fuel is clean and simple. For a sheltered patio or a tented space, wick or spirit lamps can work if the service team keeps them stable and watched. Electric warming plates suit venues with reliable power and fully indoor service. Induction is the neatest option, but only if the chafer is induction-ready.

For Cape Town planners, the key decision is footprint and control. Flame-based setups are portable and do not depend on plugs, which helps at heritage venues, farms, and locations where load-shedding still shapes the day. Electric and induction units give steadier heat, but they also tie you to power and cable management, which matters on a crowded buffet line. If the wind is high or the site is exposed, choose a heat source that can survive the conditions, not one that only looks elegant on a catalogue page.

Fuel type Best venue Wind tolerance Power needed Notes
Gel fuel Indoor receptions Low None Simple and portable, but not for exposed outdoor service
Wick or spirit lamp Sheltered patios, tents Moderate None Needs careful supervision and stable placement
Electric warming plate Indoor buffets High indoors, low outdoors Yes Good when venue power is reliable
Induction Premium indoor buffet builds High indoors, low outdoors Yes Only works with induction-compatible equipment

What matters most on the day

Fuel choice does nothing for a bad setup. If the water bath runs dry, the food suffers no matter what is burning underneath. If the lid stays open, heat escapes faster than the fuel can recover it. That is why I tell clients to choose the venue first, then the heat source, then the serving layout.

Direct advice: if you are planning an outdoor Winelands function, stop focusing on the finish and ask how the flame behaves in wind.

The same logic applies to table layout in Cape Town and the Winelands. A round chafer takes less linear buffet space than a long rectangular pan, but it still needs breathing room for guests to serve themselves without crowding the table. If the buffet is tight, a compact heat source is the safer choice because it keeps cables, fuel canisters, and staff movement under control. If you want a practical rundown of warmer types before you book, ABC Hire's catering food warmers guide is a useful reference for comparing flame-based, electric, and induction options.

Use that comparison to decide whether your event needs portable heat, steady electrical control, or a system that can handle wind and uneven site conditions. The right answer depends on power, weather, and how much control you want your team to keep during service.

Sizing Your Round Chafing Dish by Guest Count

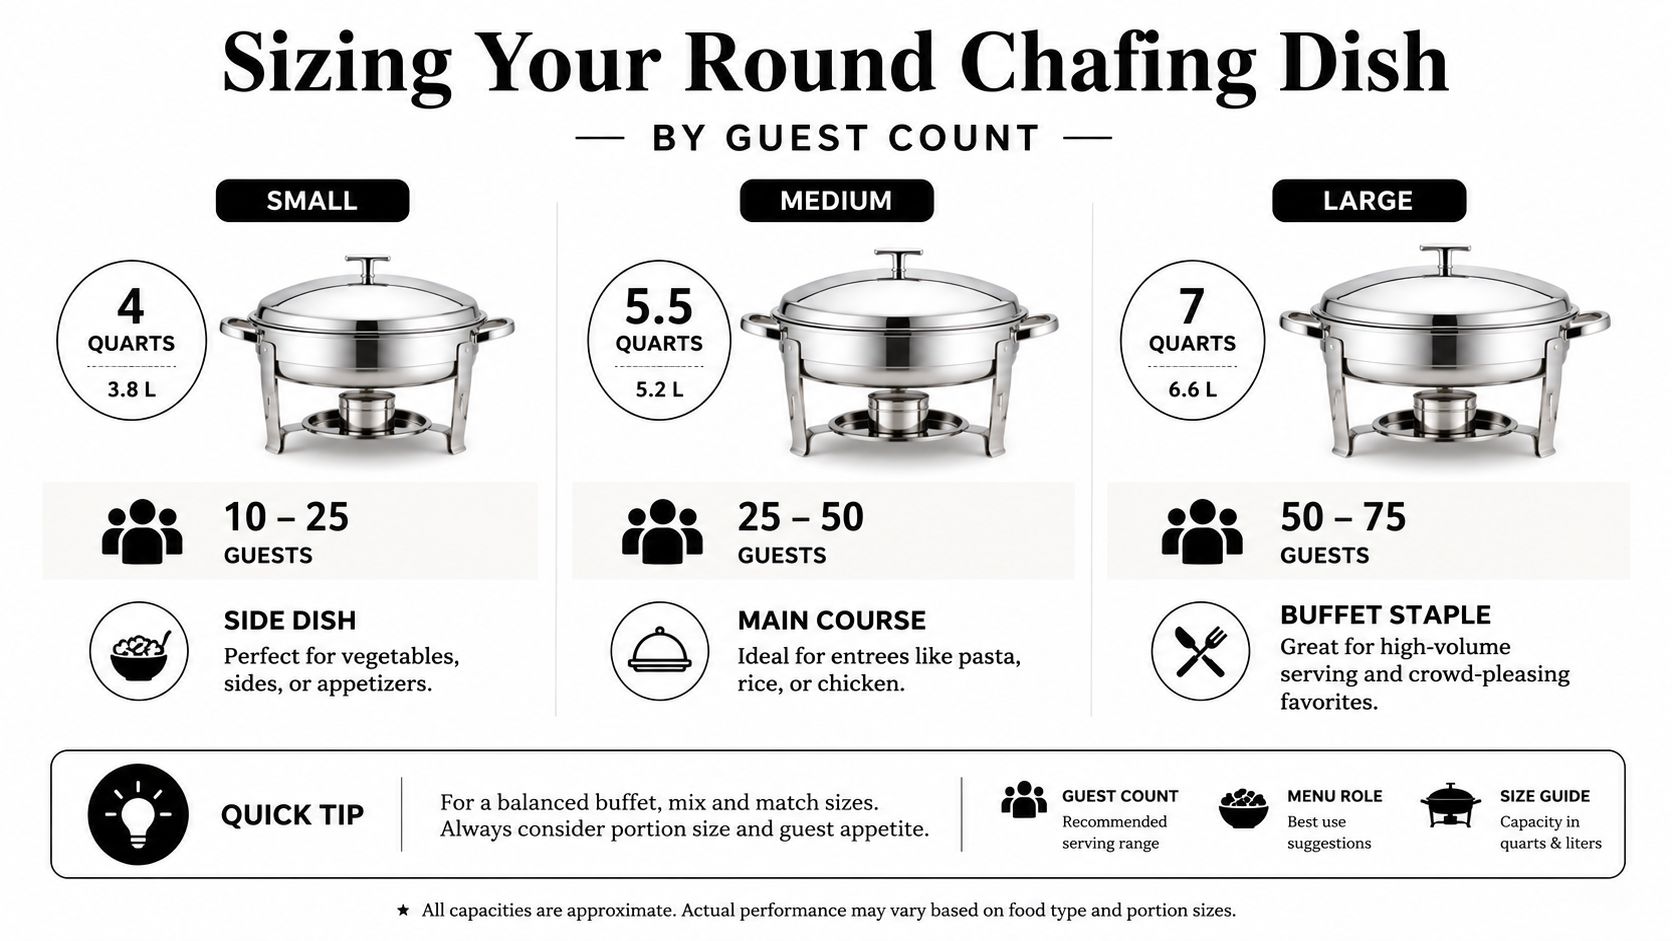
An infographic showing sizing guidelines for round chafing dishes based on guest counts and menu types.

Round chafers are usually specified by usable volume, not outer diameter. That's the number that matters for planning, because the shape might look neat on paper while the internal capacity still limits what you can serve. In South African event rental, the common working band is around 6.0 to 6.9 quarts, or about 5.6 to 6.5 litres, which is the workhorse range for buffet service.

Read capacity before you read appearance

Commercial listings show compact footprints in the rough range of 420 to 496 mm wide and about 320 mm high, based on product sheet examples in the technical reference data. That footprint is useful on a crowded table, but it also tells you something else. A 6-litre round chafer is built for medium-volume items, not for the highest-turnover main dish on the line.

Here's the cleanest way to think about it.

  • 4-quart units: use them for smaller side stations, sauces, and desserts where presentation matters more than bulk.
  • 6.0 to 6.9-quart units: use them as the practical default for most Cape Town wedding buffets, because they carry enough food to stay worthwhile without crowding the table.
  • 7-quart units: choose them when you want a little more service time from one pan, and the buffet station still has room for the round footprint.

Round versus rectangular on a real buffet table

Planners get caught. Round chafers look elegant and let guests serve from any angle, but they can leave dead space on a straight buffet line. Rectangular units use the table edge better, especially when you need tight packing and a clean run of trays. That trade-off is why round chafers work best on circular stations, clustered dessert points, and mixed-format buffets, while rectangular pans win on long, straight lines.

Rule of thumb: if your table is long and narrow, round is a style choice. If your table is tight and linear, rectangular is a space choice.

Use both formats if the menu needs it. Put round chafers on sauces, soups, and desserts, then let rectangular pans handle the mains and starches. That's the layout that usually behaves best in Cape Town venues where space is precious and service still has to feel polished.

Setting Up and Running Round Chafers Safely

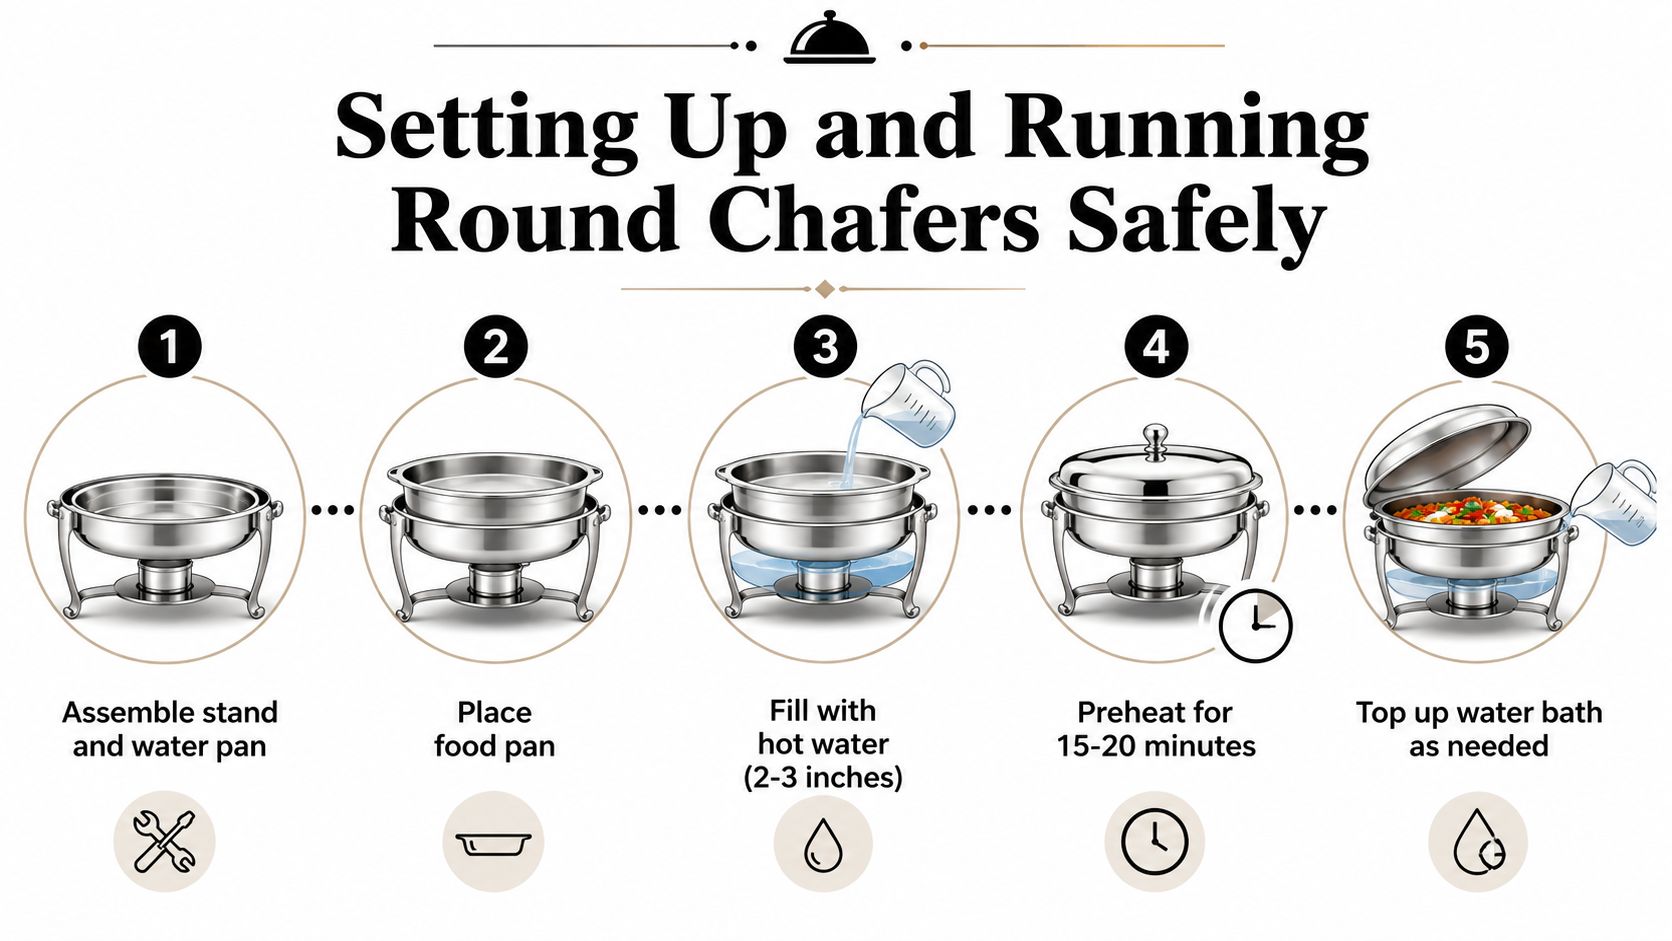
A five-step instructional guide on how to safely assemble and operate a round chafing dish for catering.

A round chafer should be easy to run. If the team is stopping to improvise during service, the setup was weak from the start. Keep hot food above 135°F or 57°C while it is holding, and build every part of the station around that target. In Cape Town and the Winelands, that also means respecting wind, table placement, and the power situation at the venue, because a pretty buffet that loses heat is bad service.

The setup that works

Start with the stand on a stable, heat-resistant surface. Add the water pan, then fit the food pan, then light or activate the heat source. Use hot water in the bath, not cold water, so the unit reaches service temperature faster and does not burn fuel warming up from scratch.

A clean workflow looks like this.

  1. Assemble the stand and water pan. Check that the base sits level and does not wobble.
  2. Place the food pan. Make sure it seats properly and does not tilt.
  3. Fill with hot water. Keep the bath deep enough to transfer heat evenly, but do not flood the unit.
  4. Preheat before service. Give the water time to stabilise before the first plate goes out.
  5. Top up the water bath as needed. If the level drops, heat transfer drops with it.

If you are running a buffet in a windy venue, use a sheltered table position and keep the chafer out of direct draughts. That small detail matters more than people want to admit. A round unit loses less heat than an open dish, but it still performs badly if the fuel is exposed and the lid is left standing open between servings. For a visual example of a polished rental finish, see ABC Hire's gold chafing dish guide.

Lid discipline matters more than people think

Keep the lid closed between servings. Use roll-top or soft-close lids where possible, especially models that open at 90° or 180°, because they cut heat loss during repeated use. That matters on a self-service buffet where guests come in short bursts. Every minute with the dome open lets heat escape and forces the water bath to work harder.

Practical rule: if the lid stays open, the chafer stops holding heat properly and starts wasting fuel.

Safety is blunt. Open flames need ventilation and supervision. Drip trays should stay in place, and tablecloths must not hang too close to burners. If a fuel can runs dry during service, replace it calmly and at once, then check that the water bath is still hot enough before you reopen the station. Use the right styling around the unit as well, because tidy presentation and safe spacing should work together, not fight each other. For planners who want to coordinate the buffet look with colour and candlelight, The Candledust color palette is a useful reference for keeping the table deliberate rather than cluttered.

Styling Round Chafers for Weddings and Functions

A round chafing dish can look sharp on its own, but styling is what makes it belong in the room. In Cape Town and the Winelands, the best-looking buffets don't try to hide the equipment. They coordinate it. That's the difference between a catered table and a considered station.

Build around the dome, not against it

Round chafers work well when you repeat the shape in the rest of the setup. Cluster them on a circular table for a hero dessert or sauce station, or line them along a rectangular buffet when the menu needs order. The round profile softens the line of the table, which is helpful in vineyard venues where the décor already leans organic and elegant.

Use simple trims instead of clutter. Greenery runners, ribbon wraps, and mirrored risers all work if they support the table rather than crowd it. For colour planning, the The Candledust color palette is a useful visual reference for planners working with soft candlelight and layered tones, because the overall mood around the buffet should feel deliberate, not improvised.

Lighting and local venue style

Uplighting the dome gives you a cleaner look than blasting it with bare bulbs. Polished lids reflect everything, including bad lighting, so keep the source controlled and warm. Candles at the base can look good in a formal setting, but only if the heat source and floral elements are kept apart.

The Winelands aesthetic is especially forgiving when you use round chafers with long vineyard tables, fynbos arrangements, and late-afternoon natural light. Stellenbosch and Franschhoek receptions often look strongest when the buffet feels understated rather than over-designed. The equipment should support the room, not compete with it.

If you're building a matching finish across the buffet, ABC Hire's gold chafing dish guide is a useful companion read because it shows how finish choice changes the visual weight of the station. Use that thinking to decide whether the round units should fade into the décor or act as part of the statement.

Rental Checklist for Cape Town and the Winelands

Hiring a round chafer is easy. Hiring the right one, on the right terms, for the right venue is where planners either look organised or end up firefighting. If your event is in Cape Town, Stellenbosch, Franschhoek, or Paarl, the rental brief needs to cover delivery access, quantity, finish, and what happens if something arrives damaged.

What to confirm before you sign

Start with logistics. Wine estates often have tighter loading access than city venues, and that affects delivery timing and drop-off points. If your event also depends on connectivity for RSVP management, supplier coordination, or digital guest lists, the wi fi events planning guide is a useful planning reference, because service staff and event managers need stable communication just as much as the buffet needs heat.

Use this checklist before booking.

  • Rental partner selection: confirm the supplier stocks round chafing dishes, not just generic buffet ware.
  • Delivery logistics: ask where the vehicle can unload at the venue and whether extra handling time is needed.
  • Quantity planning: count stations, not just guests, because one buffet line can need multiple formats.
  • Rental period: check collection and return times in writing.
  • Condition on delivery: inspect lid fit, dome polish, and stand stability before setup.

Questions planners forget to ask

Ask whether fuel is included or charged separately. Ask what happens if a dome is cracked or a hinge fails mid-event. Ask if lids are replaced between hires and whether the supplier expects a clean return or handles post-event washing themselves. Those details sound small until you're standing beside a half-set buffet with guests arriving.

Best practice: treat the rental quote like an operations document, not a shopping list.

If you want one place to start comparing catering equipment categories, ABC Hire's catering equipment for hire guide is a sensible internal reference before you finalise the order. Use it to align the chafer hire with the rest of the buffet setup, especially if you're mixing serving gear, tables, and décor across multiple stations.

Common Mistakes and Quick Answers

The three mistakes that ruin round chafer service are predictable. A dry water pan kills indirect heat. The wrong fuel for the venue creates wind, smoke, or power problems. A lid left propped open drains temperature faster than realized.

For guest planning, don't order by headcount alone. Order by station count and menu role, then mix round and rectangular units where the buffet layout demands it. If the venue loses power during service, switch to your backup heat plan immediately, then keep the water bath topped up and the lids closed until the station stabilises.

A round chafer is a service tool, not a decorative extra. Treat it that way and it behaves.

If you're planning a Cape Town, Stellenbosch, Franschhoek, or Paarl event and want the buffet equipment sorted properly, speak to ABC Hire about catering gear that fits your layout and service style. Visit ABC Hire to check what's available, then lock in the round chafing dishes, tables, and supporting equipment before your event date gets tight.

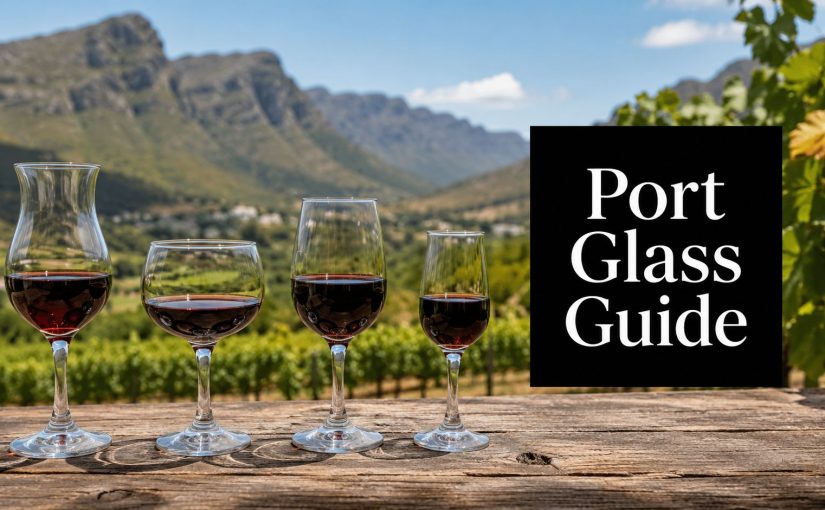
Port Drinking Glasses: A Practical Cape Town Guide

Most advice makes port drinking glasses sound like a specialist purchase for sommeliers and collectors. That's overkill for a Cape Town wedding, a Winelands tasting, or a corporate dinner. If you're hiring glassware for service on the floor, the question isn't whether the glass has a proper pedigree, it's whether it looks right, pours cleanly, stacks sensibly, and survives a busy night.

My blunt recommendation is simple. For most South African events, a small dessert-wine stem does the job better than a dedicated port glass, unless the brief is highly formal or the photo aesthetic is very specific. The old rule about tiny, tulip-shaped service still matters, but planners don't need to buy into tasting-room theory to make a good rental call. A practical port guide from McLaren Vale Cellars port guide makes the same basic point in another context, port is a serving style first, and a glass choice second.

Why Port Glasses Are Simpler Than the Internet Makes Them

Port glass advice gets inflated because people talk about it like a connoisseur problem. On a venue floor, it's a logistics problem. If your inventory already includes a small dessert-wine stem or a modest white-wine stem, you're probably closer to the right answer than you think.

The rental decision is about fit, not ceremony

Port has always been a compact pour. Antique references describe traditional service in very small vessels, often around 2–3 fluid ounces, roughly 60–90 mL, in 18th-century London records (Scottish Antiques). That's the old logic behind the shape, a small bowl, a controlled pour, and enough room for aroma without turning the glass into a splash zone.

For planners, that history matters less as nostalgia and more as a sizing clue. You do not need a giant red-wine goblet for port. You need something that reads as refined, sits neatly on a formal table, and doesn't look absurd once half-filled.

Practical rule: if the glass looks right beside dessert cutlery and espresso cups, it will usually work for port service too.

The other thing people forget is that most guests aren't there to analyse stem geometry. They're there to finish a meal well. If the drink arrives clean, measured, and elegant, the glass has done its job.

Use the smallest sensible stem you already hire

If I were building a rental brief from scratch, I'd start with a small dessert-wine stem before I'd special-order dedicated port glassware. It's easier to source, it photographs well, and it blends into mixed service without calling attention to itself. That matters on a table where the champagne flute, water goblet, and coffee service are all competing for visual space.

Dedicated port glassware is still useful for a heritage-heavy tasting or a formal dessert service, but it's not mandatory. In practice, the choice often comes down to whether the event needs a specialist look or a reliable serving solution. Most Cape Town clients need the second one.

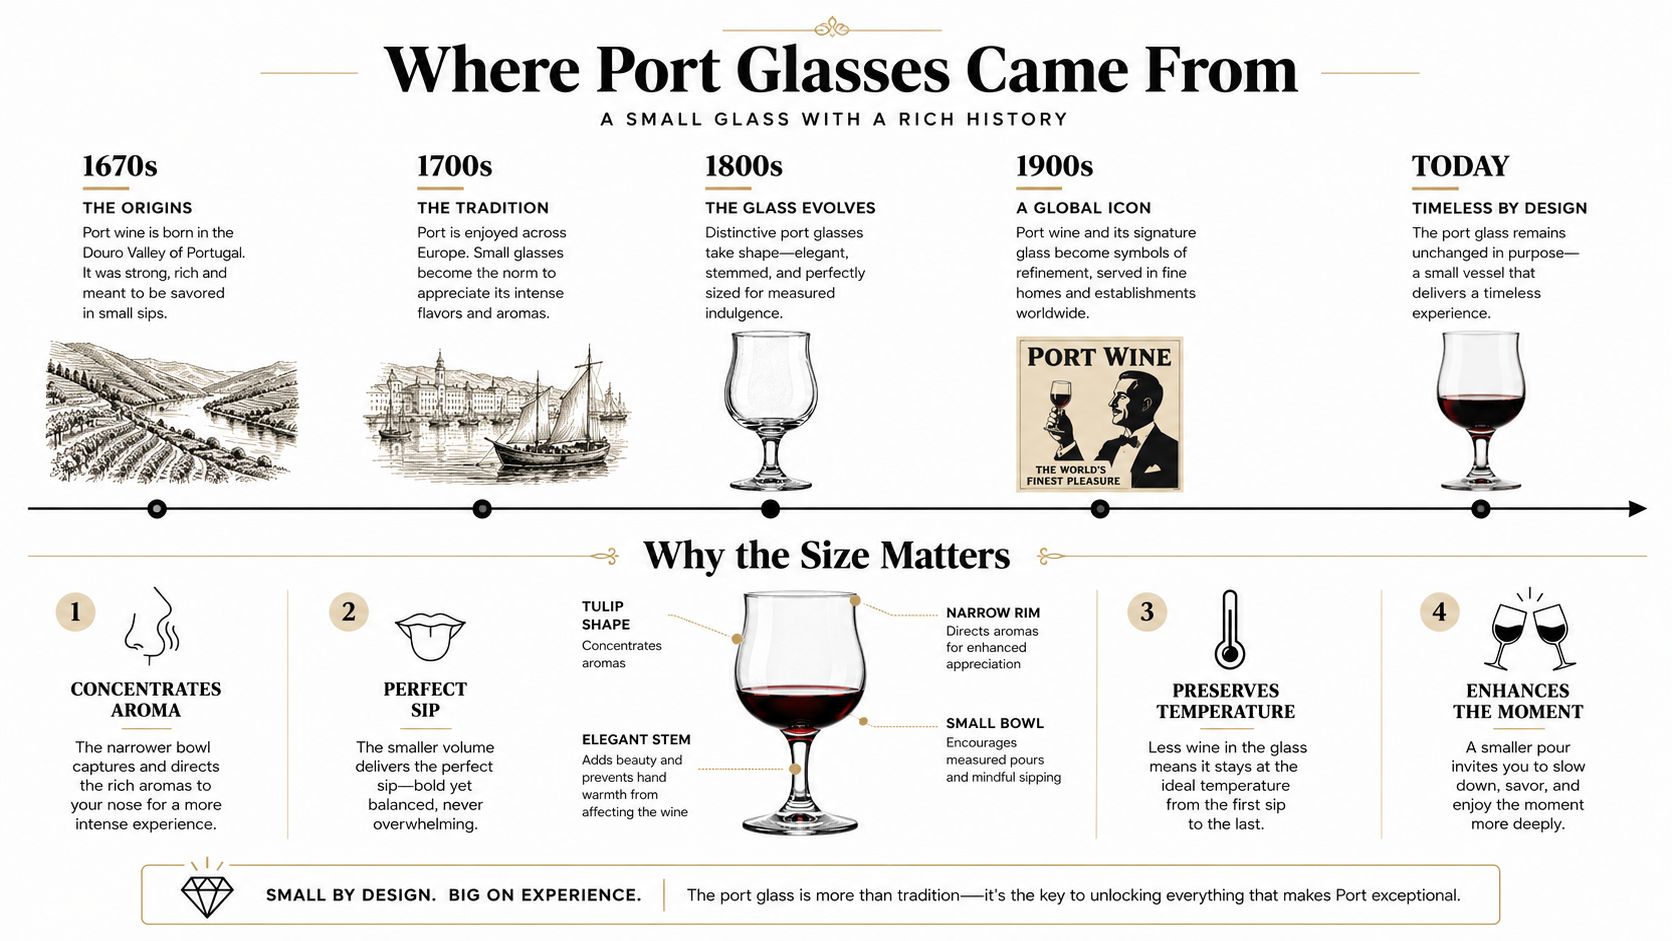
Where Port Glasses Came From and Why the Size Matters

Port drinking glasses did not start as decorative overkill. They came out of the late 17th and 18th centuries, when British trade with the Douro Valley expanded and port settled into the after-dinner routine of elite homes. Once the wine was fortified with brandy to survive shipping, the service style followed the same logic, smaller pours, smaller vessels, less fuss.

The old service style still tells you what works

Those older London references are useful because they show the original brief. Port was served in very small measures, about 60–90 mL, which matched both its fortified strength and its dessert-wine role (Scottish Antiques). That is why a modern port glass still reads as restrained beside a standard wine goblet.

For rental work, the useful benchmark is the vessel, not the mythology. The practical capacity sits at 14–18 cL, with a usual pour of 5–6 cL and about one-third of the glass filled so the aroma stays concentrated (Limonadier). A glass in that range keeps the wine focused without forcing service staff to top up constantly.

An infographic detailing the history and design benefits of port wine glasses through a timeline and illustrations.

Bigger wine glasses are the wrong instinct for port

The wider wine-glass trend in England is the warning sign. A Cambridge/BMJ study measured average wine-glass volume rising from 66 mL in 1700 to 449 mL in 2017, nearly 7 times larger. That shift suits still wine service. It works against port.

Port is fortified, sweeter, and usually poured with more control. A large bowl exposes too much surface area and makes the drink look lost on the table. For event work in South Africa, the better choice is a neat tulip shape in the 120–150 mL range, especially when the brief includes dessert, tasting notes, or a formal dinner finish. In practical terms, the best-looking option is often a small dessert-wine stem rather than a dedicated port glass, because it stacks better, survives service better, and fits mixed table settings without drawing the wrong kind of attention.

The supplier benchmark backs that up. Olympia's examples sit at 120 mL and 150 mL, with the taller version reaching 151 mm (Olympia crystal port glass). That is the size family I would trust for formal South African service, not because it is fussy, but because it lands well on a dressed table and holds up in rental stock.

The Four Glasses You Can Hire for Port Service

Not every event needs a dedicated port glass, and not every glass that can hold port should be used for it. The right choice depends on how formal the room is, how much stock you need to move, and whether the table setting has to carry a premium look. For rental work, I think in four practical options.

Dedicated tulip port glasses

This is the cleanest solution when the event is formal. A 120–150 mL tulip bowl gives you the right visual proportion, and the narrow top helps hold aroma while the pour stays controlled (Olympia crystal port glass). Fill it to about one-third, which keeps the wine concentrated and avoids the heavy, overexposed look of a larger stem.

Sherry glasses

Copita-style glasses and other small sherry forms sit in the 90–120 mL zone and work well when you want a compact, traditional pour. They're not identical to a classic port tulip, but they're close enough for many tastings, especially when the service is seated and the guest count is manageable. If the venue already keeps sherry or aperitif glassware in rotation, that stock can solve the port problem without another line item.

Small white-wine stems

A small white-wine stem around 180–220 mL is the flexible compromise. It's larger than ideal, but still acceptable when you need consistency with the rest of the tableware or you're serving mixed after-dinner drinks. If the port pour is only one element in a broader beverage plan, this is often the easiest hire decision.

Small dessert-wine glasses

This is the option I reach for most often in real event work. A small dessert-wine stem feels polished, rents easily, and fits with bread-and-butter service, petit fours, or cheese plates without reading as specialist kit. It's also the most forgiving choice when you're matching existing glassware instead of building a dedicated port set.

Glass type Capacity Typical fill Best event fit
Dedicated tulip port glass 120–150 mL About one-third, 5–7 cL Formal tastings, cellar dinners, plated dessert service
Sherry glass 90–120 mL Small controlled pour Aperitif-style service, intimate tastings
Small white-wine stem 180–220 mL Modest pour, not full Mixed table service, flexible hire inventories
Small dessert-wine glass Varies by supplier Light pour, usually one-third or less Weddings, corporate dinners, general rental use

The best port glass in theory is not always the best one in a hire shed. The right answer is the one that matches the rest of the room and doesn't create a mismatch at service.

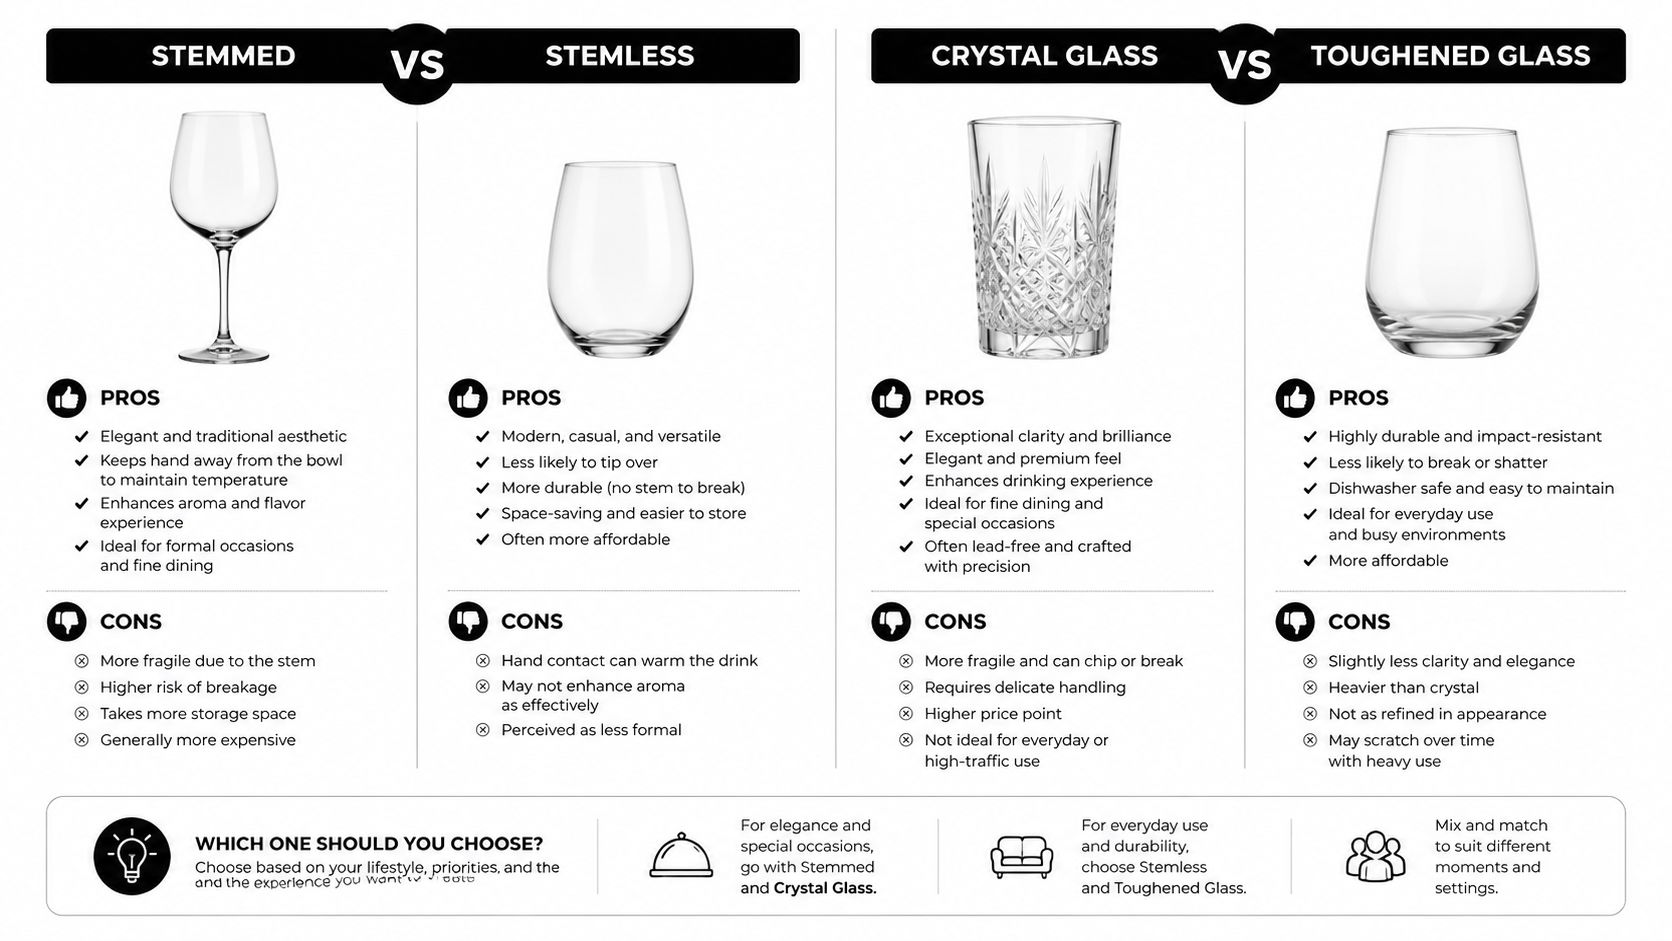
Stemmed vs Stemless and Crystal vs Toughened Glass

Rental reality takes over fast. Guests notice the drink, but the floor team notices breakage, packing, and whether the glassware survives the run from warehouse to venue and back again.

A comparison chart showing the pros and cons of stemmed vs stemless and crystal vs toughened drinking glasses.

Stemmed glassware looks cleaner, stemless glassware handles pressure better

A stemmed glass photographs better. It keeps hand heat off the wine and gives a formal table a more deliberate finish. The trade-off shows up at setup and pack-down, because stems stack awkwardly, need more care in transit, and chip more easily when staff are moving quickly between prep, service, and breakdown.

Stemless glassware is tougher and packs more tightly, so it often wins for large guest counts, informal receptions, and venues with tight storage. It warms the pour faster and reads more casual, which works for a relaxed after-dinner setup and falls short at a polished estate dinner.

Crystal brings finesse, toughened glass brings practical value

Crystal gives you clarity, sparkle, and the kind of finish people associate with premium service. It is more fragile and more expensive to replace when the inevitable knock happens, so it suits a formal tasting or a small VIP dinner where the room can justify the extra care.

For most Cape Town weddings, matric dances, and corporate functions, toughened soda-lime glass is the sensible answer. You want stock that can handle transport, stacking, and repeated washing without fuss. If you want a useful reference point for the visual difference and overall glassware positioning, the ABC Hire article on wine glasses crystal gives a clear sense of why crystal gets chosen for style, even when tougher stock makes more operational sense.

The glass that breaks least is usually the glass the floor team trusts most.

Use the setting to decide, not personal preference alone

A whiskey tasting brief makes the same point from another angle. For layered aroma and controlled nosing, the vessel shape matters, but rental choice still comes down to service style and durability as well as the drink itself. A useful comparison appears in the discussion of glasses for scotch whiskey tasting, where shape and practicality are treated as a working pair rather than separate goals.

If you are running a high-contact event, choose the glass your staff can handle with confidence. If the room is formal and the guest count is contained, choose the one that flatters the table. The best-looking glass in a catalogue is useless if it creates headaches on the floor.

Matching Port Glasses to Cape Town and Winelands Events

The same pour lands differently depending on the room. A glass that looks perfect in a cellar can look fussy on a rooftop, and a casual stem can undercut the whole mood at a plated wine estate dinner. That's why I don't recommend one universal port glass for every South African event.

Stellenbosch tasting, go formal and narrow

A Stellenbosch tasting in a working cellar or estate venue calls for a proper tulip shape. The room already does part of the storytelling, so the glass should support that language instead of fighting it. Crystal or a very clean small stem works here because the setting rewards precision and the pours are usually slower and more deliberate.

Cape Town corporate dinner, keep it efficient

A Cape Town corporate year-end dinner needs neatness more than theatre. Small dessert-wine stems are the sweet spot because they fit into mixed tableware, align with broader beverage service, and don't look overdesigned beside plated dessert or coffee service. The room might be a rooftop, a hotel ballroom, or a gallery space, so the glass has to hold up across styles.

Franschhoek wedding, match the mood of the evening

A Franschhoek wedding often sits between formal and relaxed. If port is being served after dessert or near a fireplace, stemless can work if the rest of the styling is soft and the couple wants something less precious. If the brief leans elegant and the photographs matter, I'd still push for a small stemmed option.

Rule of thumb: the more the venue already feels like a wine experience, the more a dedicated tulip glass makes sense.

I also think guest count should shape the decision as much as the menu. The bigger the event, the more you should bias towards glassware that packs well, washes easily, and blends into the rest of the service line. In the Winelands, that usually means hiring for operational confidence first and romance second.

Serving, Pouring and Pairing Port the Right Way

Port service falls apart when staff treat it like ordinary wine. It needs a smaller pour, a cleaner hand, and a glass that suits the pace of the end of the meal. For most South African events, that usually points to a small dessert-wine stem rather than a dedicated port glass, because the ultimate test is whether it works on the floor, not whether it wins a tasting-room argument.

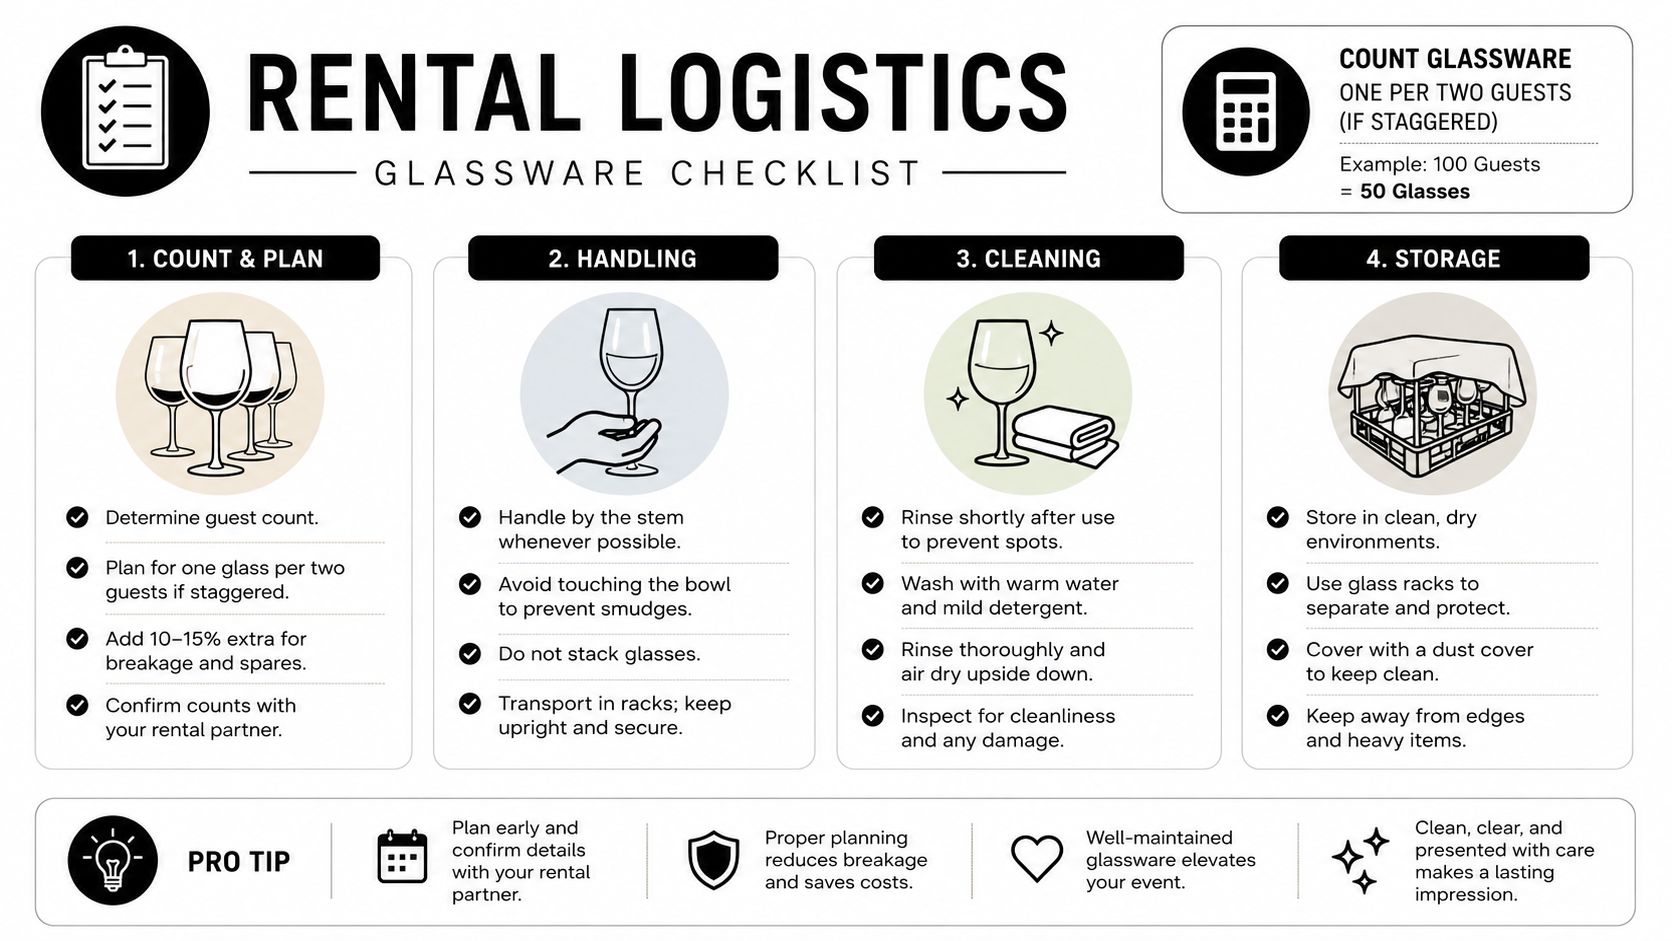
An infographic titled Rental Logistics showing a four-step checklist for managing event glassware rentals.

Pour small and keep the glass under control

The safest approach is still the one-third fill. A small stem gives enough bowl space for aroma without turning the pour into a heavy, sloshing serve. Keep the measure controlled and leave air above the wine so the service feels deliberate, not casual.

Keep the wine slightly cool, not icy

Port should sit below room temperature, but it should never be treated like a chilled white or a cocktail build. Ruby and tawny styles usually do well in a moderate temperature band, while vintage styles can sit a little warmer, so the bar team should resist the urge to over-ice the bottle or chill the glass aggressively. The point is balance, not brute cold.

Pair with the right plate

Dark chocolate, blue cheese, cured meats, nut tarts and dried fruit all hold their own beside port. Those flavours match the wine's sweetness and intensity without being flattened by it. If dessert already includes one of those elements, the port service feels like part of the course instead of a separate extra.

For event planners who want the service to feel tied to a real wine destination, a curated Porto itinerary gives useful context, even if the event is happening in Cape Town. If you are also building out the rest of the service setup, the practical notes on ice buckets and stands are worth keeping close, because port service usually sits inside a wider drinks station, not in isolation.

If the pairings are too sweet, the port feels heavy. If they are too sharp, the wine feels flat.

If your bar team needs one simple instruction sheet, keep it blunt. Open the bottle properly, measure the pour, and serve it in a glass with enough airspace for the bouquet to open.

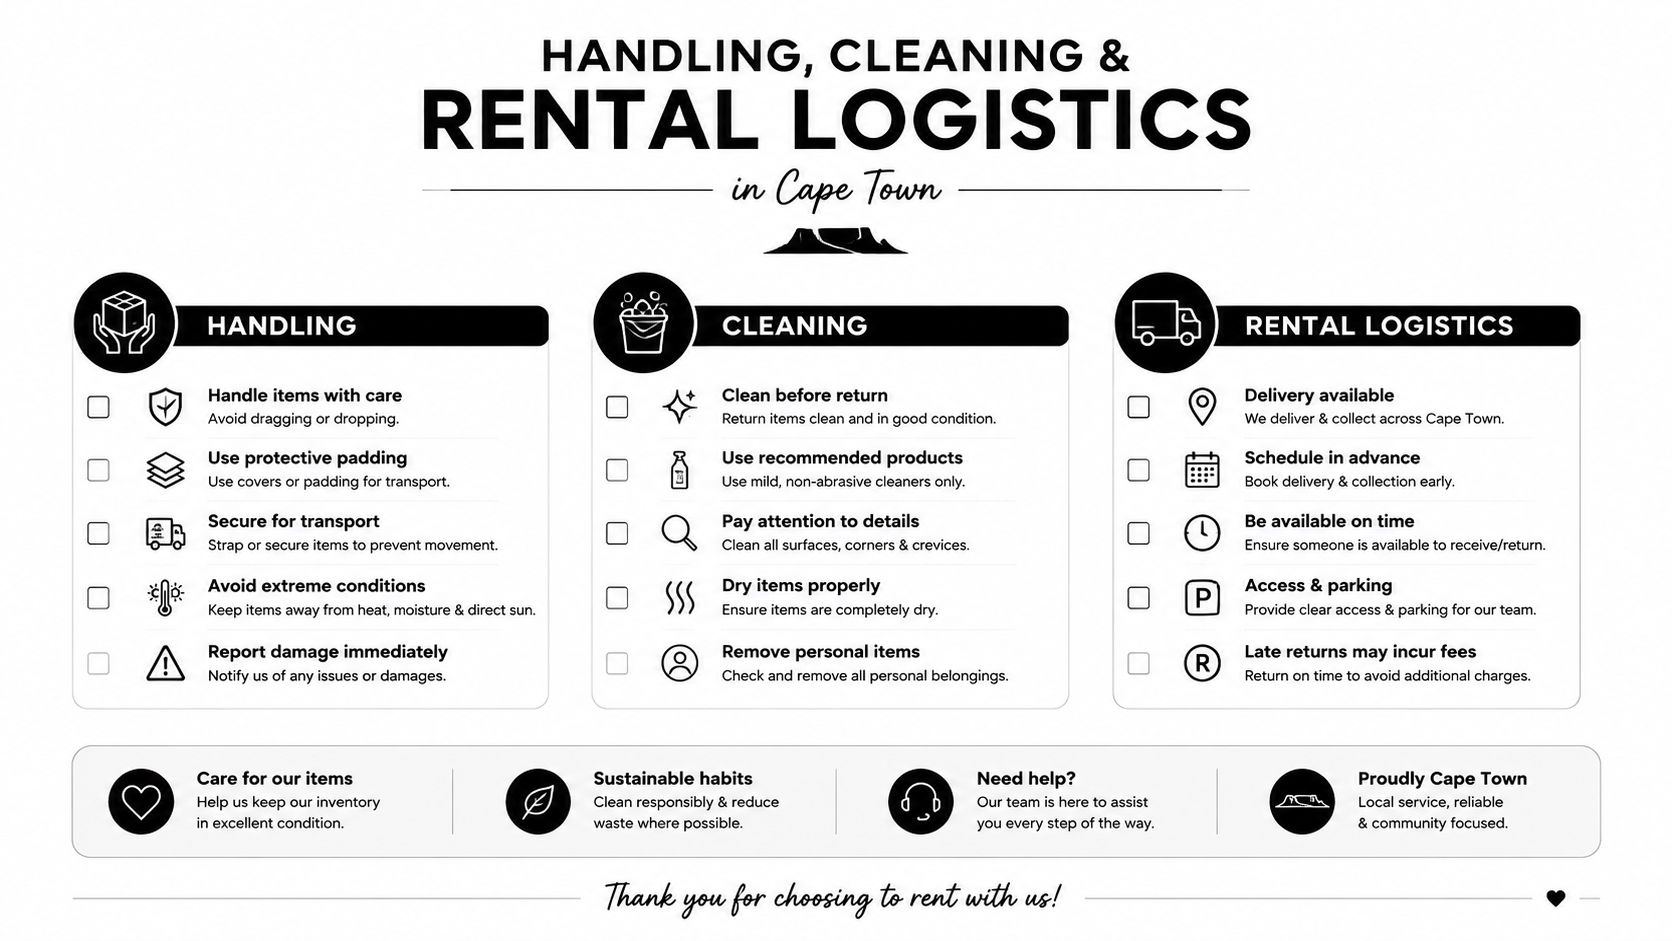
Handling, Cleaning and Rental Logistics in Cape Town

Even the right glass goes wrong if the logistics are sloppy. Port service depends on clean, chip-free stems, sensible counts, and a rental plan that doesn't leave the venue manager chasing missing stock after midnight.

A professional infographic outlining handling, cleaning, and rental logistics guidelines for equipment rentals in Cape Town.

Count for staggered service, not worst-case panic

If port is being served after dessert rather than all at once, a practical count is one glass per two guests. That keeps stock sensible while still giving the service team enough headroom to replace a damaged or missing piece during the evening. For mixed events, that approach is easier to manage than over-ordering a full second set.

Inspect, polish and pack like the venue matters

Check every glass for chips and stress cracks before it leaves the warehouse. Polish with a lint-free cloth, not a rough towel, or you'll end up with water marks that show under warm lighting. Pack by size and style so the same glasses come back together, especially if the venue has a narrow service lift or a tight load-in window.

Work with a rental partner that understands event flow

A good supplier should be able to handle delivery across Cape Town, Stellenbosch, Franschhoek and Paarl, then collect on the schedule the venue needs. For multi-day hires, turnaround on washing and repacking needs to be clear from the start. If you're comparing broader hire categories, the ABC Hire guide to cutlery and crockery hire is a useful reminder that glassware should be briefed as part of the whole table service, not as an afterthought.
ABC Hire also carries glassware as part of its event hire range, which matters if you're trying to keep the drink service consistent across water, wine, and after-dinner pours. That's the kind of practical overlap that saves time on a floor plan.

Putting Together Your Rental-Ready Glassware Brief

A good port brief is short. It should tell the supplier what glass style you want, how many guests you're serving, where the venue is, and whether the pour is formal, casual, or tied to a dessert course. If you can fit the service logic on one page, the hire order is usually clear enough for everyone involved.

Start with the glass choice. For most Cape Town and Winelands events, I'd write small dessert-wine stem or small tulip port glass, then add the style and capacity if the venue is being precise about presentation. After that, note the delivery suburb, access limits, and whether the glassware needs to match existing table settings.

Then add the service instructions. Say whether port will be poured seated, after dessert, or as a standing reception pour, and whether the bar team should expect staggered serving or a single round. Finish with a clean breakage expectation and any wash-back requirements if the event runs over more than one day.

If you keep it that tight, the rental company can do the rest without guesswork. That's the primary job here, not arguing over the perfect shape on paper. The best setup is the one that lands cleanly on the table and disappears into the service.


ABC Hire supplies glassware as part of its Cape Town event hire range, so if you need port service that matches the rest of your tables, they can help you build the order around the full floor plan. For weddings, tastings, and corporate dinners in Cape Town, Stellenbosch, Franschhoek, or Paarl, visit ABC Hire and ask for a glassware brief that fits your guest count, venue access, and service style.

How to Build a Cheese Platter Board for Cape Town Events

You can have a beautiful board lined up, the vineyard lawn ready, and a guest list that looks manageable on paper, then the afternoon heat starts working against you. Soft cheese loosens, cut fruit dulls, and the platter that looked sharp during load-in can look tired before the first round of speeches. That's the challenge with a cheese platter board in Cape Town, not just making it look generous, but keeping it elegant, safe, and easy to serve through a long event window.

A cheese platter board works because it sits at the point where hospitality, speed, and visual impact meet. Cheese has a long culinary history, with cheesemaking dating back more than 4,000 years in ancient records, and some evidence placing it over 7,000 years ago in early European and Mediterranean finds, while the formal cheese course became established in Europe during the 17th and 18th centuries according to the International Dairy Foods Association's history of cheese. That lineage matters in South African event catering, because this isn't a novelty garnish, it's a proven serving format built for sharing.

Why a Cheese Platter Board Works for Cape Town Events

A planner standing on a Winelands lawn knows the pressure points immediately. The guest list is final, the venue has a narrow load-in window, and the food has to look as good at service time as it did in the proposal deck. A cheese platter board fits that brief better than most centrepiece formats because it doesn't need on-site cooking, it transitions easily from intimate gatherings to larger receptions, and it feels at home beside local wines.

The format also carries visual credibility. Cheese boards grew from a structured course into a shared platter for social entertaining, and that shift from formal dining to easy hospitality is exactly why they work so well at weddings, tastings, matric dances, and corporate functions. The long history behind the format, documented by the International Dairy Foods Association, gives planners a useful answer when clients ask why this style feels polished without being stiff.

The practical reason it wins on event day

The biggest advantage is operational, not decorative. A board can be staged early, replenished cleanly, and photographed from several angles without a chef standing over it. It also pairs naturally with tasting-style service, which is why it suits pre-drinks, cellar-door events, and brand activations where guests circulate rather than sit.

Practical rule: if the food has to look premium, travel well, and require minimal last-minute work, a cheese board is often the safest centrepiece choice.

There's still a decision to make, though. The right guest quantity, cheese mix, board style, and temperature control plan all change how well the final display survives. That's where most catering advice goes thin, and where event planners need a working method instead of pretty inspiration.

Calculating Quantities for Any Guest Count

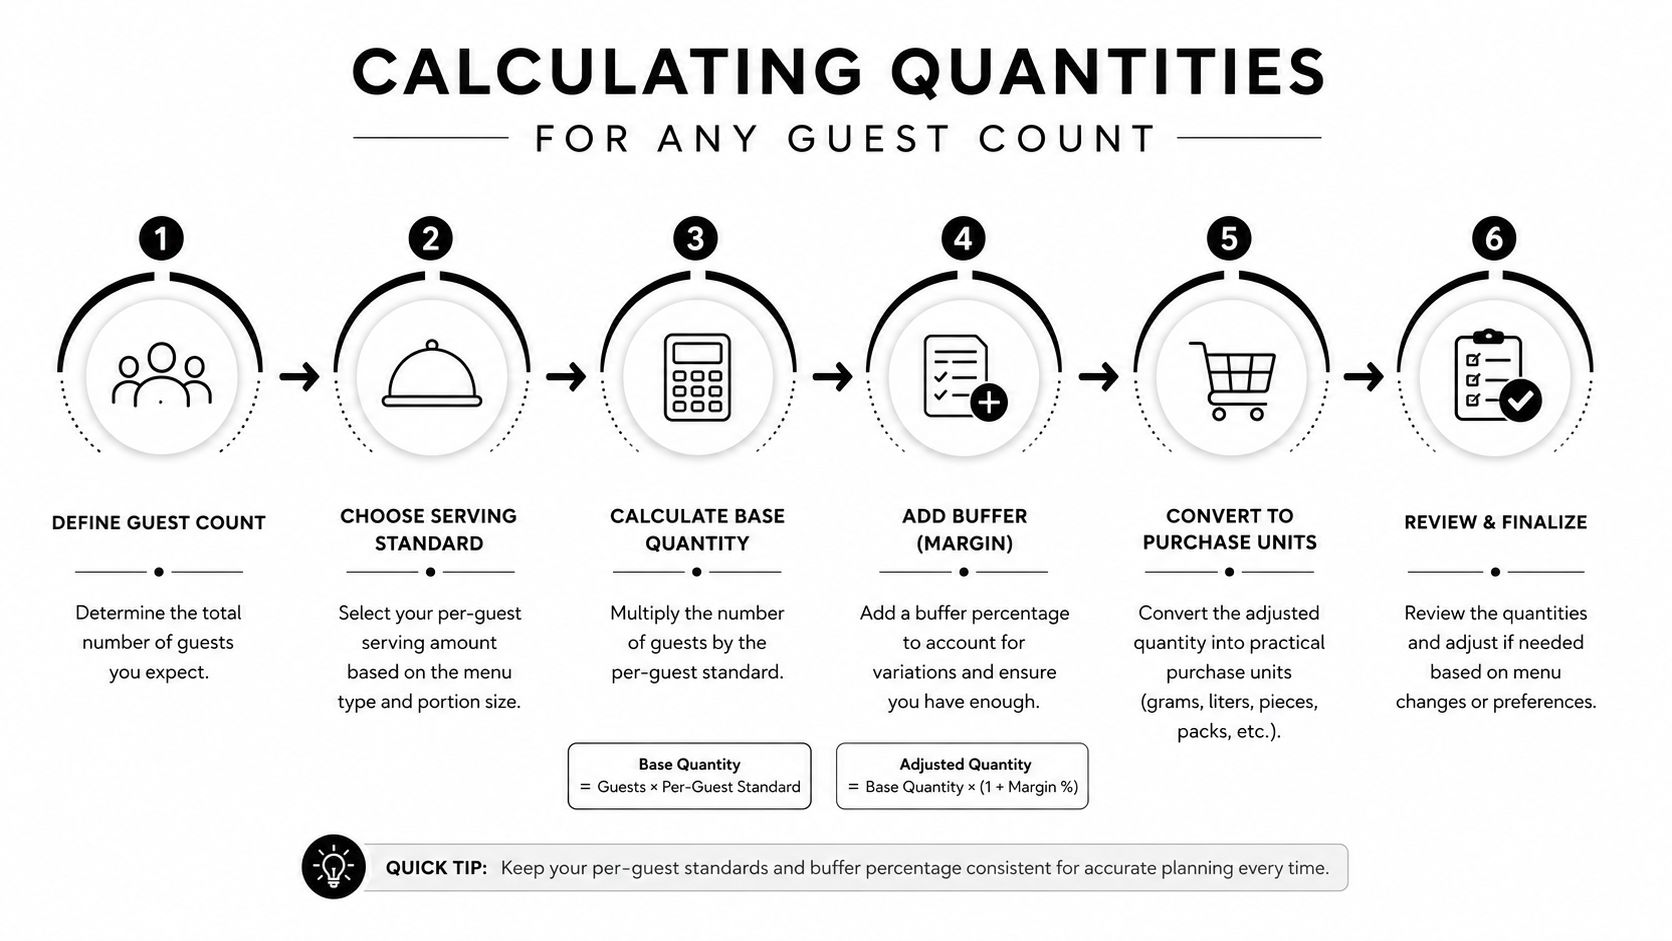
A six-step infographic on calculating food quantities for event planning for any number of guests.

Start with the cheese itself, then build the rest of the board around that number. For a cheese-centric platter, the record-based guidance in the brief points to 1.75 oz (50 g) of each cheese per person, while a board that sits alongside other food can drop to ¾ oz (25 g) per person. Another catering benchmark for an appetizer board is 1 to 1.5 oz of cheese per guest per cheese, with 3 to 4 cheeses usually giving enough flavour contrast without overcrowding the display, as noted in Shelburne Farms' cheese board guidance.

A simple working formula

Use this order of planning:

  1. Decide the board's role. If it's the main grazing station, lean heavier on cheese. If it shares space with canapés or charcuterie, go lighter.
  2. Pick 3 to 4 cheeses first. That gives contrast without turning the board into a shop shelf.
  3. Size cheese before accompaniments. Once the cheese mass is fixed, fill the board with bread, crackers, fruit, nuts, and spreads around it.
  4. Leave space for topping up. A board that looks too full from the start usually looks messy by the midpoint of service.
  5. Match quantity to format. A small dinner board needs density. A corporate station needs easier access and a faster refill pattern.

For an 80-guest Winelands wedding where the board is a pre-dinner feature and not the only food on site, the lighter benchmark is usually the smarter one. That means sizing for the lower per-guest range, then using accompaniments to create visual abundance rather than forcing too much cheese onto the board. The Guinness World Records listing for the largest cheese platter, at 2,012.85 kg (4,437 lb 9.92 oz) with around 145 varieties from Wisconsin producers, shows the format can scale dramatically, but event service still works best when the board stays readable and easy to approach, not overstuffed, according to Guinness World Records.
Use the cheese count to set the shape of the board, not the other way around. If the board is too small for the mix, guests end up fighting for space around the same wedges.
That logic holds whether you're feeding 20 people at a private dinner or 300 guests at a corporate launch. The method is the same, only the refill rhythm changes.

Choosing Cheeses That Earn Their Place on the Board

The easiest mistake is shopping by instinct instead of function. A board needs cheese roles, not just cheese names, because guests read the display as a composition, not a list. Hard cheeses anchor, semi-soft cheeses bridge, soft cheeses spread, and blue cheeses give the board a strong finish.

Category Role on Board Texture Pairing Direction
Hard Anchor Firm, sliceable, grating-friendly Works with crackers, crusty bread, and structured wine
Semi-soft Bridge Supple, balanced Fits most guests and softens the jump between stronger styles
Soft Spread Creamy, yielding Needs bread, fruit, or plain crackers for easy service
Blue Accent Bold, pungent Best used in smaller amounts as the flavour highlight

A balanced shortlist usually starts with one familiar crowd-pleaser, one local Winelands option, one hard cheese with structure, one creamy cheese, and one blue for contrast. That mix gives you comfort and interest without making the board feel random. It also helps when you brief a supplier, because you're asking for a texture profile and service role, not just a shopping list.

What to avoid when you're selecting

Avoid building the whole board from soft cheeses. They look lovely for a moment, then lose edge and become difficult to slice or spread neatly once service starts. Avoid buying only crowd-pleasers too, because the board becomes flat and forgettable.

The best boards usually have one cheese that most guests already know, one that feels a little local or seasonal, and one that makes people pause. That pause matters in a tasting setting, because it encourages conversation without turning the station into a lecture.

If a cheese doesn't change the board's texture, colour, or flavour range, it probably doesn't deserve space.

Building and Styling the Board Itself

A pair of hands arranging artisan cheese slices on a rustic wooden board for a platter.

Start with the hardest cheeses, because they do the visual heavy lifting. They act as anchors, they hold clean edges, and they give the board structure before anything softer goes in. Once those are placed, add the creamy cheeses and spreads, then fill the negative space with fruit, nuts, olives, preserves, and bread.

The order that keeps the board tidy

First place the boards or trays, then the main cheeses, then the supporting elements. Use bowls and small ramekins for olives, honey, chutney, or mustard so the liquids don't spread into the cheese area. That keeps the surface clean and lets you add height without clutter.

Colour matters more than people think. Pale cheeses need contrast from dark grapes, figs, berries, or dried fruit, while a few herbs or leafy garnishes can break up the visual weight. Odd numbers usually look more natural than pairs or perfect symmetry, but don't force that rule if the serving flow needs clearer access.

The board should still have breathing space around each cheese. Guests need room to cut, scoop, and move without damaging the arrangement, and the display looks more premium when nothing is jammed edge to edge. The wooden serving board guide from ABC Hire is useful here because the surface itself affects how polished the final layout feels, especially on rustic, vineyard-style tables.

A well-styled board should look abundant, but never crowded. The moment guests can't tell where one item ends and the next begins, the composition has gone too far.

Heat, Timing and Food Safety on Long Event Days

A cheese platter board can look perfect at set-down and still fall apart by mid-service if the temperature is wrong. Cape Town summer heat is hard on soft cheeses, cut fruit, and anything with a glossy finish, and the board starts to look tired long before guests are finished. On long winery lunches and outdoor corporate functions, the display has to survive the afternoon as well as the first reveal.

The fix is to treat timing as part of styling. Put the board out closer to guest arrival, not during early venue setup, and build a plan for refreshes if service will run for hours. Use shade wherever you can, because direct sun on a vineyard lawn or terrace will push the board downhill fast. Chilled staging bowls under selected items can keep the display steady without changing the look, and the Wayfair cheeseboard guide still gives a solid baseline for room-temperature presentation, even if it does not deal with long hot-service days in a practical way.

What holds up best

Hard cheeses handle service better than soft cheeses. They keep their shape, slice cleanly, and stay presentable for longer, which matters when the board is meant to sit in front of guests rather than disappear into the kitchen after five minutes. Soft cheeses need quicker replenishment and tighter checks because once they warm, they lose their edges and the board starts to look messy.

Cold storage behind the scenes matters just as much. The display can be styled perfectly, but if the back-up stock is sitting warm, the next refill only resets the problem for a short while. That is why a mobile fridge for hire guide from ABC Hire fits this part of planning so well, because the board depends on what is stored off-site or off-board as much as what guests can see.

Food safety and presentation rise or fall together on long event days. If the back-up stock is warm, the next refill only repeats the same issue.

Cross-contact control matters too, especially when prep teams are handling dairy, fruit, crackers, and garnish in the same prep flow. The guide on prevent cutting board cross contamination is a useful reminder that clean surfaces, separate tools, and clear prep zones are part of keeping the board safe, not just tidy.

Transport, Setup and Hygiene on Site

The journey from prep kitchen to venue is where many boards lose quality. Pack the cold items last, keep the load order logical, and avoid stacking anything that can crush fruit, crack cheese edges, or smear garnish. A board that arrives intact usually got packed in the reverse order of how it's served, with the most delicate items protected and the board surface kept clean and dry.

On site, the board should go down on a stable base before anything is styled on top. Serving knives, spoons, tongs, and cheese markers need to be placed where staff can reach them without crossing over the food. Allergen labels help guests self-serve confidently, especially at corporate functions and formal weddings where mixed dietary needs are the norm.

The board itself also matters for hygiene. A procurement-grade specification that allows for surface roughness not exceeding 3.2 µm Ra, thickness variation within ±2 mm, and edge radii of 2 to 3 mm, with groove channels about 4 to 5 mm deep and 6 to 7 mm wide, is not just technical jargon, it reduces moisture ingress, warping, and sanitation problems between events, according to the professional cheese board procurement guide. In rental work, those finish tolerances directly affect whether a board cleans properly after repeated wash-and-dry cycles.

Leftovers need a plan before service begins. If the board is meant to be reset later, keep the reserve stock separated, chilled, and clearly marked so staff don't mix fresh product with display items that have already sat in the room. That habit protects both the presentation and the venue's reputation.

Wine Pairings That Work in the Winelands

A good cheese board in the Cape lands best when the wine feels intentional, not improvised. Strong blues usually want contrast, aged hard cheeses need structure, creamy soft cheeses prefer brightness, and semi-soft cheeses sit comfortably in the middle. That gives you a useful pairing logic for weddings, cellar tastings, and corporate launches where guests expect the board to reflect the wine list rather than compete with it.

For a straightforward Winelands pairing map, bold blue cheese works well with a tawny port or sweet dessert-style wine, aged hard cheese suits a structured red such as Cabernet Sauvignon or a Bordeaux-style blend, creamy soft cheeses pair naturally with Sauvignon Blanc or Cap Classique, and semi-soft or washed-rind cheeses can sit comfortably with Pinot Noir or a lighter Chardonnay. For hosts who want a wider flavour reference beyond wine, the whiskey food pairing guide shows the same basic principle at work, pairing intensity with structure instead of throwing random flavours together.

How to label pairings so guests use them

Keep the signage short. Guests don't need a tasting essay, they need confidence. A simple note such as “Best with Cap Classique” or “Try this with the red blend” is enough to guide self-service without slowing the line.

Waiting staff should know which cheese sits where and which pour matches it. That helps at formal receptions where guests ask the same question repeatedly, and it keeps the board from becoming a bottleneck. If the bar team knows the pairing story, they can steer guests naturally instead of improvising answers.

For the physical setup, matching the serving style to the room makes a difference. The wine glasses and crystal guide from ABC Hire is relevant because stemware, board height, and table placement should feel like one design choice, not separate rentals dropped into the room.

How ABC Hire helps the board work on site

The right rental pieces remove friction where it shows up. Cheese boards, crates, and display props help with height and layout. LED cubes and furniture suit evening functions where the board needs to read as a feature station. Tables and climate control equipment solve the service window and heat problem. Slush machines can support the beverage side of a summer activation, which keeps guests moving while the board remains accessible.

For smaller private dinners, a single well-built board with simple props is usually enough. For larger weddings and corporate activations, the board often needs support from tables, chilled staging, and a cleaner traffic flow around the station. That's where good rental choices matter, because they let the food stay elegant without asking the venue team to improvise on the day.

Quick checklist for the quote

  • Board size and finish to suit the guest count and service style
  • Chilled support for backup stock and long outdoor service
  • Display props for height, visibility, and table styling
  • Stemware and furniture to match the wine experience
  • Climate control if the board has to survive a warm afternoon

If you're planning a wedding, tasting, matric dance, or corporate function in Cape Town, Stellenbosch, Franschhoek, or Paarl, build the rental quote around the board first, then add the pieces that keep it attractive and safe for the full event window. Visit ABC Hire to source the boards, props, furniture, and climate-control support that make a cheese platter board work properly on the day.

Candles for Wedding: Ultimate Guide to Styling & Safety 2026

You've probably saved a dozen images of glowing tables, taper-lined aisles, and candlelit receptions that look effortless. Then the practical questions start. Which candles work in a Cape Town venue? What survives a Winelands breeze? What belongs on the table, and what only looks good in a styled shoot?

That's where candles for wedding décor either become magical or maddening.

Used well, candlelight makes a room feel warmer, more intimate, and more expensive than it is. Used badly, it creates clutter, blocks conversation, burns too fast, or gives your venue manager a reason to say no. The difference is rarely about taste alone. It's about scale, holders, placement, wind, burn time, and how the whole lighting plan fits your venue.

Setting the Scene with Candlelight

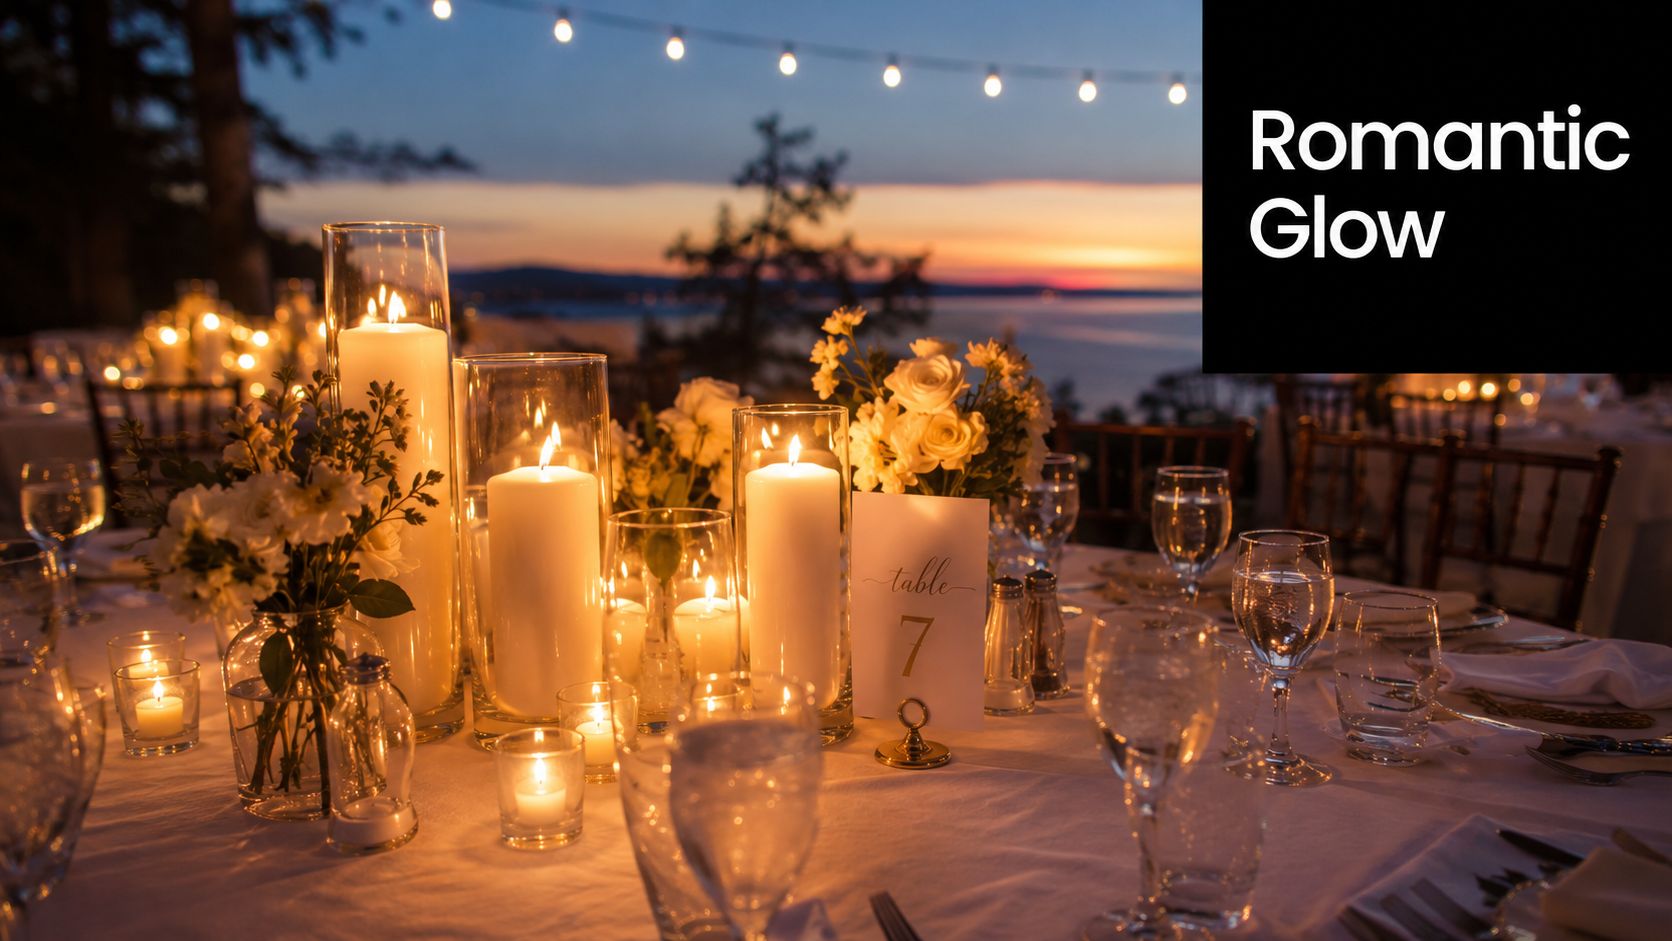
As the sun drops behind the mountains or off the Atlantic, candlelight changes a wedding from pretty to atmospheric within minutes. In Cape Town and the Winelands, that shift is especially noticeable because the natural light is already doing part of the work. Candles then take over gently, warming the room, softening hard venue lines, and giving tables a sense of depth that overhead lighting rarely achieves on its own.

Elegant wedding table setting with glowing pillar candles and white flowers during a beautiful sunset ocean view.

The strongest candle schemes usually begin with one area that carries the mood. That might be the head table, a long harvest table, the ceremony aisle, or the entrance where guests first step into the space. Once that focal point is right, the rest of the candles can support it rather than compete with it. The result feels polished instead of busy.

Couples often ask for "lots of candles" when what they really want is a room that feels intimate and flattering after sunset. Those are not always the same thing. Fifty small flames scattered without structure can read messy. Fewer candles, scaled properly and placed with intent, usually give a better result and are easier to light, protect, and clear with the venue team.

A candle plan needs to answer practical questions early:

  • Where should candlelight matter most? Ceremony aisle, reception tables, bar, entrance, lounge areas, powder rooms.
  • What will the venue allow? Some estates permit open flame on tables but not on floors or near draping.
  • What will the weather do? Cape Town wind changes styling decisions fast, especially for tapers and exposed flames.
  • Are you renting or buying? For one-night impact, hired hurricanes and holders often make more sense than purchasing mixed pieces you may never use again.

Intentional placement matters more than quantity.

Local context changes everything. A beachfront reception in Camps Bay needs sheltered flames, heavier holders, and less reliance on delicate taper moments. A cellar dinner in Franschhoek can carry richer density and lower, moodier pools of light because the environment is naturally protected. I also treat modern all-candle looks differently from classic floral-and-candle tables. The first demands stricter planning around burn time, replacement stock, and who manages relighting during service.

Good candle styling starts with the venue itself. The room tells you how much glow it can hold, where candlelight will be seen, and whether real flame is the right choice for the conditions. That is what makes the final effect feel romantic rather than forced.

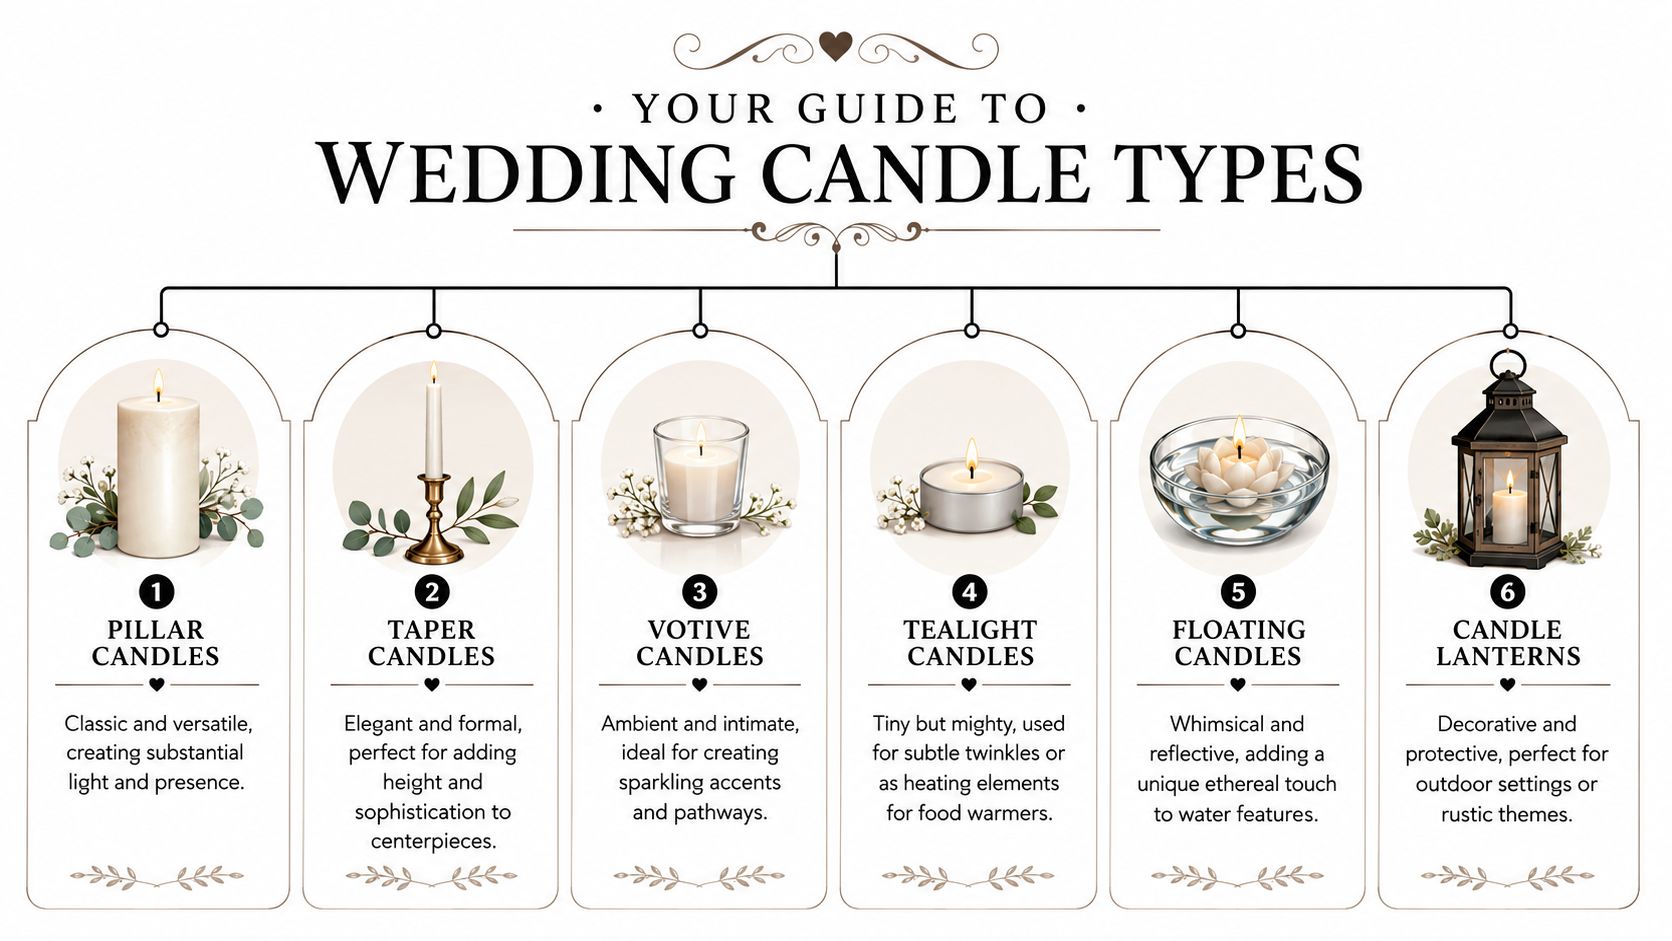
Your Guide to Wedding Candle Types

Each candle type solves a different styling problem. Choose the shape for the job first, then choose the finish and quantity.

A guide displaying six different types of wedding candles including pillar, taper, votive, tealight, floating, and lanterns.

Pillars for visual weight

Pillar candles give a table presence. I use them where a design needs body, especially on round guest tables, welcome displays, bars, ceremony plinths, and anywhere florals sit low.

They also photograph well because they read clearly from a distance. The trade-off is bulk. If every pillar is the same height and width, the arrangement can feel static very quickly.

They work well for:

  • Low centrepieces with garden-style florals
  • Lantern styling outdoors
  • Mantel or staircase installations
  • Aisle clusters in glass sleeves or hurricanes

Tapers for height and line

Taper candles bring height without adding visual heaviness. They suit long tables, formal dining layouts, and cleaner designs where the eye needs a vertical rhythm.

They are less forgiving than pillars. A slightly uneven holder, a soft table surface, or a breeze from an open barn door can make the whole row feel unsettled. In sheltered interiors, though, tapers sharpen a tablescape beautifully and give floral designs a stronger frame.

A practical rule I use often: low, loose flowers usually benefit from a few disciplined taper lines.

Votives and tealights for atmosphere

Votives and tealights do the quiet work. They fill the gaps between larger elements and create that scattered glow guests notice once the room dims.

Votives usually give a richer result because the holder becomes part of the styling and the flame sits high enough to be seen. Tealights are useful for layering, especially in large numbers, but they can disappear on oversized tables or in venues with strong ambient lighting.

If the budget is tight, I would usually keep fewer pillars and protect the spend on votives. The room often feels warmer because of it.

Floating candles for reflection

Floating candles are strongest where water already belongs in the design. They suit bowls at an entrance, troughs on a bar, fountain details, and lounge areas where guests pass close enough to notice the reflection.

Used well, they add movement and softness that standard table candles cannot. Used badly, they look like an afterthought. The vessel matters as much as the candle. Scale, water depth, and the surrounding light all affect whether the effect feels polished or makeshift.

Lanterns and LED alternatives

Lanterns are not a candle type, but they change how candlelight performs. They shield the flame, add structure, and make outdoor styling feel considered, especially at Cape Town venues where wind can shift during the course of one evening.

Then there are LED candles. For some weddings, they are the sensible choice. I recommend them for high-traffic areas, venues with strict flame policies, installations near fabric, and late-night spaces where no one wants to manage relighting. Good LED candles still need editing. Skip the bright blue-toned versions and use warm, realistic options in proper holders so they read as part of the design, not a compromise.

Choosing Candles for Your Venue and Theme

The best candle choice isn't the prettiest one on its own. It's the one that suits the room, the weather exposure, and the tone of the wedding.

Wine estates and heritage venues

Historic Winelands venues tend to suit candlelight naturally. Stone walls, old wood, textured plaster, and long dining tables all respond well to warm, low light. In those settings, pillar candles in glass sleeves or lanterns usually look right at home. They add warmth without fighting the architecture.

For a Stellenbosch or Franschhoek estate wedding, a good approach is to keep the candle shapes slightly organic. Mixed pillar heights, soft ivory tones, and a few metal or ceramic holders often feel more grounded than ultra-polished crystal.

Modern city venues and clean-lined spaces

Contemporary Cape Town venues often need a crisper hand. If the room has steel, concrete, glass, or sharp architectural lines, go cleaner with your candle choices. Tapers in sleek candlesticks and disciplined clusters of votives usually work better than bulky, rustic arrangements.

The mistake here is over-softening the room. Too many mixed holders can make a modern venue lose its edge.

A better fit often looks like this:

  • Minimalist theme: black, clear, or brushed metal holders with evenly spaced tapers
  • Modern chic: a restrained mix of tapers and votives, with symmetry doing most of the work
  • Editorial styling: statement candle groupings that feel sculptural rather than decorative

Beach, garden, and exposed outdoor venues

Outdoor weddings need a tougher candle plan. The prettier the open-air setting, the more disciplined you need to be.

At beachside venues, open tapers are usually the first thing I remove from a design draft unless the ceremony and dinner areas are very sheltered. For gardens and courtyards, lanterns and enclosed cylinders give a much more reliable result. They still feel romantic, but they don't spend the evening fighting the breeze.

If your venue manager starts talking about wind patterns before you've even discussed flowers, take that seriously and adapt the candle plan early.

Matching the candle language to the theme

A few combinations tend to work consistently well:

Theme Candle approach
Classic romance Tapers, pillars, and votives in a soft layered mix
Minimalist elegance Fewer candles, cleaner holders, stronger spacing
Bohemian or garden style Clusters of pillars and votives with softer variation in height
Black-tie modern Tall tapers, reflective surfaces, disciplined repetition

The common thread is cohesion. Candles for wedding décor should echo the room and the styling language already in place. They shouldn't try to rescue a mismatched concept.

Designing with Light Styling and Centrepiece Ideas

Good candle styling isn't about quantity alone. It's about layering light at different heights so the eye moves across the table and around the room.

A reliable recipe for round guest tables

For 5 ft round intimate wedding tables, a strong benchmark is 2 to 3 large pillar candles or 4 to 5 small pillars, paired with 5 to 7 votive candles and 3 to 4 taper candles to balance glow and safety, according to wedding candle table benchmarks.

That formula works because each type handles a different visual task:

  • Pillars build the centre of the arrangement
  • Votives spread light outward and fill the dead space
  • Tapers lift the eye and stop the design from feeling squat

If you're planning your table décor in detail, it also helps to consider what sits underneath the candles. Reflective bases and warm metallic accents can make a candle grouping feel far richer. A useful reference for that layered look is this guide to Wedding gold charger plates, especially if you want the place setting to carry some of the warmth.

How to keep centrepieces elegant, not crowded

The most common styling mistake is putting every decorative element in the middle of the table at once. Candles, flowers, menus, table numbers, favours, and charger plates all compete for the same visual space. The result looks expensive in pieces and messy as a whole.

A cleaner method is to choose one hero element and let the candles support it. If the florals are lush, reduce the number of large candles. If the candles are the main statement, keep the flowers lower and looser.

For couples who want more table arrangement ideas beyond candles alone, this roundup of a centrepiece for table styling is a helpful planning reference.

Creating candle moments beyond the table

Some of the best candle styling happens away from the guest tables.

Consider using candles in these areas:

  • Ceremony aisle edges: Keep the spacing consistent and use protected holders if there's any breeze.
  • Entrance styling: A grouped lantern or pillar installation creates a strong first impression.
  • Cake or champagne table: Candles frame details beautifully in photographs.
  • Lounge corners: Small clusters help these areas feel finished rather than forgotten.

A room feels immersive when candlelight appears in repeating pockets, not only at the dining tables.

Height, repetition, and restraint

Professional-looking candle design usually follows three principles.

First, repeat shapes. If every holder is different, the table looks unsettled. Second, vary height deliberately. Too much sameness kills the glow. Third, leave negative space. The eye needs a place to rest.

That's what separates a romantic candle setup from a decorative pile-up.

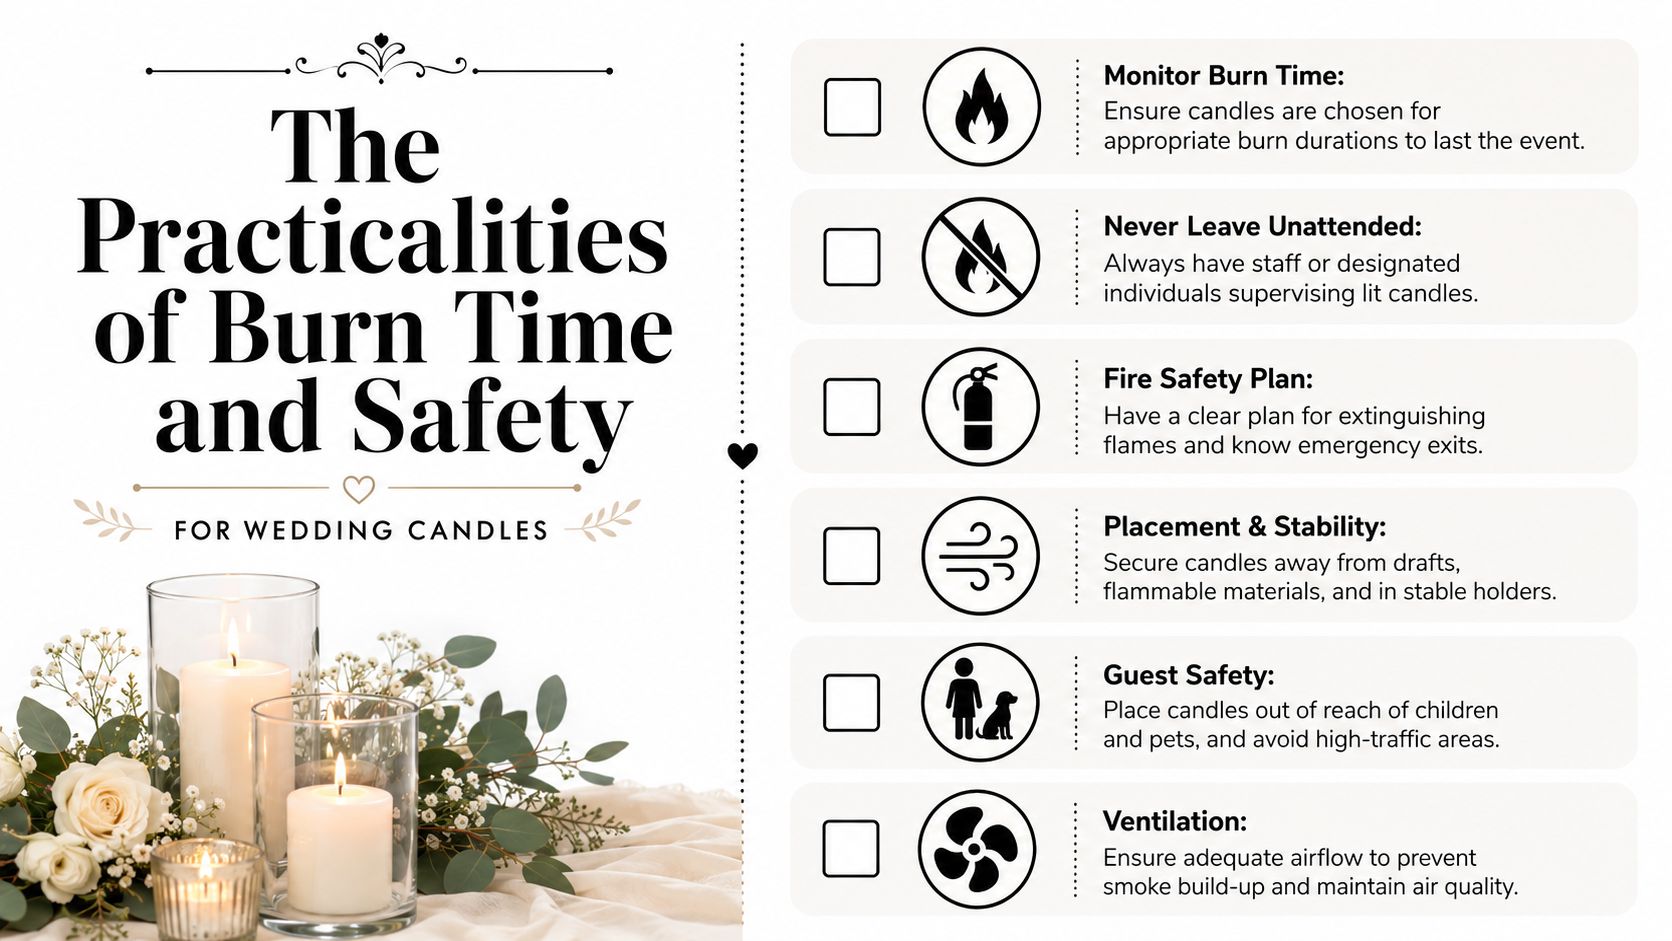
The Practicalities of Burn Time and Safety

The candles looked perfect at sunset. By the time mains were served, half the votives were low, two tapers had gone crooked in the breeze, and wax had marked the linen on the family table. I see versions of this often at Cape Town and Winelands weddings. Candlelight is romantic, but it only works when the practical side has been planned just as carefully as the styling.

An infographic titled The Practicalities of Burn Time and Safety for Wedding Candles listing six safety tips.

Burn time starts with your event schedule

Burn time should be matched to the actual flow of the wedding day. That means setup, guest arrival, any delay to the ceremony, dinner service, speeches, and the point when photographs of the room are still being taken. A candle may technically burn for hours and still be the wrong choice if it tunnels badly, throws off too much heat, or looks tired halfway through service.

Ask suppliers for the expected burn range of the exact candle size you are ordering, not a general promise across the whole range. Wax blend, wick size, draft exposure, and container shape all affect performance. In practice, I would rather use a candle with a consistent, tidy burn than chase an impressive number on paper.

A simple rule helps. If the candle needs to perform for a five-hour guest-facing window, build in a margin rather than buying to the minimum.

Wind changes everything in the Western Cape

Generic wedding advice often ignores the local problem. Cape Town wind can turn an elegant candle plan into a maintenance job within minutes, especially on wine farms, coastal venues, and terraces that feel sheltered until the temperature drops.

Open flames on exposed tables are rarely the best use of budget in those settings. The flame flickers hard, wax burns unevenly, and staff end up relighting candles instead of serving the room. Tall, unprotected tapers are usually the first to struggle.

The safer options are usually the most reliable-looking ones too:

  • Hurricane vases for tables with any cross-breeze
  • Heavy lanterns for entrances and pathways
  • Glass sleeves around pillar candles
  • Flameless candles in thoroughfares, near draping, or around children

Treat wind as part of the brief from the start. If the venue coordinator says, "It gets breezy after six," believe them and plan accordingly.

Safety rules that matter on the night

Venue rules should be checked before you place a single order. Some venues allow only enclosed flames. Others permit real candles on tables but not along aisles, staircases, or bars. Those restrictions affect the design, staffing, and budget.

Keep flames clear of hanging florals, loose napkins, dried foliage, and guest traffic routes. Use stable holders that cannot tip if a table is bumped. Assign one person or one team to light, monitor, and extinguish candles. Shared responsibility usually means nobody owns the job.

For a general reference, this guide to safe candle enjoyment covers sensible flame-care basics.

Real flame is not always the best answer

Some weddings absolutely benefit from live candlelight. Others are better served by a mix of real candles and alternatives. If the venue is windy, the tables are tight, or staff access will be limited once dinner starts, portable lighting often gives a calmer result and better consistency in photos.

For couples who want warmth without open flame in problem areas, rechargeable table lamps for events are a practical option for bars, lounge pockets, and outdoor dining tables.

The best candle plan is the one that still looks composed at 9 pm.

Cape Town and Winelands Candle Logistics

The candle plan often looks simple on paper. Then the south-easter picks up at cocktail hour, the venue only allows enclosed flames on the veranda, and someone realises the quote covered wax but not cylinders, lighters, transport crates, or the team to light everything on time.

That is why logistics deserve their own budget line. In Cape Town and the Winelands, candles are rarely just a styling purchase. They are a styling and operations decision.

What candles usually cost locally

Local candle spend varies widely because the final number depends less on the candle alone and more on the full setup around it. A few dinner tables with tealights and hired holders is one budget. A large reception with premium pillars, storm cylinders, aisle lanterns, backup stock, and setup labour is another entirely.

Couples often underestimate four line items:

  • holders and wind protection
  • delivery and collection
  • setup and strike time
  • breakage or wax damage to hired pieces

That is usually where budgets drift. The wax is visible. The support system is what changes the quote.

Screenshot from https://abchire.co.za

Rent or buy depends on the job

Buying works well when the candle itself is part of the design brief. Specific ivory tones, hand-finished tapers, oversized pillars, or a particular wax texture can justify the spend if those details matter in person and in photographs.

Renting usually makes more sense for the infrastructure. Glass hurricanes, lanterns, cylinders, mirror bases, and protective vessels are bulky to transport and annoying to store after one event. For outdoor receptions and estates with long setup routes, hiring those pieces is often the cleaner decision.

Here is the practical trade-off.

Factor Buying Candles Renting Candles & Holders
Design control Best for exact wax colour, size, and finish Best when the vessels and support pieces shape the look
Budget shape Higher product spend as quantities grow Easier to manage for one-day use
Transport You still need safe packing and delivery Often simpler if pieces arrive event-ready
Outdoor use Risky without proper protection Better suited to wind covers and enclosed options
After the wedding Leftovers need storing, reselling, or disposal Nothing to keep afterwards

The hybrid approach works well here

For many Cape Town weddings, the strongest plan is a split one. Buy the candles that carry the visual identity. Rent the technical pieces that make them work safely and neatly in the venue.

I use that approach often for Winelands properties and coastal venues because conditions can change between site visit and wedding day. A calm courtyard at noon can be exposed by sunset. A cellar venue may need candlelight moved quickly from ceremony to reception. Hired holders and lanterns give far more flexibility in those situations than a purchase-only plan.

If you are comparing candles with other rental items, this guide to wedding decor hire in Cape Town helps put the broader styling costs in context.

Local planning choices that save stress

A few decisions make a noticeable difference on the day:

  • Order by zone, not only by quantity. Ceremony, dining tables, bars, bathrooms, and entrance points each need different holders and burn plans.
  • Check access times before confirming quantities. Some estates allow long setup windows. Others compress everything into a tight afternoon turnaround.
  • Ask who is responsible for relighting or replacing candles after sunset. If nobody owns that task, half the room can look uneven by the first course.
  • Keep backup stock for wind-exposed areas. Outdoor candles rarely burn at the same pace across a full event.

The most polished candle styling in this region is not always the most elaborate. It is the plan that still looks composed once the wind changes, dinner runs late, and the room is full.

Your Wedding Candle Checklist and Timeline

By the time guests walk into dinner, candlelight should feel effortless. It only looks that way when the planning is done early, the quantities are realistic, and someone specific is responsible for lighting, checking, and clearing it.

Six to eight months before

Start with venue rules and access. Ask where open flame is allowed, whether every candle must be enclosed, and which areas are usually affected by wind after sunset. In Cape Town and the Winelands, that last question matters more than couples expect. A courtyard that feels calm at a site visit can become exposed once the temperature drops and the breeze shifts.

Set your styling direction at the same time. Decide whether candles are there to soften the room, frame key moments, or carry the whole atmosphere after dark. That choice affects everything from holder style to setup time.

Three to four months before

Map the candle plan by area, not just by item count.

Use practical zones:

  • Ceremony: aisle, signing table, altar, entrance
  • Reception: guest tables, main table, bar, cake table
  • Secondary spaces: bathrooms, lounge corners, pathways, welcome table

Then confirm the format. Buy candles if you want full control over colour and finish. Rent holders if you want flexibility, less storage, and fewer breakages to manage. For outdoor sections, a mixed plan often works best, with real flame in protected spots and LED candles where wind or venue rules make live flame unreliable.

The neatest installations are planned with purpose. Every candle should already have a place and a job.

One month before

Review quantities against your floor plan and your schedule. Careful analysis here often reveals over-ordering. A long imperial table needs a different rhythm of candlelight from round tables, and a late winter dinner needs more coverage than a midsummer reception that starts in daylight.

Confirm responsibilities in writing:

  • Who lights the candles
  • What time each zone is lit
  • Who replaces or relights candles outdoors
  • Who extinguishes everything at the end of the night

If any part of the wedding is outside, test one arrangement in real conditions if possible. I have seen beautiful taper groupings fail on a Stellenbosch lawn because the holders were too light and the flame too exposed.

In the final week

Pack and label by zone. Ceremony candles should be separate from reception candles, and outdoor spares should be easy to grab without opening every box. Include lighters, matches, cloths, drip trays if needed, and a printed lighting list for the setup team.

Edit the plan if timing is tight. A smaller candle scheme, lit properly and placed well, looks far better than an ambitious one rushed in the last twenty minutes.

On the day, place candles according to the floor plan, light them in sequence, and do one final check once guests are seated. That last walk-through catches the details that matter. A table left unlit, a lantern blown out at the entrance, wax drips on a linen runner.

If you're planning a wedding in Cape Town, Stellenbosch, Franschhoek, or Paarl and want the wider décor and lighting pieces around your candle styling to feel just as polished, ABC Hire can help with event furniture, LED options, and practical rental support that makes the whole setting work beautifully.

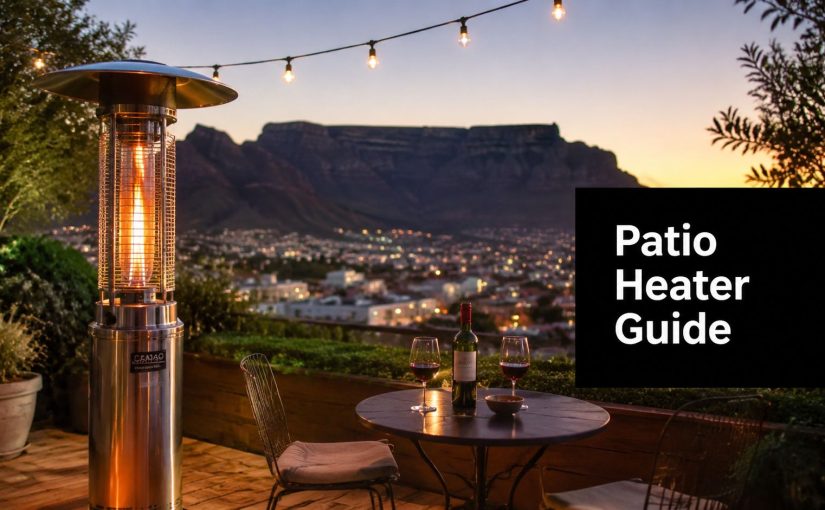
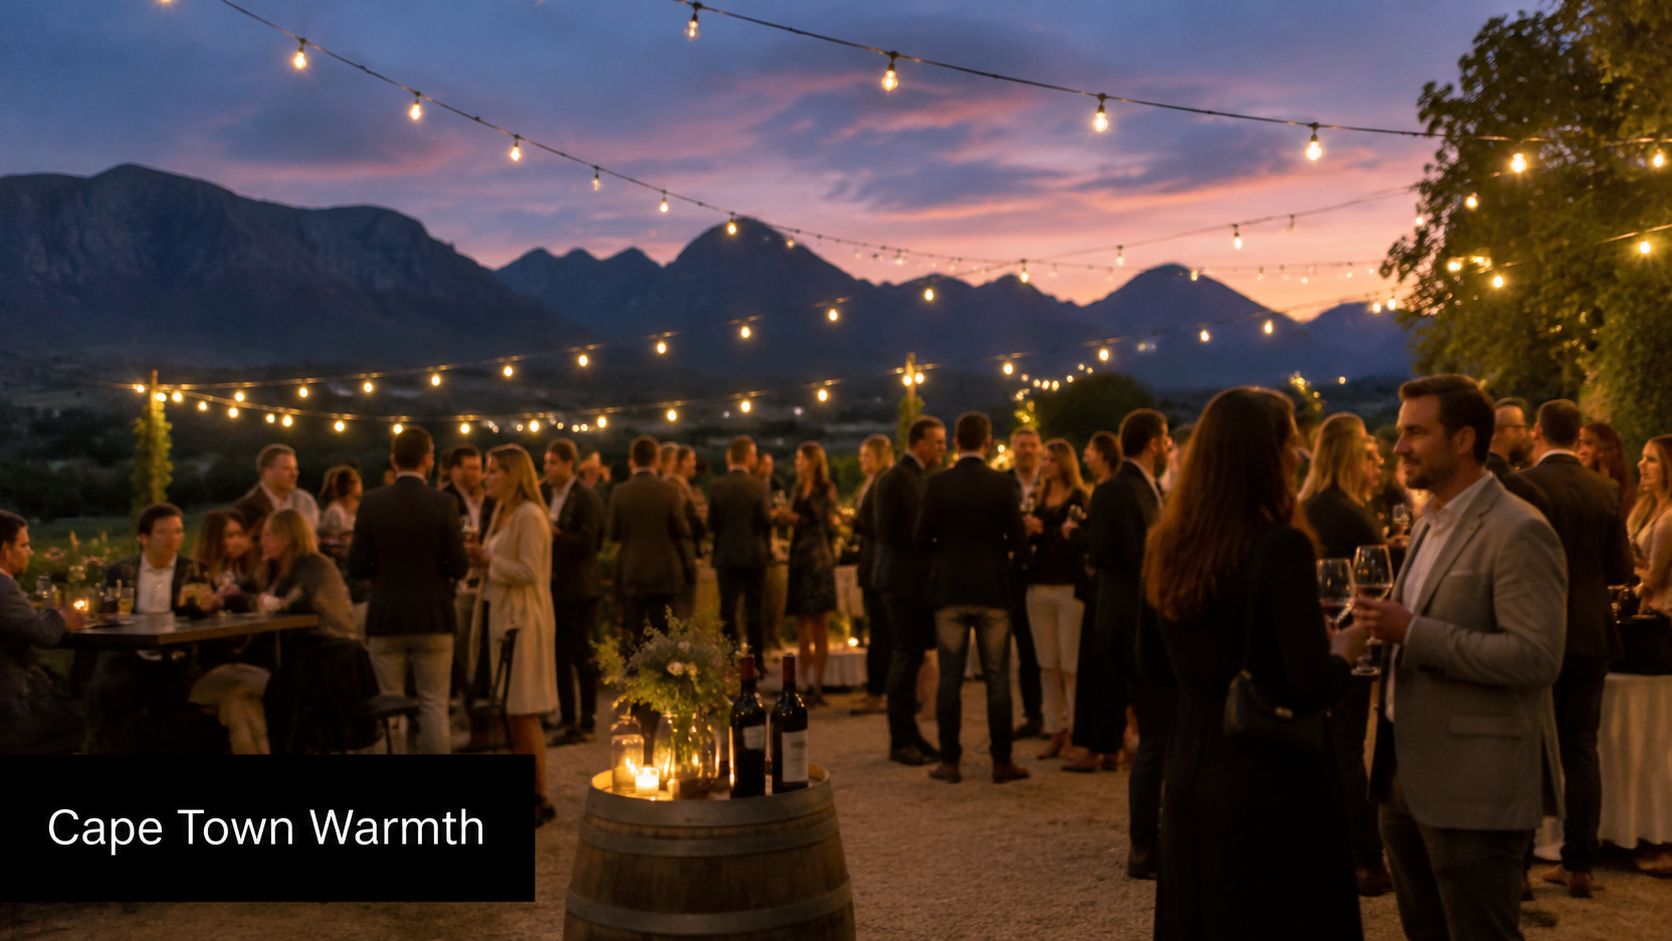
Patio Space Heater Guide for Cape Town Events

A patio space heater usually becomes urgent at the exact wrong moment. The ceremony is done, the canapés are moving, the bar is busy, and the venue looks perfect. Then the sun drops behind the mountain, the damp air settles in, and guests start choosing corners that feel less exposed instead of using the spaces you spent hours planning.

That shift happens fast in Cape Town and the Winelands. A courtyard that felt mild at sunset can feel sharply colder once wind moves through it. A terrace in town behaves differently from a lawn in Franschhoek. A covered area can hold comfort well, while an open gravel section can lose heat almost immediately.

Good event heating isn't about blasting warmth into the night and hoping for the best. It's about matching the heater type to the venue, the layout, the wind direction, the guest flow, and the length of the event. When planners get that right, guests stay where they should stay. They linger at the cocktail area, sit through speeches comfortably, and keep using the outdoor zones that make the event memorable.

Keeping Guests Warm at Your Cape Town Event

A winter wedding in the Winelands often looks effortless from the guest side. Candlelight flickers, glassware catches the last of the sunset, and the outdoor section feels like the best part of the venue. Then the cold starts working against the atmosphere.

A social gathering with people at an outdoor winery event at sunset with mountain views.

I've seen the same pattern across weddings, corporate launches, and private parties. Guests don't always say they're cold. They stop using the outdoor lounge, pull chairs closer together, or drift indoors earlier than planned. That's when the patio space heater stops being a background rental item and becomes part of the event design itself.

The practical goal isn't to make the entire outdoors feel like an indoor room. It's to keep key guest areas comfortable enough that people want to stay in them. That means focusing on cocktail pockets, dining edges, smoking areas, waiting zones, and any spot where people stand still for longer than a few minutes.

Comfort has to match the look of the event

Planners usually worry, rightly, that heating equipment can ruin a clean layout. Oversized units in the wrong spot can interrupt sightlines, crowd furniture, and compete with floral or lighting elements. The answer isn't to skip heating. It's to choose fewer, better-positioned units and support them with softer comfort layers.

For seated events, textiles still matter. If you want to enhance your outdoor comfort without changing the visual tone of the venue, throws and blankets can help bridge the gap between decorative styling and thermal comfort.

Practical rule: Guests forgive cool air. They don't forgive being cold while seated, waiting, or trying to socialise.

A well-planned heating setup protects the event flow. It keeps speeches from feeling rushed, dinner from turning stiff, and open-air mingling from collapsing into one crowded indoor fallback space.

Choosing Your Heater Type Gas vs Electric

Heater choice affects far more than temperature. In Cape Town, it affects whether guests stay on the terrace at 8 pm or drift toward the bar inside once the south-easter starts cutting across the venue.

A comparison infographic listing the pros and cons of gas versus electric patio heaters for outdoor spaces.

A planner usually needs to decide between broad, movable heat and targeted, fixed heat. Gas handles the first job well. Electric handles the second. The right answer depends on exposure, power access, ceiling height, and how much the layout might shift during setup.

Gas heaters for open event spaces

For lawns, courtyards, farm venues, and open terraces, gas is usually the safer rental choice. Freestanding propane units are portable, need no trailing extension cords, and can be repositioned if the wind changes or a floor plan gets revised late. Product guidance from Patio Kingdom's gas heater specification notes typical use with 20 lb propane tanks and describes the familiar broad heat pattern these units are known for.

That makes gas practical for:

  • Cocktail areas where guests cluster and move around
  • Perimeter dining tables that cool down faster than central seating
  • Venues with weak power distribution or too few outdoor plug points
  • Load-in setups where planners want fast placement without cable management

Gas also copes better with real event friction. If a supplier adds a bar, if a DJ position shifts, or if a windbreak goes up late, the heating plan can move with it.

Electric heaters for controlled zones

Electric infrared heaters work best where the heating target stays fixed. They warm people and surfaces directly, which suits covered patios, verandas, entrance canopies, and seated zones tucked out of the wind. They are quieter than gas and visually cleaner, which matters at private homes and tighter venues where freestanding units can feel bulky.

The trade-off is practical, not theoretical. Electric only works well if the power supply is reliable and the heater can be mounted or placed where people will feel it. On an exposed terrace in Green Point or along a damp Constantia slope, electric often underperforms unless the area has decent shelter.

Planners using visual layout tools such as ai backyard patio design should still pressure-test the plan against wind direction, cable routes, and actual power access. A neat rendering does not solve a cold corner.

Heater type Best use Main limitation
Freestanding gas Open patios, standing events, flexible layouts Needs safe tank handling and more floor space
Electric infrared Covered seating, entrances, fixed zones Depends on nearby power and shelter
Pyramid-style gas Styled events, arrival areas, visible ambience Often looks better than it heats in windy spots
Mushroom-style gas General event coverage across open areas Less decorative in design-led setups

Mushroom vs pyramid style

This choice matters because the two styles do not behave the same way on site.

Mushroom heaters are the standard event unit for a reason. They throw heat outward in a practical pattern and suit mixed-use spaces where guests stand, chat, then drift between tables. For most winter functions, they are the workhorse.

Pyramid heaters earn their place when the event brief puts more weight on appearance. They look good at entrances, brand activations, and wedding lounges. But in a windy Cape Town venue, visible flame can give a false sense of warmth. They often add atmosphere faster than they add comfort.

What works in Cape Town conditions

Cape Town microclimates change fast over short distances. A courtyard in the City Bowl can be still and mild, while a venue 20 minutes away in Noordhoek can feel damp and exposed. Humidity in the Winelands also changes how cold guests feel once they stop moving.

A simple rental rule works well:

  • Choose gas for exposed venues, shifting layouts, and broad guest movement
  • Choose electric for covered zones with fixed seating and solid power access
  • Use both when the event combines an open mingling area with a sheltered dining or waiting zone

That mixed setup usually gives the best result. Open areas get the stronger, movable heat they need. Sheltered corners get quieter, more precise warmth without cluttering the floor plan.

Calculating Heat Coverage for Your Event Layout

Heating errors often start with guesswork. A planner books a few units, parks them where there is open floor space, and ends up with warm equipment but cold guests. In Cape Town, that gap shows up fast because a courtyard in Green Point, a terrace in Camps Bay, and a lawn in Constantia can all behave differently on the same night.

A step-by-step infographic illustrating the process for calculating heat coverage and heater placement for outdoor event spaces.

Start with the area guests actually use

Measure the zones where people will stand, sit, queue, or linger. Skip the decorative lawn, unused corners, and service areas unless guests will spend time there.

Industry guidance from Lowe's patio heater buying guide suggests about 20 BTUs per square foot for a 15 to 20°F temperature rise in patio spaces. The same guide notes that a 1,500 sq ft area needs at least 30,000 BTUs, which can come from one 48,000-BTU propane heater or several smaller units.

Use that as a starting point, not a final answer. Cape Town wind exposure, damp air, and broken-up event layouts often mean the floor plan matters more than the raw BTU total.

A simple working method helps:

  1. Measure the active heating area in square feet.
  2. Multiply by 20 BTUs for a baseline.
  3. Place that output across the layout based on where people stop moving.

Map heat by behaviour, not by venue outline

Treat the site as a set of guest zones, not one large shape. On event plans, I usually break it into arrival, bar, dining, lounge, and any waiting points such as shuttle collection or registration.

That matters because guests feel cold in different ways. Standing groups on a drinks terrace can tolerate brief gaps in warmth. Seated guests in a Winelands courtyard feel the cold faster, especially once the air turns damp after sunset. Transitional spaces also matter more than planners expect, because people often bottleneck there.

If you are sketching options early, a visual planning tool like ai backyard patio design can help you test zones before the final site meeting. For practical unit options, it also helps to review common gas porch heater rental setups so the layout matches what is available for hire.

Layout problems I see repeatedly on Cape Town event sites

Marquee receptions in Franschhoek or Paarl

Planners often assume the marquee interior is the main heating job. The colder problem areas are usually the entrance flap, sidewall edges, bar opening, and any lounge spill-out section where guests drift outside cover. Heat the pause points first.

Waterfront and Atlantic Seaboard terraces

These terraces can look compact on paper and still feel cold in practice. Wind strips heat off rail-side clusters and exposed corners. Two heaters grouped near the bar rarely solve that. A wider spread around the social footprint usually works better.

Garden functions in Constantia

The layout often looks relaxed and open, but loose furniture kills heat efficiency. If seating pockets are too scattered, each heater serves dead space between groups instead of the guests themselves. Tighten the furniture plan, then place heaters around those occupied pockets.

Useful rental rule: Reduce the heated footprint before adding more units. A tighter guest layout often improves comfort more than one extra heater.

Avoid the small-space mistake

Compact patios and side courtyards get underquoted all the time. They look easy to heat, but they often have the worst combination of crosswind, hard surfaces, and guests sitting still close to openings.

Before you confirm the hire count, check four things:

  • Where will guests stay still for more than 10 minutes?
  • Which side of the venue takes the wind first?
  • What built elements block, trap, or redirect warmth?
  • Will the layout change after speeches, dinner, or dancing?

That is the difference between counting heaters and planning heat coverage.

Safe Heater Placement and Clearance Rules

A patio space heater can solve a comfort problem and create a safety problem at the same time if it's placed carelessly. At events, the risks usually come from pressure and speed. Furniture gets shifted at the last minute, florals expand into service space, cables appear where none were planned, and a heater ends up too close to fabric, foliage, or foot traffic.

An infographic illustrating essential safety guidelines for the proper placement and operation of space heaters.

The clearance rule that matters

The mandatory standard is 3-foot clearance from flammable materials, as highlighted in the NFPA heating safety guidance. That distance matters around draping, table linen, foliage, umbrellas, timber details, marquees, and decorative installations that get added after the technical plan is signed off.

The same NFPA guidance notes that portable space heaters were involved in only 3% of home heating fires but in 41% of fatal heating fires. For event planners, the lesson is simple. The incident may be unlikely. The consequence can be severe.

Placement rules that work on live event sites

Use a physical walk-through, not a paper plan only. On site, confirm these basics:

  • Stable base: Put each unit on a flat, level surface that won't shift under guest movement or service traffic.
  • Protected edges: Keep heaters away from narrow guest pathways, dancefloor entries, and busy bar queues.
  • Ventilated setup: Gas units need open-air use and proper airflow. Don't squeeze them into improvised enclosed pockets.
  • Clear overheads: Check what sits above the heater after styling is complete, not before.
  • Service access: Staff must be able to turn units off quickly without reaching through guests or furniture.

Common mistakes during setup

Some problems only show up once the room is dressed. A heater that looked safely placed in an empty venue can become a hazard when the florist adds hanging greenery or when a planner pulls lounge seating tighter around it.

This is also where specialist guidance on gas porch heaters is useful, especially for understanding how outdoor gas units behave in partially sheltered entertainment areas.

Never sign off heater placement before the final furniture and styling layout is in position.

A short safety check before guests arrive

Run this check in order:

  1. Stand where guests will stand and look for low fabric, branches, signage, and cords.
  2. Test access around the unit so staff can move safely near it.
  3. Confirm clearances again after styling because that's when many risks are introduced.
  4. Keep a fire extinguisher nearby and make sure the responsible team knows where it is.
  5. Assign ownership so one person is responsible for heater oversight during service.

Warmth helps the event. Safe placement protects everyone in it.

Renting vs Buying Your Patio Space Heater

For most planners, buying a patio space heater sounds sensible until the practical details pile up. You don't just buy a heater. You take on storage, transport, maintenance, cleaning, fuel logistics, and the risk of owning the wrong type for the next venue.

Renting keeps your options open

Events change from job to job. One week you may need freestanding gas units for an exposed courtyard. The next, the venue may only suit electric infrared units in fixed positions. Ownership pushes you toward using what you have, even when it isn't the best fit.

Renting lets you match equipment to the brief instead:

  • A wedding lawn needs broad outdoor coverage.
  • A product launch may need sleek units that don't dominate branding.
  • A birthday dinner may only need focused warmth around seated clusters.

That flexibility matters more than many planners expect.

Ownership costs more than the purchase

A typical mushroom-style propane patio heater uses 45,000 BTUs per hour, while heated furniture can use around 2,500 BTUs per hour, according to this analysis of patio heater inefficiency. That doesn't mean every event should swap heaters for heated furniture. It does show why occasional ownership of high-consumption equipment often makes less sense than accessing the right setup per event.

Storage is another issue. Freestanding heaters are awkward to keep, easy to damage in the off-season, and rarely stored as carefully as technical gear should be. Then there's transport. A heater that looks manageable in a warehouse becomes a nuisance when it has to move through narrow venue access, stairs, gravel, or late-night pack-down.

Renting usually produces a cleaner event operation

The strongest reason to rent isn't convenience alone. It's operational clarity. You can size correctly, scale up when the weather turns, and avoid building your event around whatever equipment is sitting in storage.

If you're weighing the broader pros and cons of fuel-based outdoor heating, this guide to gas patio heater options is a useful reference point.

Buy if you run the same kind of outdoor setup repeatedly and have proper storage, handling discipline, and a maintenance routine. Rent if the venue, guest flow, and exposure change from event to event.

For most weddings, launches, school functions, and private parties, renting is the more practical choice because it keeps the heating plan responsive instead of fixed.

Cape Town and Winelands Climate Considerations

Cape Town doesn't give planners one winter pattern. It gives several. A city terrace can feel sharp because of wind exposure. A Winelands venue can feel colder because damp air settles in after sunset. The same patio space heater layout that works in one suburb can underperform badly in another.

Wind changes everything

The biggest local mistake is treating heater placement as static. It isn't. Wind strips comfort from outdoor zones faster than many planners expect, especially in open courtyards, vineyard-facing lawns, and harbour-side venues.

A 2025 study by the Cape Town University of Technology found that 68% of event planners in the region report guest discomfort due to inadequate heater placement during windy conditions. That local reality explains why generic international guides often fall short here.

When the site is windy:

  • Pull guests into tighter heat zones instead of heating every metre of open space.
  • Use structures already on site such as walls, screens, or built corners to protect the warm area.
  • Avoid placing heaters in direct wind channels like gate openings, corridor gaps, and terrace edges.
  • Rehearse placement at the actual event time when possible, because late afternoon calm can become a very different evening pattern.

For semi-enclosed setups, practical weather barriers such as solar screen porch solutions can also help reduce exposure and improve heater performance when a venue allows them.

Damp cold in the Winelands behaves differently

Franschhoek, Stellenbosch, Paarl, and Constantia often produce a more penetrating chill than the thermometer alone suggests. Guests feel it most when seated. That's why dining layouts need more deliberate thermal planning than standing cocktail events.

The fix usually isn't “more heaters everywhere”. It's a combination of better siting, more compact seating groups, and less exposed lounge placement. Planners who already think carefully about shelter, surfaces, and furniture tend to get better heating outcomes too. This is one reason weather-aware setup choices, like those discussed in weather-resistant outdoor furniture, matter beyond furniture durability alone.

What works best locally

A heater plan for the Western Cape should answer these questions before hire is confirmed:

Local condition Better response
Exposed wind line Create protected guest clusters and heat those, not the whole boundary
Damp evening cold Prioritise seated zones, dining edges, and lounge pockets
Remote power access Favour portable solutions rather than long cable runs
Venue with multiple micro-zones Mix heater types instead of forcing one model across all areas

In Cape Town, heater performance depends as much on where the air moves as on what the heater can produce.

That's the local difference. You're not heating a generic patio. You're heating a temporary event in a shifting microclimate.

Your Pre-Event Heater Checklist for Planners

By the day before the event, the heating plan should already be settled. The final job is execution. A short checklist catches most of the problems that lead to cold guests or unsafe setups.

Final checks worth doing every time

  • Confirm delivery timing: Make sure heaters arrive early enough for placement before florals, furniture, and guest signage start blocking access.
  • Walk the site at the likely event hour: Conditions after sunset matter more than a midday inspection.
  • Check final placement against the live layout: Bars, lounge sets, draping, and umbrellas often shift after the original plan.
  • Verify clearances: Recheck all surrounding fabric, foliage, and overhead elements.
  • Test every unit: Ignition, stability, and access should be confirmed before guests enter the space.
  • Review fuel or power requirements: Gas supply and power access should match the agreed setup.
  • Assign one responsible person: Someone on the planner or venue team should know who monitors heaters during service.
  • Keep troubleshooting contacts ready: If a unit fails, the response should be immediate, not improvised.

One last planner habit

Don't wait for guests to tell you the space feels cold. Stand in the least protected part of the venue and stay there for a few minutes. If that area feels uncomfortable before the event starts, it will feel worse once people stop moving and night settles in.

A good patio space heater plan doesn't draw attention to itself. Guests stay comfortable, and the event keeps flowing.


If you're planning an outdoor wedding, corporate function, matric dance, or private celebration in Cape Town or the Winelands, ABC Hire can help you choose the right event heating setup for your venue, layout, and weather exposure. Their rental range covers practical climate-control solutions that work with real event logistics, not generic showroom assumptions.

Cake Stands for Weddings: A Cape Town & Winelands Guide

You've probably chosen the flavour, approved the design, and saved a dozen reference photos of cakes against vineyards, mountain views, or candlelit reception rooms. Then the baker asks one practical question that suddenly matters more than expected. What stand is the cake going on?

That question changes more than most couples realise. A wedding cake can be beautifully made and still look slightly underwhelming if it's placed on the wrong base, too low for the room, too small for the bottom tier, or too delicate for a breezy lawn reception in the Winelands. The stand is what gives the cake presence. It also protects the cake, supports the weight, and helps the whole display feel intentional instead of improvised.

In Cape Town and the Winelands, this choice needs a bit more thought than the average online checklist suggests. Outdoor venues, gravel paths, timber decks, coastal air, strong afternoon wind, and mixed indoor-outdoor layouts all affect what works. The best cake stands for weddings in this region are the ones that balance style with stability.

The Foundation of Your Wedding Centrepiece

The cake-cutting moment is short, but it carries a lot of visual weight. Guests gather, cameras come out, and suddenly the cake is doing more than dessert duty. It becomes part of the ceremony of the evening.

That's why the stand matters so much. A good stand doesn't compete with the cake. It frames it, lifts it, and gives it the kind of presence a centrepiece deserves. I've seen a simple white buttercream cake look polished and expensive on the right stand, and I've seen an intricate floral design lose impact because it sat on a basic platter that disappeared into the table linen.

Why the stand is never just an accessory

Think of the stand as the cake's stage. The cake may be the artwork, but the stand determines how guests see it from across the room and how it photographs from every angle. Height, shape, finish, and footprint all influence whether the cake table feels elegant, romantic, contemporary, rustic, or slightly off-balance.

In the Western Cape, that's even more noticeable because venues tend to have strong character. A cellar venue with stone walls asks for a different display language from a light-filled city venue or a lawn reception in Franschhoek.

A beautiful cake on the wrong stand often looks smaller, flatter, and less considered than it really is.

What couples usually underestimate

Most couples start by choosing a stand based on looks alone. That's understandable. The photos online are persuasive. But in practice, three questions matter just as much as appearance:

  • Where it will sit: Indoors, under cover, on grass, on decking, or on uneven stone.
  • What it must carry: A light single-tier cake behaves very differently from a heavy celebration cake.
  • How visible it needs to be: A cake in a large reception room needs more visual presence than one in a small dining space.

When you get those basics right, the styling becomes much easier. The stand stops being an afterthought and starts doing the job it's supposed to do.

A Guide to Wedding Cake Stand Types and Materials

Some stands are decorative first. Others are structural first. The best choice depends on your cake design, your venue, and how much visual drama you want from the display.

An infographic detailing various types of wedding cake stands and common materials used to craft them.

Stand types that actually suit wedding use

Pedestal stands are the classic option. They lift the cake without making the setup feel busy. They work especially well for single-tier cakes, modest cutting cakes, and buttercream designs where you want a clean silhouette.

Tiered stands create vertical impact. They're useful when the display itself needs height, or when the cake concept includes separate levels rather than one stacked structure. These can look striking, but they need careful setup and a venue surface that's level.

Plateau stands are lower and broader. They don't have the same dramatic lift, but they're often the safest and smartest choice for heavy cakes or venues where stability matters more than extra height.

Floating stands create that suspended look many modern couples love. They can be stunning in a contemporary venue, especially with minimalist cakes, but they demand proper engineering and should never be chosen purely because they look trendy in a photo.

Materials and the feel they create

Material changes both the style and the practicality of the display.

  • Metal: Reliable, versatile, and available in ornate or minimalist forms. Powder-coated black, brushed gold, and silver finishes tend to pair well with formal weddings.
  • Wood: Warm, relaxed, and ideal for organic styling. A timber base can soften a modern cake and works beautifully in vineyard, garden, and farm settings. If you like that look, this guide to a wooden cake stand gives a useful starting point.
  • Glass: Elegant and light in appearance. Best indoors or in sheltered setups where you want reflection and delicacy.
  • Acrylic: Crisp, modern, and visually subtle. Clear acrylic can create a floating effect, though it shows fingerprints and can feel too lightweight in exposed outdoor settings.
  • Vintage mixed materials: Think pressed glass, aged metal, ceramic, or antique-look pieces. These are wonderful for romantic styling, but they need to be chosen carefully so the stand doesn't look fussy next to an already detailed cake.

Wedding Cake Stand Material Comparison

Material Aesthetic Best For Cape Town Consideration
Metal Classic, polished, formal Ballroom, cellar, elegant indoor receptions Handles movement and setup well, especially on busy event days
Wood Natural, rustic, textured Vineyard, garden, farm, boho styling Works well with local venue styles and hides dust better than glossy finishes
Glass Refined, delicate, luminous Indoor receptions, candlelit spaces Better in protected areas where wind and uneven handling are less of a concern
Acrylic Modern, minimal, clean Contemporary venues, editorial styling Looks sleek but needs extra care outdoors
Vintage mixed materials Romantic, layered, characterful Heritage venues, eclectic styling Beautiful in photos, but check for true stability before committing

Practical rule: Choose the stand material to suit the venue surface first, then the design style second. That order prevents most regrets.

Choosing the Right Size and Structure

A stand can look perfect and still be wrong if the proportions are off. This is where design meets engineering. The right size and structure keep the cake stable, level, and visually balanced.

A hand holds a measuring tape next to a three-tiered white wedding cake on a stand.

Start with the base tier

The bottom tier tells you almost everything you need to know. As a practical rule, the visible top surface of the stand should extend beyond the cake enough to frame it neatly without looking oversized. Many bakers and stylists use the simple plus-two-inch approach, meaning the stand is slightly wider than the bottom tier all the way around.

That extra room helps with presentation, but it also gives you safer edge clearance during transport and setup. A stand that matches the cake exactly can feel cramped and leaves no margin for error.

Weight capacity is not optional

This is the part couples often don't see until something goes wrong. A standard three-tier wedding cake can weigh 15 to 18 kg or more, and venues and caterers in South Africa's event sector increasingly rely on stands rated for at least 20 kg of load, which is why reinforced professional options are common in Western Cape rental stock, as noted in this background on the cake stand.

That means a decorative stand from a homeware shop may not be suitable for a real wedding cake, even if it looks substantial in a product photo.

What to ask before confirming a stand

Use these checks when speaking to your baker, planner, or rental supplier:

  1. What is the diameter of the bottom tier? Don't guess from photos.
  2. What is the approximate finished weight? Fresh flowers, sugar work, and dense fillings all add load.
  3. Is the stand rated for that load? If the answer is vague, ask again.
  4. Does the stand have a broad base and secure top plate? A narrow stem with a heavy cake above it needs extra scrutiny.
  5. Will the venue surface be level? Even a strong stand can become risky on an uneven table.

For couples considering a taller celebration cake, this overview of a three-tier cake stand is a useful reference point.

Signs a stand is too delicate

  • It wobbles when lightly pressed
  • The top plate is thin or loosely attached
  • The stem is narrow relative to the cake size
  • It was designed for home serving, not event use
  • No one can confirm its safe load

A wedding day isn't the moment to test whether a pretty stand is strong enough.

Matching Your Stand to Your Cake and Venue

The best cake setups feel cohesive because the stand connects the cake to the room. It shouldn't look randomly added. It should feel like it belongs with both the design of the cake and the overall environment of the venue.

A three-tier white wedding cake decorated with flowers, sitting on an ornate gold stand on a wooden table.

Pairing style with cake design

A detailed cake usually benefits from a stand that supports rather than competes. If your baker is creating sugar flowers, lace piping, or textured buttercream, a simpler metal or plateau stand often gives the cleanest result.

A minimalist cake can carry more architectural presence below it. That's where a sculptural pedestal, modern acrylic form, or floating structure can add interest without overwhelming the design.

A few pairings tend to work especially well:

  • Naked or semi-naked cakes: timber, matte metal, or softly aged finishes
  • Classic white fondant cakes: polished metal, glass, or a formal pedestal
  • Modern monochrome cakes: black metal, clear acrylic, or sharp-edged contemporary stands
  • Garden floral cakes: lower-profile bases that let the flowers remain the hero

Reading the venue properly

The venue should have real influence over your decision. A stand that looks refined in an indoor city hotel may feel too slight on a long farmhouse table under open sky.

In the Western Cape, wind belongs in this conversation. A 2023 survey of South African wedding venues in the Western Cape found that 62% of outdoor ceremonies and receptions experienced gusty afternoon winds, and many general wedding guides still don't connect that reality to cake stand stability, according to this discussion on whether you need a cake stand for your wedding.

That tracks with what planners see on the ground. Light mirrored tops, narrow glass pedestals, and very tall stands can become awkward choices at exposed vineyard venues or coastal lawns.

If the reception is outdoors and the breeze picks up every afternoon, a lower, heavier stand usually looks better by the end of the day than a dramatic one that feels precarious.

Good choices for local venue types

Wine farms and garden venues
Choose weight and footprint over height. Broader bases, lower centres of gravity, and non-slip contact points matter. Matte finishes also tend to cope better with dust, pollen, and natural light.

City venues and indoor reception spaces
You've got more flexibility here. Taller pedestal stands, reflective finishes, and glass details often perform beautifully because the environment is controlled and the sightlines are cleaner.

Beachside or coastal venues
Salt air, breeze, and soft ground nearby all make stability more important. Metal with a substantial base generally performs better than lightweight acrylic if the cake table is anywhere near an open edge or terrace.

Styling and Placing Your Cake for Maximum Impact

A strong stand still needs the right setting. Placement, table choice, lighting, and guest flow all determine whether the cake becomes a highlight of the reception or fades into the background.

An infographic titled Maximizing Your Cake's Impact with five tips displayed next to a beautiful four-tiered wedding cake.

Place the cake where people will actually see it

A cake hidden in a dark corner won't suddenly become dramatic because the stand is beautiful. Put it somewhere visible but protected from heavy traffic. Near the dance floor can work well. Near the entrance can also be lovely if the table won't obstruct arrivals or staff movement.

The table itself matters too. It should feel proportionate to the cake and stand, with enough surrounding space for styling but not so much that the display looks lost.

Style around the stand, not against it

Good styling supports the base instead of masking it.

  • Use florals selectively: A few blooms or loose greenery at the foot of the stand often look more polished than covering the whole table.
  • Keep linen controlled: If the stand is ornate, a cleaner cloth works better. If the stand is simple, textured linen can add softness.
  • Add candlelight carefully: Candles flatter cakes beautifully, but heat and open flame need enough distance from icing and fresh flowers.
  • Keep the backdrop quiet: The eye should land on the cake first.

For couples planning their photography timeline, it helps to look at examples of professional wedding photography that show how cake placement, background, and lighting affect the final images. The difference between a cluttered backdrop and a considered one is immediate in photos.

Make the display easier for all guests to enjoy

Accessibility is often forgotten with cake tables, especially at outdoor venues. A 2024 report on inclusive event practices in South Africa found that 78% of event planners in Gauteng and the Western Cape felt they lacked clear guidance on accessible food and dessert displays, including wedding cakes, as highlighted in this roundup of wedding cake stand ideas.

That matters in local venues with gravel, lawns, decks, and mixed levels. A tall cake on a high stand can become hard to see for seated guests and awkward for guests using wheelchairs or mobility aids.

Try these practical adjustments:

  • Choose a lower platform if the surrounding terrain is uneven.
  • Avoid tight corners that make approach difficult.
  • Leave space around the table so guests can view the cake from more than one angle.
  • Think about sightlines from seated positions, not just standing ones.

A cake display is more successful when more guests can actually experience it, not just pass by it.

Rent or Buy Your Wedding Cake Stand

For most couples, renting makes more sense than buying. Not because buying is wrong, but because wedding cake stands are specialised items. They need to suit one cake, one venue, one setup style, and then they need to be stored safely afterwards.

Why renting is usually the practical choice

Renting gives you access to a broader range of event-grade pieces without having to commit to ownership. That matters if you need a stand with proper load capacity, a specific finish, or a shape that suits your baker's design.

It also aligns with how the local market works. In the Western Cape, cake-stand hire is one of the most frequently requested small-format accessories, with some Cape Town rental providers listing 80 to 100 or more cake stands and seeing 70 to 85% utilisation during peak season from October to April, according to this post featuring cake stand inventory and demand. That level of use tells you something important. Couples and planners already treat hiring as standard practice.

When buying does make sense

Buying can work well if:

  • You want a keepsake piece for future anniversaries or home use
  • You're hosting multiple events and expect to use it again
  • Your cake is very small and the stand is more decorative than structural
  • You've found a versatile design that suits both the wedding and life afterwards

A glass-covered option can also double as home décor after the day. If that's your style, a glass cake dome may give you a more flexible long-term piece than a formal wedding pedestal.

The hidden work in owning one

When couples buy, they often overlook transport, packing, cleaning, and storage. Large stands scratch. Glass chips. Metal tarnishes if stored badly. Multi-part stands can lose fittings. If you're already coordinating flowers, stationery, seating plans, and final payments, adding one more fragile item to manage isn't always worth it.

Renting tends to remove that admin and lets you choose the right piece for the job instead of the one you can live with afterwards.

Sourcing and Logistics in Cape Town and the Winelands

Good planning saves stress. The stand may be small compared with the rest of the wedding setup, but it touches several suppliers at once. Your baker needs dimensions. Your planner or coordinator needs setup instructions. The venue needs table placement confirmed. The hire company needs collection, return, or delivery details sorted properly.

Questions to ask before you confirm anything

A quick checklist keeps everyone aligned:

  • Ask your baker for the exact base measurement of the finished cake, not an estimate from an early sketch.
  • Confirm whether the cake will arrive assembled or be stacked on site. That affects stand placement and setup timing.
  • Check the venue surface in advance. Timber decking, uneven stone, and outdoor furniture all need closer attention.
  • Find out who is responsible for placing the cake on the stand. Never assume someone else has it covered.
  • Request a photo of the actual stand, not only a sample image from a catalogue.

Local logistics that matter more than people expect

Cape Town and the Winelands often involve travel between suppliers. A baker may be based in one area, the venue in another, and the hire collection point somewhere else again. Keep the stand journey simple where you can.

If the stand is glass, ceramic, or made of multiple parts, let the transport team know in advance. It should be packed separately, labelled clearly, and never tucked in beside décor crates and candle boxes without padding. If the venue is on a farm road or requires a longer setup walk across gravel or lawn, the day-of team should know that too.

The most reliable cake display is usually the one that was measured, packed, and assigned to a specific person before wedding week.

A simple day-of handover plan

The safest handover is straightforward:

  1. The stand arrives clean and checked.
  2. The table is placed and levelled first.
  3. The stand is positioned before the cake arrives.
  4. The baker or designated setup person places the cake.
  5. Final styling is added after the cake is stable.

That order prevents rushed adjustments with a finished cake already on top.

For couples planning weddings in Cape Town, Stellenbosch, Franschhoek, or Paarl, it helps to work with a local hire partner that already understands these venue conditions and the pace of wedding setup days. That local familiarity often matters just as much as the style of the stand itself.


If you're looking for wedding-ready cake stands and reliable event hire support in Cape Town and the Winelands, ABC Hire is a strong local option. Their range suits different venue styles, from elegant indoor receptions to practical outdoor setups, and they understand the logistics that make the day run smoothly. If you already have your cake design and venue in mind, it's worth checking availability early so your stand choice fits the look, weight, and conditions of your celebration.

Cooler Box Table: Your Guide for Cape Town Events

You're often closest to a cooler box table when an event starts going slightly wrong.

Guests drift toward the one staffed bar. A terrace drinks station runs dry because nobody wants to carry refills across gravel. The ice chest tucked behind a hedge does its job, but it looks like equipment rather than part of the event. In Cape Town and the Winelands, that problem shows up fast because venues are beautiful, spread out, and often designed for movement rather than centralised service.

A cooler box table fixes more than temperature. Used properly, it changes how people circulate, where they pause, and how much pressure lands on your main bar team. That's why event pros keep coming back to it for weddings, school functions, brand activations, birthdays, and informal corporate gatherings.

The Secret to Effortless Event Refreshments

A Paarl vineyard wedding usually looks effortless from the guest side. Sunset, soft lighting, a lawn full of conversation, and glasses constantly in hand. From the planning side, it's a different story. Drinks service has to keep moving across a site that was never built like a hotel bar.

That's where a cooler box table earns its place. Instead of one hard-working bar and a few unattractive ice chests hidden out of sight, you create smaller refreshment points that feel intentional. Guests don't need to abandon a conversation to fetch water, tonic, beer, or soft drinks. They reach for it where they're already standing.

A sophisticated group of people socializing with wine at an elegant vineyard sunset event.

Why this object works so well outdoors

The strength of the category is portability. The modern version traces back to 1951, when Richard Laramy created a recorded “portable ice chest”, a milestone in the shift away from heavy metal coolers and toward insulated consumer products, as noted in this history of the portable ice chest and cooler box evolution.

That background matters because Cape venues still present the same core challenge. You need cold drinks away from fixed refrigeration. On a lawn, by a ceremony site, next to a dance floor, or on a terrace with limited power, a portable insulated unit still beats a solution that depends on a plug point.

Practical rule: If guests must walk away from the social moment to find refreshments, your service layout is working against the event.

Why it feels smarter than a loose cooler

A standard cooler solves storage. A cooler box table solves service design.

It gives guests a surface to rest a glass, place a small plate, or gather around. That changes behaviour. People cluster naturally around a point that offers both refreshment and a place to stand. For planners, that means fewer dead corners and better use of in-between spaces such as terrace edges, lawn pockets, pre-reception zones, and informal lounge areas.

What doesn't work is using it like a hidden backup container. Once it disappears behind furniture, it loses half its value. The best results come when the unit is visible, styled, and positioned as part of the guest journey rather than an afterthought.

What Is a Cooler Box Table

At its simplest, a cooler box table is the Swiss Army knife of party furniture. It stores ice and drinks like a cooler, then converts into a usable table surface for guests. That dual role is what makes it so useful on event day.

A normal cooler chest asks you to choose function over appearance. A normal cocktail table asks you to solve drinks storage somewhere else. A cooler box table combines both, which is why it works so well in elegant but practical event setups.

A diagram illustrating a dual-purpose cooler box that transforms into a stylish cocktail table for events.

How the mechanism usually works

Most units follow the same basic logic:

  1. Insulated base that holds ice and beverages.
  2. Lift-up or telescoping lid that rises and locks into position.
  3. Stable top surface that acts like a side table or cocktail table.
  4. Easy access so guests can help themselves without unpacking the whole setup.

That matters because it removes clutter. You don't need a separate side table for glasses and a separate tub for cold drinks if one item can cover both jobs.

What problem it solves on real events

The value isn't just that it's clever. It's that it reduces friction.

A few examples make this clear:

  • At a wedding welcome area, it becomes a self-serve water and tonic station while still reading as furniture.
  • At a braai or private party, it works as a drinks point without adding another table to an already tight patio.
  • At a corporate activation, it creates a compact branded touchpoint that doesn't look like back-of-house equipment.

Guests treat a cooler box table differently from a loose cooler. They approach it, gather around it, and use it as part of the room.

What it is not

It's not a replacement for every bar format. If you're serving full cocktails, wine service, or high-volume spirits, you still need staffed bar infrastructure. It's also not ideal when the planner expects one unit to carry an entire event's beverage load from start to finish.

Where it struggles:

  • Formal plated service: It helps with support drinks, not table-by-table service.
  • Huge single-point demand: It's better distributed across a venue than overloaded in one location.
  • Poor styling choices: If it's overfilled, dripping, or ringed with empty bottles, it starts looking utilitarian.

The winning approach is to treat the cooler box table as a guest-facing service point. Not a substitute for planning, but a compact tool that makes planning look effortless.

Sizing and Technical Specifications for Planners

On site, the wrong size shows up fast. A unit that looks compact on a product page can block a path on a terrace, sit awkwardly on uneven lawn, or leave guests stooping for every refill. Good planning starts with how people will move around it, not with litres alone.

A useful benchmark is the Keter Cool Bar, which has a 49.5 × 49.5 cm footprint and a lid that extends 27 cm, according to the Keter Cool Bar product specification. For Cape Town and Winelands events, that compact base matters because it gives you another guest-facing refreshment point without asking the venue for a full bar footprint.

A descriptive infographic showing five key technical specifications and features for a multifunctional cooler box table.

Footprint and layout reality

A 49.5 × 49.5 cm base fits into the kind of spaces planners often need to activate. Patio edges, pool decks, ceremony exit routes, tasting room courtyards, and lounge pockets all benefit from a drinks point that does not dominate the floor plan.

That small footprint solves a service design problem. Guests get refreshments closer to where they are already standing, which reduces unnecessary trips back to a central bar and helps keep mingling zones alive. At dispersed venues, that matters more than raw storage volume.

For planners working through spacing and guest flow, the principles used in mastering wedding table design apply here as well. A cooler box table becomes part of the room plan, so you still need enough clearance for approach, opening height, and people gathering around it without pinching circulation.

Height and guest comfort

The 27 cm lid extension changes how the unit performs in use. Closed, it reads as a compact table. Opened, it becomes a practical standing-height service point for drinks, water, or mixers.

That is a strong fit for cocktail hours, outdoor ceremonies, and pre-reception lawns where guests are moving in short bursts and need somewhere convenient to set down a glass. It is a weaker fit beside low lounge seating or in narrow passages where the raised lid starts competing with people's shoulders and sightlines.

Ground conditions matter too. I treat lawn, gravel, cobbles, and timber decks differently because a cooler table only feels polished when the top surface stays stable once loaded with ice and bottles.

Capacity in service terms

Capacity should be read as service reach, not just storage. One patio-style cooler table in this category holds enough drinks for a small guest cluster, which makes it useful as a local support station rather than the main event bar.

That distinction saves planners from a common mistake. If one unit is expected to carry a whole function, guests queue, lids stay open too long, ice burns off faster, and the station starts looking picked over. If the same unit is assigned to a defined zone, such as a lawn game area, shuttle drop-off point, or welcome court, it works hard and still looks tidy.

A simple planning read looks like this:

Spec What it means on event day
Compact square footprint Easier to place near guest clusters without crowding the venue
Rising lid Better standing access and a more usable surface for quick drink service
Mid-size cooler cavity Best for satellite refreshments, water, mixers, or canned beverages

If you're weighing portable cooling against powered equipment, this guide to bar refrigerator sizes for event setups is useful for deciding when to use chilled back-up stock and when a cooler box table can handle guest-facing service on its own.

The sizing mistake planners make most often

Planners sometimes size the unit for how much stock they want on hand, instead of how the station will behave once guests arrive.

A cooler box table works best as a distributed service tool. Use it to shorten walking distance, support informal mingling, and relieve pressure on the main bar. For Cape Town events with terraces, lawns, and split-level venue areas, several well-placed units usually serve guests better than one oversized drinks point at the centre.

Styling a Cooler Box Table for Weddings and Corporate Events

Guests step off the shuttle in Franschhoek or drift out onto a Constantia lawn, and the first five minutes decide the mood. If the refreshment point feels awkward, people hover, wait, or head straight for the main bar. If it feels considered, they settle quickly, pick up a drink without friction, and start talking.

Function gets a cooler box table onto the floor plan. Styling makes it feel intentional, and that matters because this piece often sits in the exact zones where guest experience can either loosen up or stall.

A YETI cooler repurposed as a stylish table with a champagne bucket, flowers, and glasses in a vineyard.

For a Stellenbosch or Franschhoek wedding

At a wedding, the cooler box table works best as a small hospitality moment. Guests should read it in seconds. Water here. Spritz there. Garnish within reach. No hunting, no clutter, no uncertainty about whether they're allowed to use it.

The strongest setups keep the top surface disciplined. One low floral detail that matches the palette, one drinks direction, and glassware that belongs together is usually enough. Once couples start loading the surface with signage, mixed bottles, scattered fruit, and extra décor, the table stops helping service and starts looking like overflow.

A wedding-ready version often suits welcome drinks, post-ceremony mingling, or a late-night soft drink pocket away from the dance floor. In Cape Town and the Winelands, that distributed approach helps because guests rarely stay in one neat cluster for long. They spread across lawns, terraces, courtyards, and firepit areas.

Good choices for wedding styling include:

  • A single drink story: G and T, spritz, canned cocktails, still and sparkling water, or soft drinks
  • Restrained garnish: Citrus, rosemary, cucumber, or edible florals in small, tidy quantities
  • Matching glassware: One style reads better than a mix of leftovers
  • Clear social support: If the station needs a stronger mingling zone, pair it with nearby bar tables and chairs for events

I usually advise couples to style for guest behaviour, not for a photo alone. If 40 people are likely to pass through that area in 20 minutes, every decorative choice has to leave enough working room for lids, ice, bottles, and hands.

For a Cape Town corporate function

Corporate events need a cleaner read. The cooler box table should support movement and conversation, especially at launches, terrace networking sessions, and split-room functions where the main bar cannot carry every interaction.

Branding works best when it is controlled. Use one brand colour, one concise message, and products that make sense together. Branded water, premium soft drinks, or canned mixers usually perform better than a mixed assortment that feels like leftover stock from three suppliers.

What works well:

  • Brand colour blocking
  • Neat, repeated product facings
  • Minimal top styling
  • A station purpose guests understand immediately

What tends to fail:

  • Too much branding, which makes the setup feel promotional instead of hospitable
  • Stock that does not match the tone of the event
  • Styling that ignores service flow and leaves no room for guests to serve themselves comfortably

There is also a planning benefit here. A well-styled cooler box table creates an informal refreshment node without the cost and footprint of a full secondary bar. For teams solving event planning challenges, that is often the difference between a room that bottlenecks and one that keeps moving.

A cooler box table should sharpen the service idea of the space. If guests can tell what it is for, reach it easily, and feel comfortable lingering nearby, the styling is doing its job.

Smart Placement and Logistics for Cape Town Venues

Placement decides whether a cooler box table feels well-integrated or pointless.

On Cape Town events, the best use is rarely “put it somewhere with drinks.” The better question is where guests naturally slow down, gather, or break away from the main crowd. That's where the unit starts working for you. It should intercept movement, not compete with the main bar.

Use it as a hydration station, not a backup bin

In event supply discussions, the cooler box table is increasingly framed as a hydration station that can “relieve the need for additional staff” at self-serve functions, a practical angle noted in this roofed cooler-box station reference. That's especially useful for Cape Town and Winelands events where labour budgets, long walking distances, and queue management all matter.

That doesn't mean replacing your bar team. It means protecting them from low-value interruptions such as repeated water requests, canned soft drinks, or basic self-serve refreshments.

The placements that work best

A cooler box table performs well in these zones:

  • Ceremony-to-cocktail transition areas: Guests arrive thirsty and don't want to join a queue immediately.
  • Dance floor edges: A quick grab point keeps people in the energy of the room.
  • Outdoor lounges and terraces: These spaces often feel detached from the main service point.
  • School function foyers or courtyards: Students and parents move constantly, so decentralised drinks access helps.
  • Brand activation pockets: One central bar often creates a dead queue rather than conversation.

For planners wrestling with broader movement, timing, and setup issues, this article on solving event planning challenges through logistics thinking is a useful companion because it looks at flow as a systems problem, not just a checklist.

Local venue realities that change the setup

Cape venues are rarely neutral boxes. Wine farms have gravel, lawns, and uneven transitions. Heritage buildings have tight doorways and awkward corners. Coastal properties bring wind and salt into every practical decision.

That means the cooler box table should be placed with a few essential considerations in mind:

Placement check Why it matters
Level surface A raised lid needs a stable base
Clear access around the unit Guests shouldn't crowd a narrow passage
Shade where possible Better for guest comfort and easier service management
Visible but not central It should support the room, not hijack it

A common mistake is placing one right beside the main bar. That usually adds clutter without reducing pressure. Move it to the outer ring of activity and it starts doing real work.

Your Cooler Box Table Rental Checklist and FAQs

Hiring a cooler box table is straightforward when you ask the right questions. Most problems don't come from the concept. They come from poor fit, tired units, or vague delivery planning.

For outdoor Cape events, material durability matters more than many clients realise. Finishes, fasteners, trim, and cladding need to cope with sun, transport, and coastal air. The material discussion around a practical build using stainless steel fittings and an aluminium top in this outdoor cooler box build example points to the core issue. Longevity depends on what the unit is made from, not just how it looks on day one.

Cooler Box Table Rental Checklist

Checklist Item Why It Matters
Ask how the units are cleaned between hires Guest-facing drink stations need to arrive hygienic and presentation-ready.
Confirm whether the lid locks securely in table mode A table surface that feels loose creates risk in busy mingling areas.
Check the material finish for outdoor use Sun, transport, and moisture expose weak finishes quickly.
Ask about metal fittings and fasteners Coastal air is hard on poor-quality hardware.
Confirm delivery access at the venue Farms, stairs, gravel paths, and narrow passages can complicate setup.
Ask whether drainage and emptying are simple Breakdown should be fast, especially on short turnaround events.
Clarify whether it's best used for self-serve or staffed support The answer affects placement, stock, and guest flow.
Plan backup cooling if the event has long service hours Portable cooling supports service well, but it still needs refill logic.

If your event includes multiple beverage zones, it also helps to understand how portable cooling fits alongside larger cold-storage options such as mobile fridge hire for events.

FAQs planners actually ask

How long does the ice last

That depends on weather, stock rotation, lid use, and how often guests open the unit. There isn't one fixed answer that suits every event. In practice, planners should treat a cooler box table as a service point that needs replenishment planning, especially on warm outdoor functions.

Can it be used for food

It's best thought of as a beverage and hydration solution unless the hire company specifically confirms suitable food-safe use for your application. On most events, drinks are the cleaner and more reliable role.

Is it formal enough for a wedding

Yes, if it's styled properly and placed with intent. It looks elegant when it forms part of a drinks experience. It looks temporary when it's treated like hidden storage.

Is it worth using if there's already a main bar

Usually, yes. Its value is in reducing unnecessary trips and queues, especially for water, canned drinks, mixers, and informal grab-and-go service.

The smartest hires are the ones guests barely notice as equipment. They just experience the event as smoother.

A cooler box table does exactly that when the planner uses it to shape movement, reduce bar congestion, and create natural social pockets.


If you're planning an outdoor wedding, corporate function, school event, or private celebration in the Cape, ABC Hire can help you choose the right furniture and service pieces for a cleaner, smoother setup. Ask for a quote based on your venue layout, guest flow, and beverage plan, not just a product list.

Planning Cape Town Events: Your Guide to T Pee Tents

You're probably balancing two competing pictures right now. One is the event you want your guests to remember: mountain views, warm lighting, open air, a structure that feels more special than a standard marquee. The other is the practical reality of Cape Town and the Winelands: wind that can arrive without warning, farm roads that don't suit large delivery vehicles, venue rules, and the need to keep everyone comfortable from midday heat into a chilly evening.

That's exactly where T pee tents work well, provided they're planned properly. They're striking, flexible and well suited to outdoor functions, but they are not a drop-and-go product. In the Western Cape, the success of a teepee event depends on sizing, site choice, access, anchoring, layout and weather management.

Used well, a teepee becomes both your shelter and your centrepiece. Used badly, it becomes a beautiful idea fighting the site all day. The difference is in the planning.

Why Teepee Tents Are Perfect for Cape Town Events

Cape Town events ask more from a structure than many other destinations do. It needs to look exceptional against vineyards, mountains, lawns and courtyards. It also needs to adapt to changing light, moving wind, uneven terrain and a guest experience that often shifts from ceremony to drinks to dinner to dancing in one setting.

That's why T pee tents have become such a strong fit locally. They don't read like temporary infrastructure in the way some conventional tents do. They feel architectural. The cone shape, high headroom and open-plan interior create a room with presence, which matters when the venue backdrop is already doing a lot of visual work.

They suit the way Cape events are styled

A Winelands wedding often wants softness, warmth and texture rather than a rigid corporate shell. A brand activation in Cape Town often needs a structure that photographs well from every angle and can be configured around product displays, lounges or service zones. A private celebration may need to feel relaxed but still polished.

Teepees handle that mix well because the interior doesn't force one layout style. You can keep it formal with banquet tables, loosen it up with long harvest tables, or build in lounge pockets and a dance floor without the space feeling chopped up.

Practical rule: If the brief calls for “outdoor, but elevated”, a teepee usually makes more visual sense than a standard white tent.

There's also a wider shift behind this. The global camping tent market was valued at about USD 5.7 billion in 2023 and is projected to reach USD 10.9 billion by 2033, with 6.7% CAGR, according to camping tent market research published by Market.us. For Cape Town planners, the useful takeaway isn't retail camping. It's that guests and clients increasingly respond to outdoor-living formats that feel spacious, distinctive and quick to install.

They do more than look good

The appeal isn't just aesthetic. The tipi format has been used for centuries, and modern versions still rely on the same core ideas: a central pole system, a shape that sheds weather well, and a roomy interior. For events, that translates into usable vertical space, cleaner sightlines and more freedom with décor.

A few local event types where they work particularly well:

  • Vineyard weddings because the silhouette complements the natural setting rather than competing with it.
  • Corporate launches where branding, bars and lounge zones need to sit in one coherent environment.
  • Matric dances and private functions where guests want something more memorable than a standard hall setup.
  • Garden celebrations where the structure needs to feel soft and premium, not bulky.

Where they outperform standard options

Traditional marquees still have their place. If your site is tight, fully paved, or heavily constrained by neighbouring structures, another format may be easier. But for many outdoor venues around Stellenbosch, Franschhoek, Paarl and the southern suburbs, a teepee offers something marquees often don't: atmosphere built into the structure itself.

That matters because when the tent already creates mood, the rest of the budget works harder. Lighting looks better. Furniture feels more intentional. The event starts with character before the first floral installation is even hung.

Selecting the Right Teepee Size and Capacity

A planner calls a week before a Stellenbosch wedding and says, “We have 80 guests, so one big teepee should do it.” Sometimes it will. Often it will not, especially once you account for a bar, a DJ, a gift table, catering access, and enough circulation for guests in heels carrying wine glasses on an uneven farm site.

That is the primary sizing question in Cape Town and the Winelands. Capacity is never only about guest count. It is about how the event needs to work on the ground, and how much margin you want once weather, service, and site constraints start putting pressure on the layout.

Plan for usable space, not brochure capacity

The quickest way to undersize a teepee is to buy according to the maximum number and ignore the event format. A seated dinner, a cocktail launch, and a tasting event can all use the same structure very differently.

Ask these questions first:

  • Will guests be seated for a full meal or mostly standing?
  • Do catering staff need to serve inside the tent?
  • Will the bar sit under cover or outside?
  • Is there a dance floor, stage area, DJ booth, or lounge grouping?
  • Does the venue need clear access routes for staff, suppliers, or emergency exit points?
  • Can any support functions sit outside without exposing guests or equipment to wind?

Those answers usually change the size decision more than the guest list does.

Match the teepee to the event format

Use this table as a practical starting point, then adjust for layout and site conditions.

Teepee Diameter Seated Guests (Banquet Tables) Standing Guests (Cocktail Event) Best For
Small Intimate seating with room to spare for styling Compact standing gatherings Proposals, small birthdays, lounge areas, children's sleepover styling
Medium Mid-sized seated events with careful table planning Comfortable cocktail flow Private celebrations, small brand events, ceremony cover
9 m Around 40 seated Higher standing capacity with simpler furniture layouts Weddings, dinners, tasting events, activation hubs
Large multi-teepee setup Depends on how units connect and where support areas sit Strong for high-volume guest movement Larger weddings, launches, festival-style events

As a working benchmark, suppliers such as Native Teepees list a 9m giant hat teepee at around 40 seated guests. That figure is useful, but only as a starting point. Round tables, a central feature, or a dance floor will reduce practical capacity fast.

In the Winelands, I would rather see a tent feel generous than watch staff and guests fight for space all evening.

Three decisions that usually change the size

Dining style

Round banquet tables take more room once chairs are pulled back and service starts. Long harvest tables can use space more efficiently and suit vineyard settings well, but only if spacing is disciplined and there is still room along the edges. If guests have to squeeze past seated diners, the layout is too tight.

Event rhythm

Some events need one static layout. Others shift through welcome drinks, dinner, speeches, and dancing. That changeover needs open floor area and clean circulation. If the room has to transform during the event, size up early instead of trying to force too many functions into one footprint.

Site logistics

Cape Town tent planning is rarely just about what fits on paper. Access roads at farms can be narrow. Certain lawns are softer than they look. Some venues want structures positioned away from irrigation lines, vines, or heritage features. A permit or venue sign-off may also dictate where the tent can sit, which can limit usable diameter or require linked units rather than one larger structure.

One teepee or multiple connected units?

A single teepee often works well for intimate events where everyone shares one central room. Connected teepees are usually the better answer for larger guest numbers or more layered briefs.

They let you separate functions clearly. Dining in one section, lounge and bar in another, service tucked to one side. They also help on awkward sites where trees, slopes, farm tracks, or existing buildings interrupt the ideal footprint.

For planners still comparing structures, it helps to review different types of tents for events before committing to a teepee layout. Some sites in the Western Cape suit a peg-and-pole structure beautifully. Others are better served by a different system.

A practical rule for Cape Town events

If the event includes seated dining, styling, and any dancing under cover, choose the next size up from your first estimate.

That extra room pays for itself. Service runs better, the tent photographs better, and guests feel relaxed instead of compressed. In a region where wind can force more activity under cover than planned, that margin is not indulgence. It is good event planning.

Designing Your Floor Plan and Interior

Once the structure is chosen, the tent stops being a product and starts becoming a room. That shift matters. People don't experience diameter measurements. They experience arrival, movement, comfort, temperature, acoustics and whether the space feels easy to use.

The strongest teepee interiors aren't overdesigned. They're organised.

Start with zones, not furniture

Before placing a single table, define what the room needs to do. Most Cape Town and Winelands events need some combination of these zones:

  • Arrival zone where guests first step in and get the visual impact
  • Main social zone for dining, speeches or central activity
  • Service edge for staff movement, bar access or catering support
  • Atmosphere pockets such as lounges, cake display, gifts or photo moments

That approach prevents the common mistake of pushing everything to the perimeter and leaving a dead centre. In a teepee, the centre often wants intention. Sometimes that means a statement floral installation. Sometimes it means a dramatic dance floor. Sometimes it means preserving openness so the roofline can do the work.

A luxury-style interior often leans into warm materials and soft textures:

A cozy, sunlit interior of a luxury teepee tent featuring a comfortable bed, wooden decor, and scenic landscape views.

Three floor-plan approaches that work

Formal wedding layout

Place dining as the dominant function, with a clear focal point for speeches and the couple. Keep the central area open enough that guests can still read the shape of the tent. If there's dancing later, allow furniture that can be removed without rebuilding the room.

Corporate presentation layout

Keep sightlines disciplined. A teepee can look relaxed, but for launches or internal functions the audience still needs to see and hear clearly. Put presentation infrastructure on a strong axis and avoid cluttering side zones with furniture that interrupts flow.

Relaxed celebration layout

This works well for birthdays, engagement parties and brand socials. Use scattered cocktail tables, mixed seating heights and lounge clusters. The trick is to make it feel effortless while still protecting circulation between bar, loos, entry and service points.

Flooring and comfort choices matter more than people think

A teepee over grass can look beautiful and still be uncomfortable if the floor is uneven, damp or dusty by mid-event. Flooring isn't just aesthetic. It changes the way heels, catering equipment and dance traffic behave.

Consider these decisions early:

  • Matting or natural-look flooring if you want a softer, rustic finish
  • A firm dance floor insert if dancing is part of the programme
  • Defined thresholds at the entrance so guests don't drag mud or dust into the main area
  • Cable planning before floor finishes go down

The interior should feel intentional from the first step inside. Guests notice underfoot comfort immediately, even if they never mention it aloud.

Plan for temperature, not just style

Cape events often begin in sunshine and end in cool air. In summer, heat buildup can become a problem during setup and early guest arrival. In the Winelands, evenings can turn cold quickly once the sun drops behind the mountains.

That means climate control should be built into the design, not added as an apology later. Practical options include discreet heaters for evening functions, fans for warmer daytime events, and vent management that supports airflow without disrupting the room visually.

A polished teepee interior usually gets four things right at once:

  1. Clear movement paths so guests and staff never fight the layout.
  2. Balanced furniture density so the room feels full but not packed.
  3. A central visual idea that gives the tent identity.
  4. Comfort infrastructure such as flooring, heating or airflow planning.

When those are resolved early, décor becomes easier. You're styling a functional room, not trying to hide a bad layout with pretty objects.

Mastering Setup and Wind Safety in the Western Cape

The wind picks up at 2 pm, right as the florist starts dressing the entrance and guests are due in three hours. That is a normal Cape Town event scenario, not bad luck. On coastal venues, exposed farms, and many Winelands properties, wind planning needs to be built into the teepee install from the start.

A teepee handles wind better than many flat-sided structures because of its shape, but shape alone does not make a site safe. Good results come from the basics being done properly: suitable ground, correct anchoring, even cover tension, and enough working space around the tent for adjustments during setup and service.

A traditional canvas tipi tent standing in a scenic high desert landscape with mountains in the background.

The site determines the install

In the Western Cape, I would rather have a good site with an average view than a dramatic site that fights the structure all day. Teepees need clear perimeter space beyond the visible footprint so crews can tension the cover properly, manage flap rods safely, and return to access points if conditions change. If the tent is squeezed between hedges, walls, planters, or parked vehicles, the install becomes harder and the margin for error gets smaller.

That point gets missed often at vineyards and private homes. A planner measures the internal floor area and assumes the tent will fit. The working footprint is larger, and that extra room matters once the weather changes.

What causes trouble on Cape Town and Winelands sites

Vineyard access affects setup quality

Some of the best-looking Winelands venues are the hardest to build on. Narrow farm roads, soft lawn edges, hidden irrigation, low tree branches, and long hand-carry distances all slow the crew down. If installation equipment cannot get close enough to the final position, the job takes longer and setup options become more limited.

Wind exposure changes from one corner of a property to another

A lawn can look perfect at a site visit and still behave badly in wind. I see this often on estates where buildings create wind tunnels or where an otherwise level area sits on an exposed edge. Sandy ground and soft soils also reduce anchoring confidence, especially after irrigation or recent rain.

Uneven tension shows up later

Many teepee problems are not frame failures. They start with tension that is slightly off during installation, then worsen once gusts build through the afternoon. A cover that is carrying load unevenly will move differently across the structure, and that is when flapping, stress points, and water ingress become more likely.

On a windy Western Cape site, the real question is whether the teepee has been installed for that specific ground, exposure, and access constraint.

Required checks for Western Cape setups

Ask your supplier these questions before you confirm the booking:

  • Has the team inspected the actual setup area? Venue photos are useful, but they do not show soil condition, slope, hidden services, or wind exposure properly.
  • What anchoring method suits this surface? Pegging, weighting, and backup restraint planning depend on the ground.
  • How much perimeter must stay clear? Operational space should stay free of furniture, florals, bars, and signage.
  • What is the weather plan if strong wind is forecast? The answer should cover timing, site changes, and what adjustments can be made safely.
  • How is an exposed site handled differently? Coastal lawns, ridgelines, and open vineyard positions often need more conservative planning.

For planners weighing alternatives on difficult sites, this guide to heavy-duty gazebos for outdoor events is useful. Some locations are better served by a different structure.

Permits, venue rules, and access timing matter too

Cape Town and Winelands events often run into practical limits that have nothing to do with aesthetics. A venue may restrict vehicle movement across lawns, require protection over irrigation routes, or limit installation windows around guest check-ins, tasting-room trade, or neighbouring functions. On municipal or public-facing sites, permit requirements can also affect where and when a structure can be erected.

These details change the installation plan. They also affect safety, because rushed crews and compressed build windows leave less room to correct avoidable site issues.

Wind planning also protects the guest experience

A well-installed teepee feels calmer. You get less movement in the cover, fewer draughts through the wrong openings, and better protection for lighting, tables, and service areas. That matters at weddings and private events, where guests may never notice the engineering, but they notice discomfort immediately.

Keep these habits in place on the day:

  1. Keep the perimeter clear. The crew may need access points during final adjustments.
  2. Check anything attached to the structure. Signage, draping, floral work, and lightweight décor all add wind behaviour.
  3. Report changing conditions early. The venue coordinator, planner, and tent team should stay in contact if the wind strengthens.

The best Cape teepee events look effortless because the hard decisions were made early, with the site, the weather, and the logistics treated seriously from the start.

Lighting and Décor Ideas to Style Your Teepee

A teepee doesn't need excessive decoration. It already brings shape, height and texture into the event. The best styling uses that structure rather than hiding it.

I've seen the strongest results come from a simple principle: let the canopy stay visible, then add layers that warm it up. When decorators try to fill every line of sight, the room loses the calm, dramatic quality that makes teepees special in the first place.

Use light to define mood and architecture

Lighting should do two jobs at once. It must make people look good, and it must reveal the shape of the tent after sunset. Warm overhead glow, focused accents and low-level ambient light usually work better than one harsh wash.

This visual guide captures the kind of details that soften and enhance a teepee interior:

An educational infographic showing six essential decor and lighting ideas for styling a cozy teepee tent.

A few combinations work especially well:

  • Pole lighting with warm fairy lights to draw the eye upward and create softness overhead
  • Lanterns and table lighting to make dining areas feel intimate rather than cavernous
  • Uplighting at key points if you want to highlight the teepee geometry without flattening it
  • Lounge-area accent lighting so quieter corners feel intentional at night

If you want a softer, romantic treatment for weddings and evening functions, fairy light curtain ideas for events are useful inspiration for layering glow without overpowering the space.

Soft light at multiple heights almost always beats one bright source in the middle of the room.

Styling examples that suit local event briefs

Winelands wedding

Keep the palette grounded. Timber tones, woven textures, layered rugs, candles or lantern-style lighting, and restrained florals tend to suit the setting. The tent should feel connected to the setting, not imported into it.

Modern brand activation

Contrast works well. Pair the natural canvas and rope textures with clean furniture, tighter colour control and a stronger lighting scheme. A contemporary lounge inside a rustic shell can look sharp when the branding is disciplined.

Private party or milestone celebration

Use the teepee to create atmosphere pockets. A bar at one edge, low seating in one corner, a dance area in the centre and warm decorative lighting overhead can make the event feel full of discovery without becoming cluttered.

Decor that works and decor that doesn't

What works:

  • Natural botanicals that echo the outdoor setting
  • Sheer draping in small doses to soften edges
  • Rugs and layered textures to define zones
  • Furniture with presence rather than lots of small filler items

What usually doesn't:

  • Too many hanging elements that fight for the same visual space
  • Heavy décor at the perimeter where operational access may still be needed
  • Cold white lighting that makes the canvas look flat
  • Overfilling the floor so the structure disappears behind furniture

A teepee is at its best when guests can still register the volume of the space. Leave some air in the design. The room should glow, not groan under styling.

Your Cape Town Teepee Rental and Logistics Checklist

Most teepee problems don't start with the tent. They start with assumptions. Someone assumes the access road is fine. Someone assumes the venue allows stakes. Someone assumes the supplier's cleaning standards are obvious. Someone assumes power can be pulled from the nearest building. Event day is the wrong time to test any of that.

A good rental process is a checklist process.

Questions to settle before you book

Start with the venue and the site itself. Then move to the structure.

  • Access: Can delivery vehicles reach the setup area easily, or is there a long manual carry from the parking zone?
  • Ground permission: Does the venue allow pegging and anchoring in that specific area?
  • Power: Where will lighting, catering support, sound and climate-control equipment run from?
  • Timing: How early can setup begin, and how late can breakdown happen?
  • Weather plan: What happens if conditions change close to the event date?

For public spaces or highly controlled venues, also check permit requirements early. On farms and estates, ask one extra question: who gives final approval on exact placement? It's not always the same person who signs the booking.

Hygiene, fabric care and repeat-use rentals

This matters more than many clients realise, especially for children's parties, school functions and public-facing events. Fabric structures are reused, transported, packed and reopened across different environments. You should ask directly about cleaning and sanitation between hires.

That's not fussy. It's responsible. Guidance around repeat-use fabric structures highlights the importance of asking about cleaning and sanitation protocols between hires to support hygiene and indoor air quality, especially for children's parties and public gatherings, as discussed in teepee care guidance from Colorado Yurt Company.

Ask what gets cleaned, how it's dried, how it's stored and what happens if the canvas comes back damp from a previous event.

A practical event-week checklist

Venue confirmation

Reconfirm the exact setup area, access route and contact person on site. Don't rely on an old pin drop or a verbal description from weeks ago.

Supplier coordination

Make sure all vendors are working from the same floor plan. The florist, furniture team, lighting crew and caterer should not discover the layout for the first time on arrival.

Weather review

Check conditions and revisit the site plan if the forecast changes. Exposed lawns, open vineyards and coastal locations often need a sharper eye in the final days.

Service logistics

Confirm toilets, waste handling, staff movement and pack-down timing. A refined event still depends on basic operational discipline.

What a smooth booking usually includes

A strong teepee booking process should cover these practical items clearly:

  1. Site suitability
  2. Tent size and intended layout
  3. Installation timing
  4. Anchoring method
  5. Furniture and flooring coordination
  6. Weather response
  7. Cleaning expectations
  8. Breakdown access and timing

When those are settled early, the tent becomes easy to work with. When they're left vague, even a stunning setup can become stressful behind the scenes.


If you're planning a wedding, launch, matric dance or private celebration in Cape Town or the Winelands, ABC Hire can help you build the full event environment around the right structure. From furniture and LED pieces to climate-control equipment and practical event essentials, the team supports polished outdoor setups that look exceptional and run smoothly.

Small Round Table Guide for Cape Town Events

You've probably had this brief before. The venue is beautiful, the client loves the look, and then the floorplan lands in your inbox and everything gets awkward. The farmstead dining room has thick walls and narrow pinch points. The courtyard is charming but uneven. The marquee has poles exactly where you don't want them. Or the city venue looks generous online, then feels tight the moment you start placing chairs.

That's where the small round table stops being a filler item and starts doing real work. In Cape Town and the Winelands, the right small table can rescue circulation, soften a rigid room, and make guests feel more comfortable without making the event look improvised. It's one of those pieces that planners tend to underestimate until a difficult venue reminds them why shape matters.

Why a Small Round Table is Your Secret Weapon

A small round table earns its keep in spaces that aren't perfectly square, perfectly flat, or perfectly forgiving. That describes a lot of Western Cape venues. Historic farm buildings often have awkward corners, old thresholds, and support elements that punish rigid layouts. A round table gives you more freedom to shift, rotate, and open up traffic lanes without the whole room looking off-balance.

It also changes the way people behave. Guests don't have to negotiate “head” positions, and conversation starts more naturally when everyone sits on an equal curve. At a wedding in Franschhoek, that matters. At a CBD brand launch where people are circulating between drinks, canapés, and short conversations, it matters just as much.

Why planners keep coming back to them

Its value isn't only visual. It's operational.

  • They fit difficult rooms better: Small rounds slide into alcoves, between poles, and beside dance floors with less visual heaviness than square or rectangular options.
  • They encourage interaction: Guests can make eye contact more easily, which helps at intimate dinners, networking events, and private celebrations.
  • They soften the room: In venues with lots of stone, glass, steel, or timber, a circular top breaks up hard lines and makes the setup feel less formal.
  • They adapt well: You can use them for two guests with drinks, for a three-person seated setting, or as part of a mixed-format event.

Practical rule: If the venue feels tighter in person than it did on the site visit photos, a small round table usually gives you more recovery options than a hard-cornered layout.

There's also a styling advantage. A small round table can look polished with very little on it. A cloth, a low arrangement, the right chair, and suddenly the setup feels deliberate instead of sparse. If you're comparing timber options and finishes, a good reference point is this guide to a wood round table for events.

For planners who work across weddings, matric dances, launches, and home functions, that versatility is the secret. One furniture choice solves layout, flow, and atmosphere at the same time.

Sizing and Spacing Your Tables Correctly

You feel spacing mistakes fastest at guest level. A chair clips the waiter carrying mains. Someone near the barn door has to stand to let the row behind them out. On a calm floorplan, everything looked fine. In a real Cape Town or Winelands venue, especially one with thick walls, uneven patios, or a breeze pushing people under cover, that layout can tighten up very quickly.

A measuring tape sits on a small round table in a room filled with identical tables.

The fix starts with footprint, not guest count. I plan small rounds by the space they occupy once chairs are pulled out and staff are moving, not by the maximum number a brochure says they can seat. That matters even more at older Stellenbosch and Franschhoek properties where door openings are narrow, verandas steal usable width, and one support pillar can ruin an otherwise tidy grid.

For Cape Town event rentals, a practical method comes down to three checks. Allow enough room for chair pull-out and proper walkways, as noted in this table and chair rental layout guide. Match the diameter to how guests will use the table. Then test the pressure points near doors, bars, buffet lines, and dance floors, because those are the first places a pretty plan fails.

Start with the working footprint

A small round table always needs more room than the top suggests. The timber or cloth edge is only the centre of the problem. Chairs, handbags, servers, camera operators, and guests standing to greet each other are what turn a compact setup into a congested one.

In practice, a 900mm round usually suits two to four guests, and three feels comfortable if there are proper place settings, glassware, and a centrepiece. A 1200mm round can take four to six, but it needs more breathing room around it and gets awkward quickly if the venue has tight circulation. I use 900mm rounds often for tasting rooms, courtyards, and side sections of larger receptions because they give more recovery options if the room starts feeling crowded.

Table Diameter Cocktail Standing Seated Guests (Comfortable) Required Floor Space (incl. clearance)
760mm 2 Not ideal for full dining Allow for standing circulation and service access
900mm 2 to 4 3 Allow for chair pull-out plus walkway space
1200mm Limited use for standing 5 Needs a wider operating footprint than 900mm

Plan the room in the right order

I pressure-test layouts in this sequence:

  1. Mark fixed obstacles first
    Doors, fireplaces, bars, service stations, stages, poles, DJ booths, heaters, and garden steps decide the layout before the tables do. Historic farm venues are notorious for this. The room may be charming, but alcoves and old wall thickness can steal usable metres.

  2. Draw guest and staff routes
    If staff and guests are forced into the same narrow path, service slows and the room feels busy. This gets worse in the Winelands during winter when everyone drifts indoors, and in summer when the Cape Doctor pushes outdoor guests toward sheltered edges.

  3. Place the smallest table that still fits the event
    A 900mm round usually buys cleaner movement than a larger top. That extra bit of clearance matters more than planners expect, especially near dance floors and on patios where chair legs can catch on grout lines or lawn edges.

  4. Check edge cases by hand
    Open the chair positions properly. Stand where a server would stand. Test the route to the bathroom and bar. A plan can pass on paper and still fail once real bodies start moving through it.

Tight layouts usually break down at the edges. Corners, thresholds, buffet approaches, and the first row beside the dance floor are where guests notice bad spacing first.

Match the size to the event format

Different functions need different tolerances. A seated dinner needs elbow room and service access. A brand launch or wine tasting can run a little tighter if guests are circulating. A wedding in a cellar or farmhouse dining room often needs a mixed approach, with some fully seated tables and some lighter satellite rounds near the perimeter.

Use 900mm rounds where conversation matters and the room is doing you no favours. Use 1200mm rounds only if the venue can carry the extra chair movement without pinching walkways. For mixed-format events, small rounds work best as pockets of seating, not a dense field of identical tables.

That is usually the difference between a room that feels intimate and one that feels cramped.

Choosing Your Table Style for Cape Town Events

The table that looked perfect in a showroom can fail badly at a Cape Town venue. I see it most often at sea-facing properties, courtyard receptions, and old Winelands farmsteads where the setting is beautiful but the conditions are hard on furniture. Salt in the air, damp morning setup windows, hot afternoon sun, and the Cape Doctor all expose weak finishes and light bases very quickly.

Three distinct small round tables with drinks placed on a stone patio overlooking the blue ocean.

Style choice starts with the venue, not the mood board. At an old Stellenbosch manor with narrow doorways and uneven stone, I would rather use a simpler table that carries safely and stands firm than a prettier piece that arrives scratched and wobbles by canapés. In my experience, a surprising amount of rental stock looks good in photos but struggles once it has to be loaded in, set on imperfect surfaces, and left outdoors for six hours.

Timber tops for warmth and character

Timber works well in the Winelands. It suits cellar doors, barns, garden lunches, and farmhouse courtyards where you want texture without heavy linen. A good timber small round table can also carry a table setting with less decoration, which helps if the room already has enough character.

The trade-off is condition control. Poorly sealed timber marks easily from chilled glasses, shifts with temperature swings, and can pick up wear fast during summer season. At venues in Franschhoek or Paarl, that matters even more if the tables are set the night before or exposed during a long build.

Ask what finish is on the top. Ask how often the stock is refinished. Ask whether the rental company uses protective pads during transport. Those details tell you more than the product photo.

Metal and mixed-material tables for harder-working setups

For corporate functions, gallery spaces, and brand events, metal-base tables usually make service easier. They read cleaner, sit comfortably with monochrome or branded palettes, and generally cope better with frequent handling. I also prefer them for venues in the CBD where load-in often involves lifts, ramps, and tight turnaround times.

But metal is only as good as its coating and hardware. Cheap powder coating chips. Base plates rust around the bolts. Adjustable feet seize up if they are neglected, which is a real problem on old paving or sloped terraces. A heavier base is usually worth the extra handling time if the event is outdoors or exposed to wind.

Style Best fit Strength Watch for
Timber small round table Weddings, private dining, farm venues Warmth, texture, softer visual feel Surface movement and marking if the finish is poor
Metal-base round table Corporate events, city venues, activations Clean lines, dependable rental performance Rust, chipped finishes, weak hardware
Acrylic or LED feature table Night events, parties, branded moments Strong visual impact Weather exposure, visible scratches, power planning

A premium look means very little if the table rocks during speeches or shifts every time a guest rests an elbow on it.

When feature tables make sense

Feature tables work best in controlled doses. One or two can define a lounge pocket, a VIP area, or a branded drinks zone without making the whole floor feel busy. That approach suits Cape Town venues especially well because many of them already have strong architectural character, from rough plaster walls to old oak beams to mountain-facing terraces.

Contrast usually does the heavy lifting. A crisp modern top can sharpen an old farm venue. A warmer textured top can soften a contemporary space in Woodstock or on the Atlantic Seaboard. The right call depends on what the room already gives you, and what the weather is likely to do on the day.

For exposed sites, practical performance comes first. If the event sits near the coast, on gravel, or on heritage paving, choose the table that stays stable, carries cleanly, and still looks good after setup. That is usually the better style choice in the Western Cape.

Creative Layouts for Intimate Conversations

A small round table earns its keep when guests can settle into a real conversation without feeling stranded from the rest of the room. In Cape Town and the Winelands, that usually means working around awkward old walls, deep verandas, uneven courtyards, and wind that shifts guest behaviour by the hour. A layout that looks balanced on paper can feel tight, exposed, or underused once the South Easter starts pushing people off the terrace and back inside.

A modern restaurant interior featuring small round tables with green velvet chairs and refreshing citrus drinks.

For short-stay seating, keep the scale honest. A 760mm cocktail table suits 2 people for a close conversation. A 900mm round works for 3 to 4 guests if they are standing or sitting briefly between speeches, tastings, or networking loops. On old farm paving, quarry tile, or cobbles, choose tables with adjustable levellers. That is not a luxury extra in the Western Cape. It is the difference between a table that stays planted and one that rocks every time someone puts down a wine glass.

The constellation layout for weddings

This layout works well in long barns, courtyards, and werf-style spaces where a rigid grid makes the room feel too formal. Instead of lining up every table perfectly, place small rounds in loose clusters with slight offsets between them. The room immediately feels softer, and conversations happen in smaller, more natural pockets.

It also helps with sightlines. Guests still catch the couple's table, the dance floor, or the mountain view, but they do not feel parked in rows.

I usually leave more open centre space than the planner first expects. At Boschendal, Cavalli, or an older Stellenbosch farmstead, that buffer gets used fast by photographers, servers, and guests drifting toward the action. If you close it up too early, the room feels blocked long before dinner starts.

Clustered rounds for launches and networking

For launches, tastings, and mixed-format corporate events, clustered rounds usually outperform fully seated plans. Guests need a place to stop, put down a drink, and speak without committing to one spot for the whole event. The trick is to create pockets, not obstacles.

A practical setup looks like this:

  • Use 760mm tables near bars, tasting stations, or activation points for quick two-person chats.
  • Set 900mm rounds just off the main traffic line so groups can gather without clogging service routes.
  • Build pause zones near branding moments or view lines but keep entrances and venue pinch points clear.
  • Use weighted bases or sheltered positions outdoors if the Cape Doctor is likely to hit the terrace.

Guests do not read a floorplan the way planners do. They notice whether a space lets them stop comfortably, rejoin the flow easily, and avoid standing in the wind with a full glass.

If the event includes linen, table spacing needs even more discipline. Full-drop cloths can visually bulk up a layout and tighten walkways faster than many planners expect. This guide to choosing a round table cloth for event use is useful if you are balancing look against clearance.

Cabaret curves for presentations

In venues with a speaker, panel, or tasting host, small rounds work well in a cabaret-style curve. Turn each grouping so the open side faces the presentation point. That keeps guests engaged with the front of the room while still allowing side conversation before and after the formal segment.

This is especially effective in city venues with broad open floors, and in Winelands halls where one end naturally becomes the stage wall. It gives guests somewhere to set notebooks, tasting glasses, or coffee without forcing the room into a classroom feel.

For evening functions, feature tables can help mark the bar edge, lounge pocket, or entrance zone, but use them sparingly. A few lit rounds can pull people through a dark room. Too many make the space feel busy, and outdoors they add one more weather and power check to the setup list. For Cape summer conditions, look for an IP54 rating or higher if those tables may sit near open sides, terraces, or courtyard edges.

Styling and Decorating Your Tables

A small round table looks best when the styling respects its scale. Too many planners treat it like a reduced version of a large banquet table and then wonder why it feels cramped. The table is smaller, the guest circle is tighter, and every object on top competes directly with glasses, plates, elbows, handbags, and sightlines.

The first rule is simple. Leave breathing room. If guests have to move florals just to reach water glasses, the styling has gone too far.

Get the linen right

Linen changes the whole read of a small round table. It can make a basic hire item feel formal, romantic, modern, or casual depending on fabric, fall, and finish. It can also make the table look underdressed or clumsy if the drop is wrong.

For a clean event look, use cloths that suit the table diameter and the function of the event. You want enough drop to feel intentional, but not so much fabric that it pools into chair legs or catches on shoes in tight layouts. If you're comparing options, this guide to a round table cloth for event use is a useful starting point.

A few practical rules help:

  • For exposed timber tops: Skip the cloth if the table surface is attractive and the event style is relaxed or rustic.
  • For formal settings: Use a full drop or near-full drop that gives the table presence without feeling bulky.
  • For cocktail use: Keep linen neat and secure, especially outdoors where wind can turn loose fabric into a nuisance.
  • For mixed layouts: Repeat one cloth style across the room so the smaller tables still feel connected to larger feature tables.

Keep centrepieces low and honest

Small rounds reward restraint. A low floral bowl, compact bud vase grouping, candle cluster, or simple lamp often works better than one tall arrangement. Guests don't want to peer around a structure to speak to the person opposite them.

If the event needs height, create it elsewhere. Put drama on the bar, the entrance, the ceremony backdrop, or suspended installations. Let the table stay useful.

A good centrepiece on a small round table should finish the setting, not dominate it.

Choose details that support conversation

The most successful tablescapes usually solve two jobs at once. They look polished, and they make guests comfortable. That means thinking about what sits on the table during the event.

Consider these combinations:

Event style Best table styling direction What to avoid
Winelands wedding Soft linen, low florals, warm candlelight Tall arrangements that interrupt sightlines
Corporate dinner Crisp cloth, clean stationery, minimal centrepiece Overdecorating that crowds plates and branded items
Birthday or private party Textured layers, coloured glassware, playful lighting Too many props competing for surface space

Candles can work beautifully indoors, especially in cellar venues or evening receptions, but outdoors they need protection. If the weather is uncertain, enclosed lighting or stable LED alternatives are often easier to manage. The table should still look complete even if the wind picks up.

A small round table is one of the few pieces that can look expensive with very little added. Good linen, one scaled arrangement, and disciplined editing usually beat a table loaded with “extras”.

The Ultimate Cape Town Rental and Logistics Checklist

The trouble usually starts at load-in. The tables fit the floorplan, but the truck can't get close to the courtyard, the crew is carrying folded furniture over gravel, and the afternoon south-easter has started pushing through the oaks. That is a normal Cape Town setup problem, especially at older Winelands properties and compact city venues.

A checklist for renting furniture for events in Cape Town featuring small round tables and logistical planning.

Small round tables work well in these spaces because they are easier to place in narrow rooms, around pillars, and through awkward access points. They also give a crew more flexibility on site if the final layout changes after the coordinator sees the room dressed. From a hire side, that flexibility matters as much as the look.

I have seen the same issue repeat at farm venues near Stellenbosch and Franschhoek. A table can be perfect on paper and still be the wrong choice if it has to go through a kitchen passage, over uneven brick, or into a courtyard that catches the Cape Doctor by mid-afternoon. The checklist needs to cover the route, the surface, and the reset plan, not just the guest count.

Before you book

Start with the room and the access route, then look at price.

  • Measure the usable space, not just the venue size: Exclude bars, dance floors, DJ positions, fireplaces, pillars, and service paths.
  • Ask for entry measurements: Door widths, passage turns, lifts, stairs, and side gates decide what can be delivered without delays.
  • Confirm the table height and chair pairing: Slight mismatches look untidy and feel awkward once guests are seated for a full meal.
  • Ask how the tables fold and stack: Our internal hire experience shows that stack-friendly designs save time on loading, unloading, and multi-stop deliveries.
  • Check whether the setup is indoors, under cover, or fully exposed: Wind changes what works for courtyards, lawns, and terrace dining.

If the venue is a historic farmstead, ask where the crew may trolley and where they must hand-carry. That one answer often tells you more than the brochure.

Before delivery day

A floorplan helps. A proper access brief saves the day.

Older Cape Town and Winelands venues often have details that do not show up on the first venue visit. Gravel that shifts under load. Steps near the cellar entrance. A gate that is wide enough for guests but awkward for stacked furniture. If the event is outdoors, add weather timing to the plan. Morning deliveries can be calm, then the wind picks up by lunch.

Use this pre-delivery checklist:

  1. Confirm the delivery window with the venue and planner
  2. Check the exact drop-off point for the truck or bakkie
  3. Flag gravel, lawn, cobbles, stairs, and narrow passages
  4. Set aside a holding area for stacked furniture during setup
  5. Match chairs to tables before dispatch
  6. Note any outdoor sections that may need levelling wedges or a layout adjustment
  7. Confirm who is on site to sign off quantities at delivery

The best setups usually look over-prepared on paper. That is what keeps the install calm when access is tight and three suppliers arrive at once.

On-site setup and post-event collection

Test every table before linen goes on. A cloth hides a wobble. Guests find it later when they lean in for speeches, coffee, or a crowded plated service.

This matters even more outside. Courtyards at Paarl and Franschhoek venues can look level from a distance and still shift from one table position to the next. Check each leg. Recheck after placement. If wind is expected, keep centrepieces contained and avoid leaving folded linens or lightweight tabletop items unattended during setup.

For breakdown, make collection easy on the crew and kind to the venue:

  • Clear florals, candles, and stationery early: Decorative items slow stacking and increase breakage risk in low light.
  • Group furniture by type: Keep tables, chairs, and linen in separate collection points.
  • Keep access routes open after dinner service: Wet lawns, muddy paths, and dark passages slow the strike.
  • Leave space for collection vehicles and other suppliers: This is a common pressure point at shared venue exits.
  • Check for damage before the truck leaves: It is easier to resolve on site than the next morning.

Good event logistics are quiet. The tables arrive, sit flat, survive the weather, and leave without scraping a heritage doorway or blocking a midnight strike.

If you're planning a wedding, launch, matric dance, or private event in Cape Town or the Winelands, ABC Hire can help you match the right small round table to your venue, style, and setup logistics. Their range covers practical event furniture for city venues, farm settings, and after-dark functions, with local delivery experience across Cape Town, Stellenbosch, Franschhoek, and Paarl.

Cylinder Glass Vases: A Cape Town Event Pro’s Guide

You make the same decision under pressure. The florist is asking for final vessel sizes, the venue has sent table plans late, and the client wants something that looks polished without tipping into overdone. In Cape Town and the Winelands, that decision gets harder because the setting does half the work for you. A vineyard, a mountain backdrop, or a stripped-back industrial venue can either make your décor sing or expose every weak choice.

That’s why cylinder glass vases stay in rotation. They’re clean, adaptable, and far more useful than trend-led containers that only suit one look. They work at weddings in Stellenbosch, brand dinners in the city, and matric dances where the room needs height and glow but not visual clutter.

Used properly, they solve real event problems. They hold florals without fighting the room. They take candles well. They can be dressed up, stripped back, clustered, or left almost bare. Used badly, though, they create other problems. Wrong proportions block guest sightlines. Lightweight pieces wobble outdoors. Poor glass quality shows every flaw once the afternoon light hits it.

Elevating Your Event with Cylinder Glass Vases

By late afternoon in Stellenbosch, the light shifts, the wind usually picks up, and every glass surface on the table starts showing its true quality. That is often the moment a cylinder vase proves its value. Good ones catch candlelight cleanly, hold their line in a refined setup, and add polish without pulling attention away from the venue.

Lit floating candles in tall cylinder glass vases on rustic wooden tables amidst a lush vineyard.

That matters in Cape Town and the Winelands because the room is often already doing a lot of visual work. A Franschhoek estate has stone, vines, and long views. A city venue near the Waterfront has glass, steel, and sharper lines. Cylinder vases fit both because they bring structure without adding visual noise.

Why the shape keeps working

The shape has lasted for a reason. It is simple, readable, and easy to style well. Guests understand it immediately, which helps a table feel settled and intentional even when the rest of the décor is restrained.

It also gives suppliers room to work. Florists can keep stems upright without fighting an awkward opening. Stylists can use candles, water, branches, fruit, stones, or nothing more than clear glass in repetition. On event day, that flexibility saves time.

Where it earns its place in Cape Town

Cylinder glass vases do their best work at venues where you want to support the setting, not compete with it. That is a common brief here. At a Winelands wedding, the backdrop usually carries enough romance on its own. At a corporate dinner in town, the table often needs discipline more than decoration.

They are especially useful for:

  • Adding height cleanly without the width of heavier urns or compotes
  • Keeping a consistent look across mixed table sizes and changing guest counts
  • Switching easily between candles and florals if the brief changes late
  • Photographing well in natural light, candlelight, and indoor evening service

A simple rule works at most Western Cape venues. If the view, ceiling, or architecture is already strong, clear glass usually performs better than an ornate vessel.

From my side, the best table designs I see in the Cape use cylinder vases as structure. Not as the star of the show. Repetition, scale, and spacing do more for a room than a table full of unrelated containers. That approach also makes life easier during setup, especially when stock is being split between Cape Town, Paarl, and Stellenbosch on the same day.

Choosing the Right Cylinder Vase for Your Theme and Venue

Most problems with centrepieces start before styling. They start with proportion. A vase can be beautiful on a shelf and still be wrong for the room, the table shape, or the drive out to the venue.

In Cape Town, selection has to do three jobs at once. It must suit the look, survive transport, and behave on site. If one of those fails, the whole centrepiece plan becomes labour-heavy very quickly.

Start with venue reality

Tall cylinders look elegant, but they aren't the right call. On a round banquet table in a ballroom, height can create presence without taking over. On a narrow harvest table under low festoon lighting, the same vase can feel awkward and top-heavy.

Use this as a practical guide.

Cylinder Vase Size Guide for Cape Town Events

Vase Dimensions (Height x Diameter) Best For (Table Type) Typical Use Pro Tip for Winelands Venues
20cm x 10cm Small round tables, café-style setups Low floral clusters, pebbles, tea lights, compact greenery Good where wind is a concern because the lower profile stays settled
30cm x 10cm Long rectangular tables Floating candles, single-stem styling, layered fillers Use in groups rather than as stand-alone pieces for a fuller table line
40cm x 12cm Standard guest tables Submerged florals, fuller candle styling, mixed natural fillers Check table width before committing, especially at narrower estate tables
50cm x 15cm Large round tables, statement entrance styling Tall branches, dramatic candle designs, sculptural arrangements Better indoors or in sheltered courtyards where gusts won’t catch the height
75cm or taller, slender profile High-ceiling venues and formal gala tables Vertical impact without wide arrangements Only use if the base feels stable enough for transport and setup conditions

What to prioritise when inspecting quality

For premium event rentals, quality isn’t guesswork. Local production checks can include ultrasonic thickness gauging for 3 to 5mm walls with a tolerance of ±0.2mm, plus thermal shock testing where vases survive a 200°C temperature change more than 95% of the time, which matters when cold water meets a hot Cape afternoon, according to this overview of glass manufacturing and quality control.

That’s the technical side. On the ground, you’ll notice quality faster by eye and by hand.

Look for these signs:

  • Clean rims: Chips show immediately under candlelight and look careless in close-up photos.
  • Useful weight: A vase shouldn’t feel flimsy, especially if it’s going outdoors.
  • Clear glass: Distortion can ruin the look of submerged stems or floating candles.
  • Even walls: Uneven thickness often shows up once water is added.

Don’t choose height first. Choose stability first, then choose the height that still fits the brief.

Matching vase choice to event style

Different Cape venues pull styling in different directions.

For wine estates and garden venues, shorter or medium cylinders often work better because they feel anchored against stone, timber, and open natural settings. For city venues with clean architecture, taller cylinders can reinforce a modern line without adding clutter.

A quick decision framework helps:

  1. Check sightlines. Seated guests should still be able to talk across the table.
  2. Check wind exposure. Outdoor lawns and terraces need broader, steadier forms.
  3. Check the road to venue. The further and bumpier the route, the less forgiving delicate pieces become.
  4. Check labour time. More intricate shapes slow packing, washing, and on-site assembly.

The best choice is rarely the most dramatic vase in the storeroom. It’s the one that still looks composed after the van trip, setup rush, and first breeze.

Styling Cylinder Vases Beyond Basic Florals

A cylinder vase is best treated as a framework. Once you stop thinking of it as a flower holder, more options open up. That matters in Cape Town because venue styles change fast from one job to the next. One week it’s a vineyard lunch. Next it’s a black-tie dinner in town.

Floating candles done properly

Floating candles are the first thing many planners reach for, and for good reason. They create height, reflection, and movement without needing a dense floral budget. But they only look expensive when the water is clean and the proportions are right.

Use distilled or very clear water if you want the vase to stay crisp-looking through service. Keep the waterline intentional. Half-filled often looks accidental. Very full usually reads cleaner.

A few practical rules make the difference:

  • Keep wick height controlled: If the candle sits too close to the rim, breezes catch it faster.
  • Clean fingerprints after filling: Water magnifies marks on the outside.
  • Avoid overcrowding: One floating candle in one vase often looks better than trying to force more in.

Outdoor candle styling works best in sheltered spots. If the venue catches late afternoon wind, shift to enclosed lighting or LEDs before setup becomes a firefight.

Submerged stems and restrained botanical looks

Submerged florals suit modern Cape venues well. Single orchid stems, calla lilies, or foliage with a strong line can look refined because the glass does part of the visual work. You’re not relying on mass. You’re relying on clarity and silhouette.

To keep stems in place, use clear glass beads or another unobtrusive anchor at the base. Cut stems with enough length to hold shape once submerged. Short cuts tend to float up and ruin the line.

This style works especially well when you want:

  • A cooler, cleaner look for corporate dinners
  • Minimal colour noise against branded table settings
  • High impact with fewer stems, which helps when the budget needs discipline

If you’re using orchids, maintenance matters. A solid reference for handling them without bruising the look is this glass vase care guide, especially for planners who need arrangements to hold through setup and service.

For broader centrepiece planning, this roundup on a centrepiece for table is also useful when you’re pairing vase styling with the rest of the tabletop.

Lights, layers, and non-floral fillers

Evening events often need something florists alone won’t solve. That’s where lights and structured fillers come in. Cylinder glass vases take LED fairy lights well because the glass amplifies the glow without adding heat risk.

Other fillers can work too, if they match the event language:

  • Pebbles or sand: Good for earthy, coastal, or neutral schemes
  • Coffee beans: Strong for winter events, food-led functions, or rich brown palettes
  • Citrus slices in water: Fresh and sharp-looking for daytime lunches
  • Layered natural textures: Useful where the vase itself needs to carry the design

What tends not to work

Some ideas look better on Pinterest than in Paarl after a warm setup window.

Avoid these common mistakes:

  1. Too many filler types in one vase. It starts to look busy, not curated.
  2. Murky water with floral debris. Clear glass is unforgiving.
  3. Oversized inserts in narrow cylinders. They press against the glass and look cramped.
  4. Unstable top-heavy designs outdoors. If wind is part of the brief, design for it from the start.

Plain cylinders reward discipline. If the contents are clean, scaled well, and repeated consistently, they read as premium. If every table is doing something different, the room loses cohesion fast.

Transport Setup and Breakdown Logistics

Most vase failures don’t happen on the table. They happen in transit, during unpacking, or at strike when everyone’s tired and rushing. That’s why logistics deserve as much attention as styling.

A vase can leave the depot looking perfect and arrive at a Franschhoek venue with a hairline crack you only notice once water goes in. By then, your setup clock is already running.

A gloved hand loading brown paper-wrapped cylinder glass vases into the back of a delivery van.

Why handling matters more than people think

High-quality vases are built to handle repeated use, but only when the production is sound. A key part of that is annealing, which relieves internal stress and reaches 92 to 95% success rates in controlled facilities. Poor annealing is a major reason glass cracks during transport or when filled with water at a different temperature, as explained in this glassblowing process video.

That doesn’t mean the vase is indestructible. It means your packing and handling still matter.

A setup system that saves time

The fastest teams don’t improvise on site. They build a simple workflow and keep handling to a minimum.

A practical event setup line looks like this:

  • Unpack and inspect: Open crates first, then check rims and bases before any styling starts.
  • Polish dry: Remove transit dust and marks before water or fillers go in.
  • Fill in batches: Keep water, candles, beads, or stems standardised table by table.
  • Place last: Move finished vases onto tables only once the tablecloth, cutlery, and other décor are locked in.

The more often a glass vase changes hands, the higher the chance of chips, fingerprints, and avoidable breakage.

Foam-divided crates are worth insisting on. Brown paper wrapping alone won’t stop glass from knocking together on uneven roads. Cape routes out to wine farms aren’t always forgiving, especially when vehicles are loaded with mixed rental stock.

If you’re managing broader event logistics at the same time, this guide to renting furniture for events is useful because vase transport usually has to fit into a much larger loading plan.

Breakdown is where costs creep in

Post-event handling catches teams out because the job feels finished. It isn’t. Breakdown is where replacement fees and stock losses often start.

Use a proper strike routine:

  1. Extinguish or remove candles first.
  2. Empty water on site where permitted.
  3. Separate debris from reusable fillers.
  4. Wrap and crate immediately, not later in a pile.

What doesn’t work is stacking loose glass at the end of the night and assuming someone will sort it back at the warehouse. That’s how chips spread through a set.

For Cape Town planners, the hidden win in good logistics is consistency. When every vase arrives intact, sets up cleanly, and returns safely, the final room looks deliberate instead of assembled under pressure.

The Smart Financial Choice Renting vs Buying Vases

Buying feels sensible at first. A vase is a physical object, so it seems like something you’ll own and reuse. In practice, most single-event clients underestimate what comes with ownership.

Storage is the first problem. Glass doesn’t store like linen or signage. It needs protection, space, and careful stacking. Then there’s washing, polishing, transport, replacement, and the inevitable issue of mismatched stock after a few breakages.

What the local market tells you

For the Western Cape, the rental question isn’t abstract. A source discussing the local market states that the event industry saw a 28% surge in 2025, that searches for glass vase rental Stellenbosch often go unanswered, and that renting through an established supplier is typically around R50 to R150 per day, compared with a purchase price of R200+ per vase in the same market context, according to this overview of glass cylinders and local rental demand.

That gap matters because many planners only compare hire price with shelf price. They don’t compare the full event cost.

Comparing Rental and Purchase

Renting usually makes more sense when:

  • You need event-ready stock: Clean, matching vases save prep time.
  • You don’t want post-event storage: Glass takes up more room than many expect.
  • You want lower risk: Breakage during delivery and return is easier to manage within a rental system.
  • You need flexibility: Different events need different sizes and looks.

Buying can make sense for venues or stylists who use the same format constantly and already have protected storage and trained handling staff. For most private hosts, one-off weddings, matric committees, and corporate teams, that’s not the setup.

A useful broader reference point is how the Events Rentals industry frames rental operations around repeat use, asset handling, and service coordination. Those operational realities explain why renting often wins financially even before you factor in labour.

If you’re comparing décor options across a whole event, this guide to decor hire in Cape Town helps put vases into the wider budget picture.

Where buying usually goes wrong

The common trap is overbuying a style that only suits one event. Then half the stock sits boxed up, a few pieces chip, and replacements don’t match perfectly. Glass is only an asset when you can keep it in circulation without creating admin and storage headaches.

For most Cape Town event clients, renting cylinder glass vases is the cleaner financial decision because it shifts the burden of maintenance, stock consistency, and transport off your plate.

Common Questions About Using Cylinder Vases

A planner signs off a beautiful layout for a Franschhoek wedding, then the forecast shifts and the dinner moves onto an exposed terrace. Suddenly the questions get practical. Will the candles stay lit, will the glass travel safely from Cape Town, and will the tables still look polished once guests sit down? That is usually the point where cylinder vases either prove their value or create extra work.

FAQ

Question Answer
Are cylinder glass vases still in style for weddings and formal events? Yes. Their appeal is timeless because the shape is simple, clean, and easy to adapt across different décor styles. A clear cylinder can read formal in a ballroom, relaxed at a wine farm, or modern at a corporate dinner without looking dated.
What works best in windy outdoor venues? Lower, broader cylinders are usually the safer choice at exposed Cape Town and Winelands venues. On lawns in Stellenbosch or terraces in Constantia, I would rather use a stable vase with a compact arrangement than a tall narrow piece that catches wind and shifts once service starts.
Should every table use the same height? No. The table shape should decide that. Long harvest tables usually look better with a controlled mix of heights, while round guest tables tend to feel cleaner with one repeated height or two carefully matched sizes.
Are floating candles better than florals? They solve different problems. Floating candles build atmosphere fast and work well for evening receptions, especially where the venue already has strong architecture. Florals add softness and colour, but they need tighter execution in heat and wind.
How do you stop clear glass from looking messy? Use clean water, wipe each vase after filling, and keep stems, sand, stones, or candles consistent from table to table. The simplicity of the vase means small mistakes show up clearly.
Do cylinder vases suit corporate events as well as weddings? Yes. They are one of the easiest vessels to restyle. Change the fill, spacing, and scale, and the same vase can suit a product launch in the city, a year-end function in Paarl, or a formal awards dinner.
Is it worth using them for matric dances and school formals? Yes, especially when the brief calls for impact without complicated installation. Repetition works well here. A row of matching cylinders with candles or simple florals can make a hall feel finished quickly, provided the setup team keeps everything uniform.

Final practical checks before event day

Keep this list close during final sign-off, especially if the event is outside Cape Town and the stock is travelling in:

  • Confirm the actual table dimensions: A vase that works on a supplier mock-up can look oversized once linen, cutlery, and platters are on the table.
  • Ask where the wind hits hardest: Courtyards, cellar doors, lawns, and decks all behave differently, even at the same venue.
  • Decide who fills the vases on site: Transporting glass pre-filled with water adds weight, increases breakage risk, and slows setup.
  • Plan the strike before the event starts: Late-night breakdown on a farm venue is harder when staff are packing wet glass into crates in poor light.

Cylinder vases reward tidy work.

Get the basics right and they give you a polished result without fighting the venue. In Cape Town and the Winelands, where the setting often does half the visual work for you, that restraint is usually an advantage.

If you need reliable, event-ready options for weddings, corporate functions, matric dances, and private celebrations, ABC Hire can help with practical rental support across Cape Town, Stellenbosch, Franschhoek, Paarl, and surrounding areas. Their range of event furniture and accessories makes it easier to build a cohesive setup without juggling multiple suppliers.