Perfect Three Tier Cake Stand for Cape Town

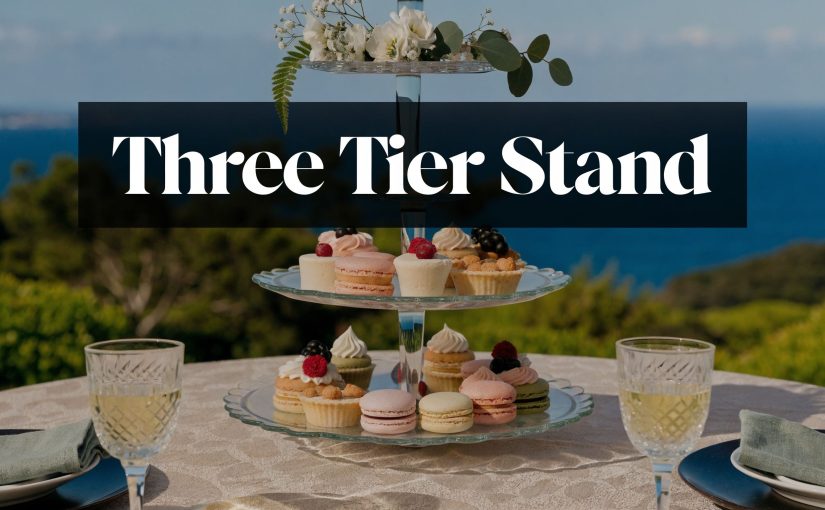
The dessert menu is finalised. The florist has signed off. The venue has approved the floorplan. Then someone asks the question that changes the look of the whole table.

What are we putting the sweets on?

That detail often gets left late, but it shapes the entire presentation. A good three tier cake stand does more than hold cupcakes or petit fours. It gives height, creates order, controls guest flow around a dessert table, and turns scattered items into a focal point that feels intentional.

In Cape Town and the Winelands, that matters. A reception in Franschhoek, a corporate launch in the city, or a matric dance in Stellenbosch all need display pieces that work visually and practically. The stand has to travel well, sit level on a dressed table, handle service pressure, and still look polished in photographs.

The Centrepiece That Elevates Your Celebration

A dessert table can look expensive without being organised. It can also look organised without feeling memorable. The three tier cake stand is one of the few pieces that does both.

At weddings, it draws guests toward the sweet table without needing oversized styling. At corporate events, it gives branded treats a defined home instead of spreading them flat across linen. At private celebrations, it helps a modest menu feel fuller and more considered.

A three tier cake stand filled with assorted gourmet desserts set against a scenic mountain landscape backdrop.

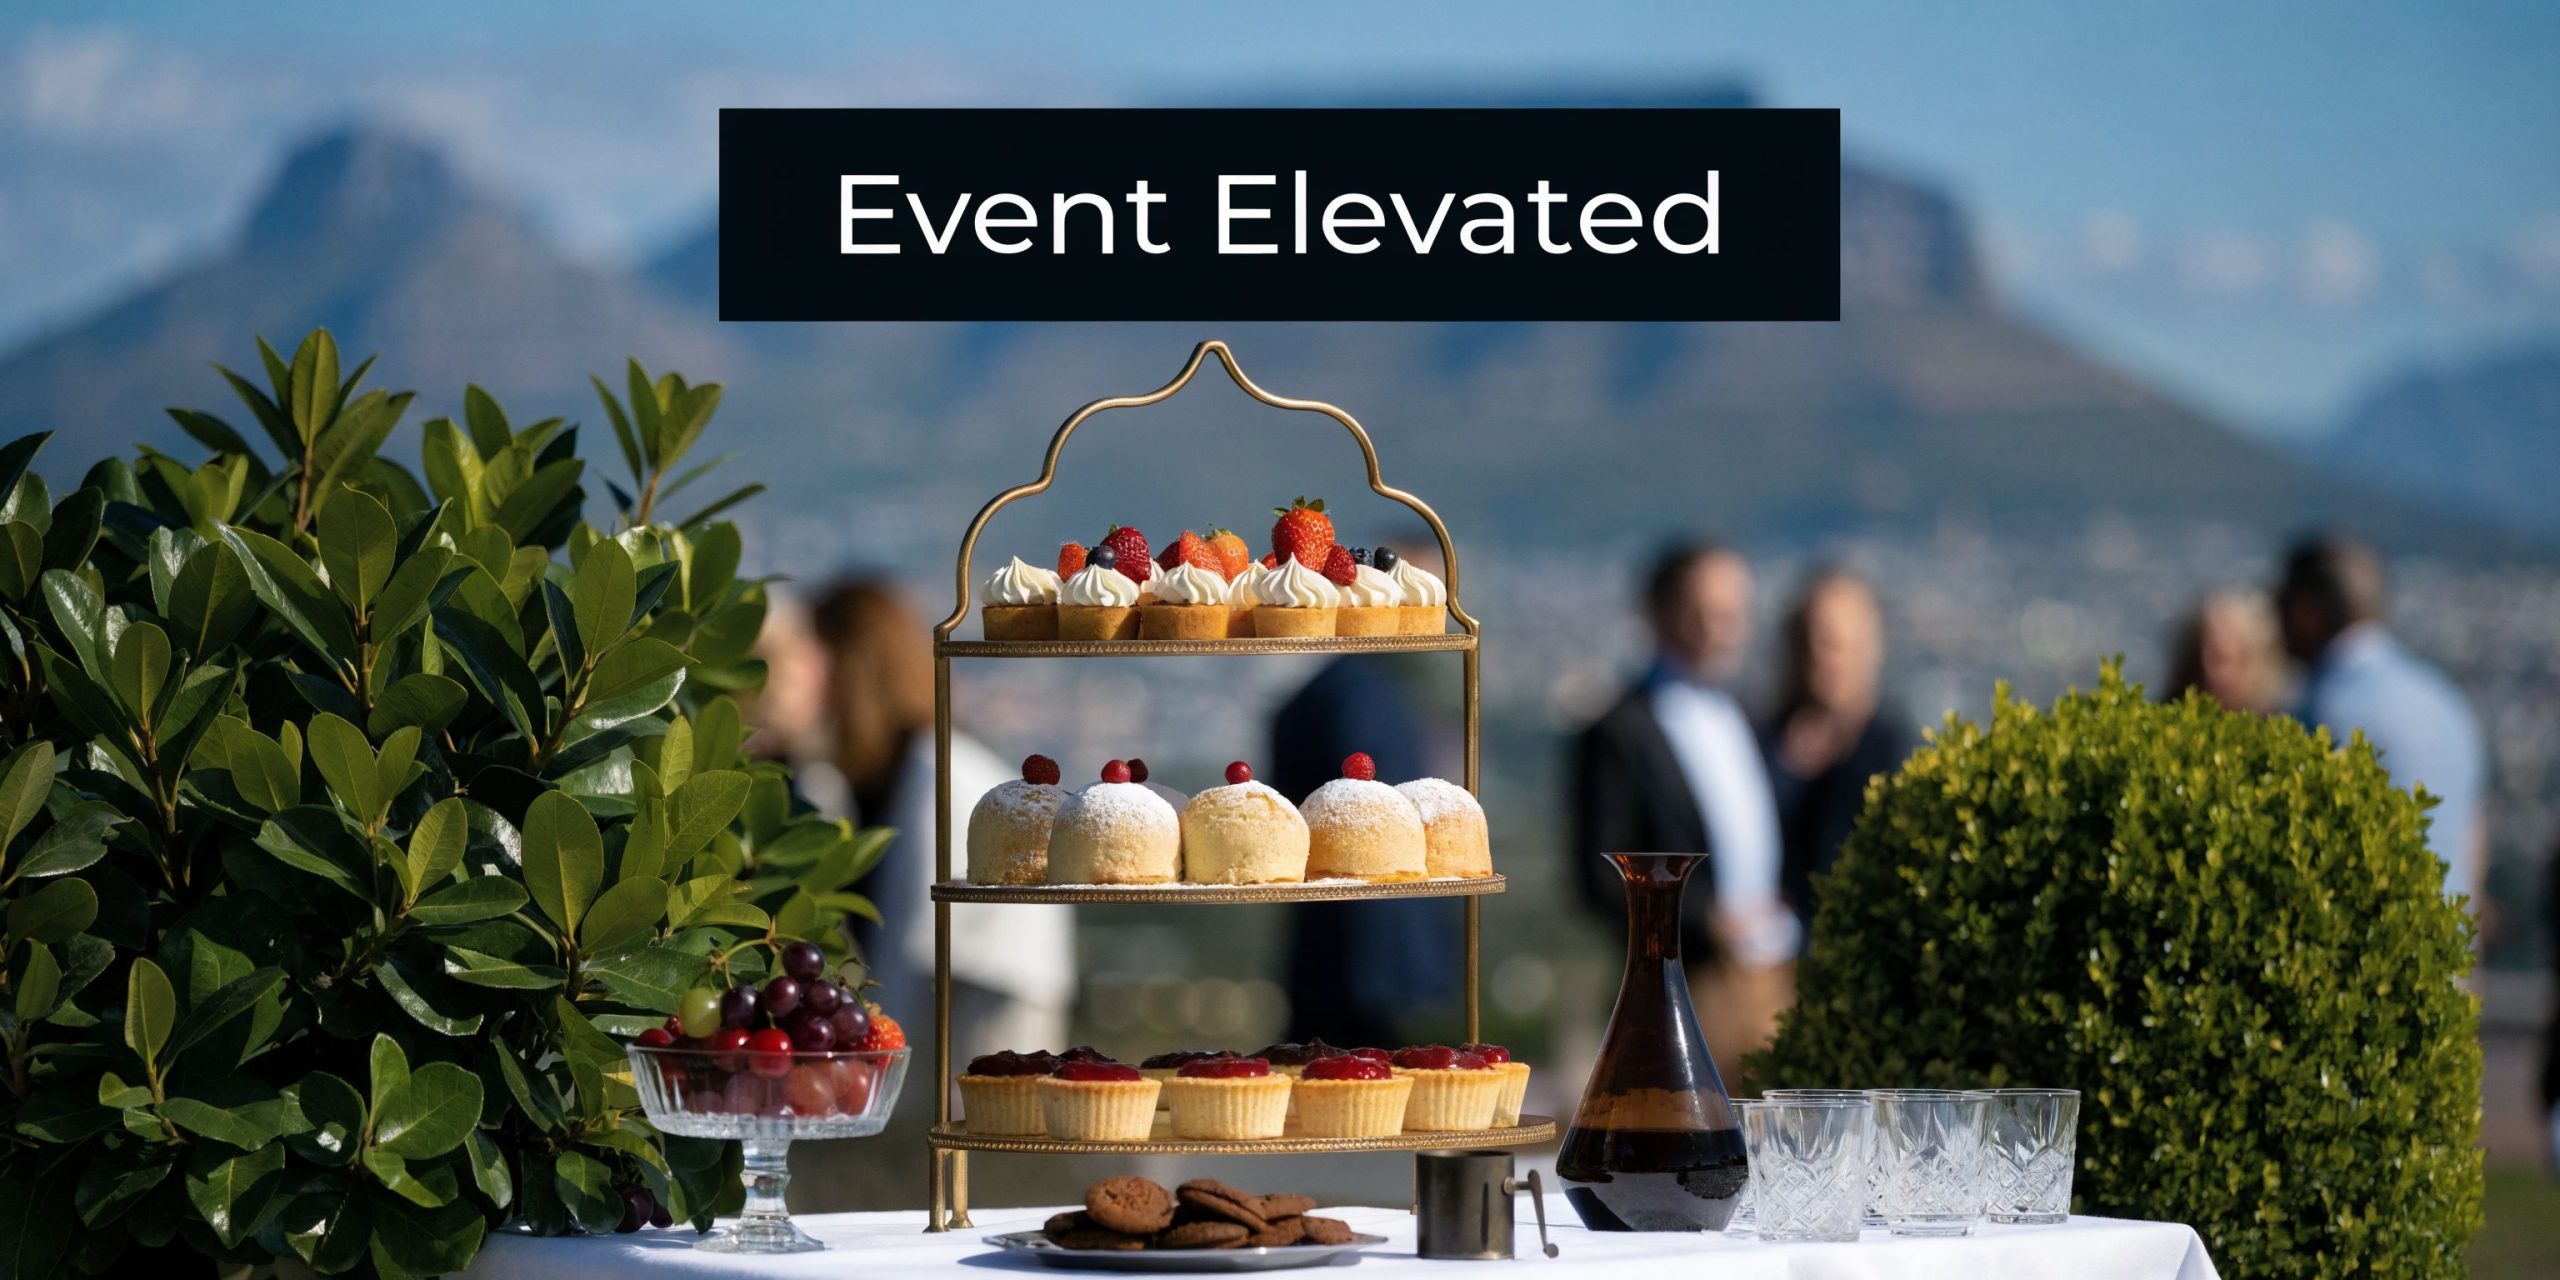
Why guests notice it first

When the eye scans a table, it lands on height before detail. Flat platters can be beautiful, but they need more space and more styling to create the same impact. A three tier cake stand solves that quickly.

It also helps tie together the surrounding décor. If you are building a larger visual story, your dessert display should work with your florals, candles, charger plates, and table centrepiece ideas rather than sit apart from them.

Where it works best

Different events use the stand differently.

  • Wedding receptions: Best for macarons, mini tarts, cupcakes, and bite-sized cake portions that need a refined display.
  • Corporate functions: Strong for individually portioned branded desserts or canapés where neat presentation matters.
  • Matric dances and formals: Useful when organisers want a polished dessert station without covering the whole table in separate platters.
  • Milestone birthdays: Ideal when the host wants one anchor piece instead of a cluttered sweets setup.

Tip: If the dessert table feels busy, remove one or two lower platters before changing the stand itself. Better spacing usually improves the look faster than adding more décor.

Understanding the Three Tier Cake Stand

At an event, a three tier cake stand has a job to do. It must present desserts cleanly, hold its shape through service, and survive transport from store to venue without arriving loose, chipped, or awkward to assemble.

Infographic

The basic anatomy

A proper stand is built around a central post with graduated plates fixed at set intervals. The plate sizes are not arbitrary. A wider base and smaller top create a balanced silhouette and give the lower tier the strength to carry the heaviest items, as outlined in this breakdown of three tier cake stand construction.

That structure matters even more in professional service. Caterers rarely load all three levels evenly. The bottom tier often carries denser items such as mini cakes or larger pastries, while the upper tiers hold lighter pieces that need visibility more than weight support.

Why the hardware matters

In rental and event work, the fittings tell you very quickly whether a stand is built for repeated use or just occasional display at home. Threaded rods, secure spacers, and plates that tighten properly give the stand a cleaner line and a steadier feel on the table.

They also solve practical problems behind the scenes:

  • More stable service: Plates stay aligned and are less likely to shift when guests serve themselves.
  • Better menu flexibility: Some stands can be configured as two tiers if the dessert count drops or the table feels crowded.
  • Safer packing: A stand that breaks down into separate components is easier to wrap, crate, and move between venues.

That last point matters in Cape Town and the Winelands. Vehicles are often loading for weddings in Franschhoek, corporate functions in Stellenbosch, and private events on farms where access roads, wind, and setup time all put pressure on the equipment. A stand that disassembles cleanly is far easier to transport without damage.

What separates event-grade stands from decorative home stands

Many retail stands are made to look attractive in a product photo. They are less convincing after two or three hires, especially if the rod loosens, the plates sit unevenly, or the top handle encourages staff to lift the whole stand the wrong way.

Event-grade stands are selected with service in mind. The base should sit flat on a dressed table. The centre rod should tighten firmly without wobble. The gap between tiers should suit what is being served, not just what looks elegant empty. The top finial should only be used as a lifting point if the design allows it.

I always judge a stand by how it behaves during setup, not by how it looks in storage. If it takes too long to assemble, shifts once loaded, or needs delicate handling every minute on site, it is the wrong stand for professional work.

Key takeaway: A three tier cake stand succeeds on structure, balance, and handling. Good styling helps, but reliable hardware is what keeps the display working through the full event.

Choosing the Right Material and Size

Material changes everything. It changes the mood of the table, the handling process, the cleaning method, and how well the stand copes with Cape conditions.

Some planners choose by look alone and regret it at load-in. A stand that matches the mood board but struggles outdoors, scratches easily, or shows every water mark is not the right stand.

Three different tiered cake stands made of metallic silver, dark green ceramic, and natural wood materials.

Porcelain, stainless steel, and acrylic

The strongest event choices usually fall into three groups.

Porcelain works well when you want a classic presentation. It suits weddings, teas, engagement celebrations, and venues with a softer, more traditional interior. It also has a practical advantage. Porcelain stands are often dishwasher-safe for high-volume use, according to this material and care reference.

Stainless steel is the workhorse option. It suits outdoor venues, coastal conditions, and repeated commercial handling. The same source notes that stainless steel offers superior corrosion resistance, making it a smart choice in humid South African venues such as Stellenbosch and Franschhoek, where humidity can sit in the often high range.

Acrylic suits modern displays where visibility matters. Clear acrylic can make a dessert table feel lighter and cleaner, especially when you are displaying colourful macarons, layered sweets, or branded treats. In event settings, it is often chosen for the visual effect and easier carrying compared with heavier materials.

The size decision that affects service

Size is not only about the outer look. It affects reach, stability, and menu planning.

A taller stand creates drama, but if the top tier ends up awkward for guests to reach, service becomes messy. A wider base gives more confidence, but it also needs enough table depth so the stand does not crowd signage, florals, or serving tongs.

When selecting size, check these factors first:

  • Menu type: Small pastries need less vertical clearance than iced cupcakes.
  • Guest interaction: Self-service tables need easier access than styled displays that staff serve from.
  • Venue conditions: Outdoor setups benefit from sturdier, less top-heavy materials.
  • Transport route: Stairs, gravel paths, and tight service passages all matter before setup starts.

Cake Stand Material Comparison

Material Aesthetic Best For Considerations
Porcelain Classic, refined, timeless Weddings, teas, milestone celebrations Heavier to handle, but often dishwasher-safe for volume use
Stainless steel Sleek, professional, polished Outdoor events, humid venues, high-turnover catering More utilitarian look in some décor schemes, but excellent durability
Acrylic Modern, light-looking, clean Contemporary functions, branded displays, layered desserts Can show scratches over time and needs careful handling to keep its finish crisp

What works in the Winelands

For Stellenbosch and Franschhoek, stainless steel usually wins when the venue is outdoors or partially exposed. Moisture and repeated handling punish decorative finishes quickly. Indoors, porcelain remains a favourite for formal wedding styling.

Acrylic is often strongest when the event brief is contemporary and the desserts themselves provide the colour. The stand almost disappears, which can be exactly the right move.

Planning Capacity for Catering Success

The first mistake people make is asking how many items a three tier cake stand can hold. The better question is how many items it can hold well.

A stand can be physically full and still look underplanned. Overcrowding hides detail, makes service awkward, and increases the chance of guests bumping the upper tiers while taking something from the base.

Think by category, not by total

Start with the menu shape.

Small, neat items such as macarons, petit fours, and compact biscuits usually sit comfortably across all three levels. Taller desserts need more headroom, especially on the middle and top tiers. Iced cupcakes often work best when the tallest decorations are kept off the upper tier.

When planning with caterers, divide the display this way:

  • Base tier: Heavier items and anything guests will reach for first
  • Middle tier: Medium-height pastries or items you want to feature
  • Top tier: Lightest and smallest pieces, or the most decorative selection

That approach keeps the stand balanced and makes the table feel deliberate.

Build abundance without overloading

Visual abundance comes from spacing and repetition. It does not come from squeezing every centimetre of plate space.

Leave enough room for guests to lift an item without brushing the next one. Alternate shapes and colours if the menu allows. Group similar desserts instead of mixing everything across all three levels.

Effective communication between event planning and catering teams is essential early in the process. If the stand is one element in a larger sweets display, it should carry the most photogenic pieces, not the entire dessert count. For broader dessert service planning, it helps to review the full mix of catering equipment for hire so the stand supports the setup rather than carrying too much responsibility on its own.

Practical checks before service

A quick run-through avoids most on-table problems.

  1. Put the heaviest loaded tier at the bottom first.
  2. Test guest reach from the front of the table, not just from the side during setup.
  3. Check whether serving utensils can sit neatly beside the stand.
  4. Step back and confirm the display still looks open, not cramped.

Tip: If the menu is generous, use the three tier cake stand as the hero piece and refill surrounding platters from back-of-house. The table looks fresh for longer and the stand stays orderly.

Styling and Placement for Maximum Impact

Guests notice placement before they notice detail. At a Stellenbosch wedding or a corporate launch in Cape Town, the same three tier cake stand can read as polished and intentional, or it can look squeezed in because the table plan was settled too late.

Cape Town and Winelands events usually benefit from a cleaner hand. Strong views, estate architecture, florals, branded elements, and candlelight already give the room plenty to work with. The stand should earn its place by drawing the eye and serving guests smoothly.

A elegant three tier cake stand filled with various small desserts surrounded by fresh flowers and greenery.

Position it where guests can use it

A three tier cake stand performs best as a focal point with space around it.

On a round dessert table, that usually means a central position with lower platters and décor kept beneath the stand's visual height. On a long buffet, a slight offset often works better, especially when the centre is already carrying a celebration cake, floral arrangement, or signage. That layout gives the display hierarchy without forcing guests to reach across other items.

Access matters as much as appearance. If coffee queues, bar traffic, or a narrow vineyard venue aisle will push guests against the dessert table, the stand needs a calmer position. I would rather place it half a metre away from the obvious spot and keep it usable than chase symmetry and invite breakage.

Style with discipline, not clutter

Many local event planners say tiered stands help a dessert table feel more refined. That result usually comes from restraint, not from adding more props.

A few styling choices consistently work well in professional setups:

  • Match the stand to the brief: Porcelain suits classic weddings and high tea service. Clear acrylic keeps modern corporate tables lighter. Polished metal works well for formal evening functions.
  • Dress the footprint, not the whole structure: Add linen texture, a low floral ring, or greenery at the base so the stand feels grounded without crowding the plates.
  • Repeat colours already in the room: Pull from florals, menus, branding, or table stationery so the dessert table feels connected to the rest of the day.
  • Protect the top tier visually: Leave it clean enough to finish the composition. If every level is busy, the stand loses shape in photos.

For weddings, dessert styling should sit comfortably with the rest of the detail choices. A broader guide to wedding accessories can help when the cake display needs to align with the overall look rather than feel like a separate idea.

Adjust placement for the event type

At weddings, softer framing works well, but flowers should not block guest access or hide the stand's outline in photographs.

At corporate events, cleaner spacing usually wins. Keep the stand clear of branded backdrops, coffee stations, and registration flow so guests can serve themselves without creating a bottleneck.

At matric dances and school formals, durability and traffic control matter more than delicate styling. Students tend to approach in groups, so the stand needs breathing room and a stable table with no loose linen corners nearby.

For covered outdoor service in the Winelands, also factor in wind. Lightweight signage, taper candles, and tall stems can make a dessert table feel unsettled fast. If the stand is paired with a dome for display or protection, this guide to using a glass cake dome effectively at events is useful for judging what suits the menu and setting.

The best styling still serves the food first. If guests can see the stand clearly, reach it easily, and remove an item without hesitation, the table is doing its job.

Mastering Assembly Transport and Care

A three tier cake stand often causes trouble during load-in, not during styling. In Cape Town and the Winelands, the pressure points are clear: long drives to farms and estates, uneven access roads, quick venue turnarounds, and staff who need the stand assembled and loaded without wasting service time.

That is why setup needs a simple, repeatable method.

Assemble in the right order

For drilled ceramic, porcelain, glass, or acrylic plates, the safest approach is to build from the bottom up. Set the base plate first, add the centre fittings, then secure the middle and top tiers in sequence. If the stand includes a dome or needs extra protection for display, this guide on using a glass cake dome effectively at events helps when planning the final setup.

The order matters because alignment starts at the base. A rushed top-down assembly usually leads to a crooked centre rod, uneven plate spacing, or a slight wobble that only shows once pastries are loaded.

Use a practical event-day routine:

  1. Lay out every plate, rod, spacer, washer, and handle before assembly starts.
  2. Check each part for chips, hairline cracks, or bent fittings.
  3. Tighten by hand until secure, then stop short of forcing delicate materials.
  4. Place the assembled stand on the dressed table before adding food.
  5. Test stability again after linen, risers, and nearby props are in position.

One final check saves embarrassment later.

Transport causes most breakages

Damage usually starts in transit. A stand can leave the prep kitchen in perfect condition and arrive at the venue with chipped edges, scratched plates, or missing hardware if it was packed like retail tableware instead of event equipment.

Professional crews separate plates, wrap metal components individually, and keep small fittings in labelled bags. They also avoid loading cake stands under heavier service stock. That matters on Winelands routes where corners, gravel sections, and repeated unloading can shift fragile items fast.

Flat packing is usually safer than transporting a fully assembled stand. The exception is a very short trip on a smooth route with a dedicated vehicle shelf and no rehandling.

Care standards that matter in service

Cleaning a three tier cake stand properly takes more attention than a quick rinse after dessert service. Crumbs and icing collect around threaded joins, undersides, and decorative rims. If those areas are missed, the stand may still look clean from a distance but fail basic service standards.

In practice, good care includes:

  • Food-safe washing: especially where petit fours, macarons, or slices sit directly on the plate
  • Full drying before storage: trapped moisture shortens the life of fittings and marks some finishes
  • Material-specific handling: glass, plated metal, porcelain, and acrylic do not all tolerate the same cleaning method
  • Allergen separation: important when the same stand rotates between different menus and event types

For occasional hosts, that workload rarely makes sense. For planners, caterers, and venues, it only makes sense if the stand is in constant use and there is a proper cleaning and storage system behind it.

This highlights the main trade-off. Owning the stand means owning the packing, transport risk, cleaning time, replacement parts, and storage discipline as well.

Why Renting From ABC Hire is the Smart Choice

Once you look past the photos, the true value of a three tier cake stand is operational. It needs to arrive on time, suit the event style, survive transport, assemble cleanly, and leave the venue without adding stress to pack-down.

That is where rental becomes the practical choice.

For weddings and private celebrations, hiring avoids the familiar pattern of buying a stand that looks right online but arrives lighter, weaker, or less refined than expected. For corporate teams and venues, rental keeps storage under control and removes the cleaning burden after service. For schools and formal event organisers, it reduces the risk that a key display item arrives chipped, incomplete, or unstable.

ABC Hire is built for that reality in Cape Town and the Winelands. The advantage is not only access to quality stock. It is access to event-ready stock that fits into real production timelines.

What hiring solves immediately

  • No storage problem: You do not need to keep bulky, fragile serving pieces between events.
  • No post-event cleaning burden: The stand goes back into a professional care process.
  • No guesswork on suitability: You can match the stand to the function, venue, and service style.
  • Less transport risk: Event rental items are selected and handled with repeated use in mind.

The result is simple. You get the visual payoff of a polished dessert display without inheriting the maintenance, replacement, and storage issues that come with ownership.

A three tier cake stand should help the event run better, not create another checklist item for your team.


If you are planning a wedding, corporate function, matric dance, or private celebration in Cape Town, Stellenbosch, Franschhoek, or Paarl, ABC Hire can help you choose event-ready display pieces that look polished and work under real service conditions. Browse the range, get practical advice for your venue, and hire with confidence.

Your Guide to Choosing the Perfect Welcome Board Stand

A welcome board stand does so much more than just hold up a sign. Think of it as your event's very first handshake—it’s a crucial first impression that sets the whole mood for a wedding, corporate function, or party. It’s the first thing your guests see, offering a warm, organised, and stylish welcome.

Crafting an Unforgettable First Impression

Those first few moments can truly define a guest's experience. That's why a well-placed welcome board stand has become a cornerstone of modern event design, not just a minor detail. It’s what guides your guests from the moment they arrive, making them feel instantly valued and expected.

Whether you're planning an intimate wedding in the Winelands or a large-scale corporate event in Cape Town, this single piece does a lot of heavy lifting. It acts as a guide, a key part of your theme, and a fantastic photo opportunity, all while making sure your event kicks off on a high note.

The Power of a Purposeful Welcome

A great welcome does more than just point people in the right direction. It communicates the exact style and feel of your celebration from the moment guests step out of their cars. A rustic wooden easel, for instance, whispers romance and charm, while a sleek metallic frame communicates a more modern, professional vibe.

The right welcome display can:

  • Set the Event's Tone: It instantly tells guests if the atmosphere is formal, casual, rustic, or glamorous.
  • Provide Clear Direction: No more confusion! It guides everyone to the ceremony, reception, or registration area.
  • Create a Photo-Worthy Moment: It naturally becomes a popular backdrop for guest photos, which often generates a great buzz on social media.
  • Reinforce Your Theme: A good stand integrates perfectly with your colour scheme and decor, tying the whole look together beautifully.

If you're looking for some creative inspiration on how to make your welcome truly pop, it’s worth exploring different Church Welcome Sign Ideas for a warm, inviting atmosphere.

A welcome board stand is your event's silent host. It greets every guest with purpose and style, making them feel attended to before they've even met anyone.

Meeting Rising Event Expectations

These days, guests expect personalised details. Here in the vibrant wedding scene of Cape Town and the Winelands, welcome board stands are now a non-negotiable staple. As local rental suppliers, we’ve seen a 45% increase in bookings for these customisable displays. This demand is part of a bigger trend, especially with Cape Town having hosted over 2,300 weddings recently.

We've also noticed that these stands can boost social media shares by up to 40% among engaged couples in the Winelands, turning a simple greeting into a moment people want to capture and share. A thoughtful welcome isn't a luxury anymore—it's essential for creating that immediate 'wow' factor.

How to Choose the Perfect Stand for Your Event

Your welcome board stand is more than just a prop; it’s one of the first things your guests will see. It sets the tone for your entire event, so getting it right is about balancing style with stability. A beautiful welcome sign deserves a stand that not only looks the part but can also hold it securely.

Think of it this way: a rustic wooden easel just feels right for a relaxed wedding in the Franschhoek Winelands. For a sleek corporate gala in the heart of Cape Town, however, a polished gold or minimalist black metal frame makes a much stronger statement. The stand should feel like a natural extension of your event’s theme.

Matching the Stand to Your Vibe

The material of your stand says a lot. Before you choose, think about the atmosphere you're trying to create. Most of the stands you’ll find fall into a few key categories.

  • Wooden Easels: These are a go-to for anything rustic, bohemian, or outdoorsy. A classic wooden easel brings a warm, organic touch that’s perfect for farm weddings and laid-back celebrations.
  • Metal Frames: This is where you get real versatility. Gold and rose gold frames add instant glamour, making them ideal for formal weddings and milestone birthday parties. For a clean, modern aesthetic at a corporate function, you can’t go wrong with black or silver metal.
  • Acrylic Stands: If you’re after a chic, contemporary look, a clear acrylic stand is a showstopper. It creates a cool “floating” effect that lets your welcome board’s design take centre stage.

To help you visualise the options, here's a quick decision-making guide we've put together based on the events we've helped create.

A flowchart event tone decision tree, guiding choices for welcome stand, wedding, or corporate events.

Welcome Board Stand Selector: Matching the Stand to Your Event

Choosing the right stand can feel overwhelming, so we've created this simple table to help you match the material and style to your event type and venue. It's a quick-reference guide to make sure your choice is a perfect fit.

Event Type Recommended Stand Material Recommended Style Best Suited Venue
Rustic Wedding Wood Natural, Weathered Easel Winelands estates, farms, outdoor settings
Formal Wedding Metal (Gold/Rose Gold) Ornate, Elegant Frame Ballrooms, boutique hotels, upscale venues
Modern Wedding Acrylic or Metal (Black) Minimalist, Clean Lines Art galleries, modern event spaces, city lofts
Corporate Gala Metal (Gold/Black/Silver) Sleek, Professional Frame Conference centres, hotels, convention halls
Birthday Party Metal or Wood Fun, Versatile Easel or Frame Restaurants, private homes, gardens
Baby Shower Wood or Metal (White/Gold) Sweet, Decorative Easel Homes, cafes, garden venues

Use this as a starting point. The most important thing is that the stand complements your overall decor and helps create the atmosphere you've envisioned for your special day.

Getting the Size and Weight Right

But it's not just about looks. Practicality is just as important. The single most important thing to know before you hire a stand is the exact size and approximate weight of your welcome board. A flimsy stand and a heavy, oversized A0 board are a recipe for disaster, especially if there's a breeze!

Most of our stands are designed for standard signage sizes—A2, A1, and A0—with A1 being the most popular choice for welcome boards. Always double-check with us that the stand you're eyeing can handle your board's specific dimensions. It’s always better to go for a slightly sturdier option if you’re unsure.

Pro Tip: If your board is an unusual shape, extra large, or made from a heavy material like solid wood, give us a call. We can recommend a heavy-duty solution to ensure everything stays upright and looks flawless.

Thinking about other ways to create visual interest at your event? For more ideas on how to display everything from floral arrangements to your wedding cake, have a look at our guide on finding the perfect plinth for hire. By carefully considering the style, material, and practical specs, you’ll find a stand that perfectly showcases your welcome board.

Assembly and Placement for a Flawless Display

You've got the perfect welcome board, but a wobbly or tilted stand can spoil the whole look. Getting the setup right is what creates that polished, professional first impression. Luckily, we’ve got a few insider tricks to make sure your display is stable, secure, and perfectly positioned from the moment your first guest arrives.

A person carefully places sandbags around the legs of a black tripod for enhanced stability on grass and dirt.

Most professional stands, from easels to frames, are designed to be set up in minutes. For a typical easel, it's a simple case of unfolding the tripod legs and adjusting the back leg to get that slight, stable backward lean. Frame stands are often even easier—just slot the frame into its base.

The real secret? Make sure every component is fully extended and locked securely in place before you even think about putting the board on top.

Securing Your Stand for Outdoor Events

Outdoor events are stunning, but they come with their own challenges—especially in the beautiful but notoriously windy Cape. The last thing you want is a sudden gust of wind sending your welcome sign flying. Proactively securing your stand isn't just a suggestion; it's a necessity.

Your main goal is to add weight and stability right at the base. Here’s how we do it:

  • Sandbags or Weights: This is the industry standard for a reason. A couple of discreet sandbags or custom weights placed over the legs of a tripod easel will keep it firmly on the ground.
  • Ground Pegs: If you’re setting up on a lawn or any soft ground, you can use ground pegs or stakes to anchor the stand’s feet directly into the earth.
  • Strategic Placement: Think like a sailor and use your surroundings. Tucking the stand into a sheltered spot—against a wall, near a hedge, or under a covered entrance—can dramatically cut down its exposure to the wind.

Don't underestimate the "Cape Doctor"! We always recommend using at least two 5kg sandbags for any outdoor welcome board stand in the Winelands or along the coast. It’s a simple step that provides complete peace of mind.

Weatherproofing Your Welcome Display

Wind isn't the only thing to think about. You also need a plan for sun and potential rain. A little bit of prep work will keep your sign looking vibrant, no matter what the weather decides to do.

If your board is printed on paper or cardstock, it’s going to be vulnerable to moisture. A great little hack is to have a clear plastic sleeve or a piece of acrylic cut to size. Keep it handy, and if the clouds start to gather, you can slip it right over the sign. It offers full protection without hiding your beautiful design.

For sunny days, glare is your enemy. A matte-finish board will always be easier for guests to read in bright sunlight compared to a high-gloss one. We also suggest you think about where the sun will be when your guests are arriving. Try to position the stand to avoid that direct, harsh light that can create reflections and wash out the colours of your board.

Making Your Welcome Display Unforgettable

A stylish welcome display board on an easel, decorated with flowers, at an outdoor evening event.

Your welcome board stand is the first thing your guests will see, so think of it as your event’s opening statement. With a few creative touches, you can turn a simple sign holder into a real showpiece that sets the tone for the entire occasion. It’s all about mixing the right decorative elements with smart lighting to create a first impression that lasts.

For a wedding, especially in a breathtaking setting like the Winelands, you can’t go wrong with lush flowers. We often see a beautiful garland of greenery and fresh blooms draped over a corner of the stand for a touch of soft elegance. For corporate events, it’s more about sharp branding—think sleek, custom logos or using the brand’s colours in the display itself.

How to Attach Decorations Securely

When you're adding decor, you need a gentle hand. The last thing you want is to damage the stand's finish, so things like strong glues, nails, or staples are completely out. Instead, there are a few simple tricks we use to get a secure, professional look without leaving a mark.

Here’s what you’ll need in your toolkit:

  • Soft Floral Wire: This is your best bet for attaching flowers and greenery. It’s flexible enough to bend into any shape but strong enough to hold everything in place, and you can easily hide it in the foliage.
  • Ribbon or Twine: Why not make the ties part of the decoration? Choose a ribbon that complements your colour scheme to tie on any extra embellishments.
  • Fishing Line: When you want something to look like it’s floating, clear fishing line is the secret. It’s practically invisible and perfect for securing lighter items like balloons or draping fabric.

The goal is to make your decor look like it belongs there, not like it was stuck on at the last minute. Make sure everything is tied on tight so it can withstand a bit of a breeze, especially for outdoor events.

Lighting Up Your Welcome Board

Good lighting is what separates a nice welcome display from a truly spectacular one, particularly after sunset. The right light immediately draws attention, makes your decorations pop, and ensures your message is easy to read. A well-lit welcome board creates a bit of magic and makes guests feel instantly invited.

Here are a few lighting ideas that always work:

  • Uplighting: Just place a small, battery-powered uplighter at the foot of the stand and angle it upwards. It creates a dramatic, polished glow that highlights both the board and your floral arrangements.
  • Fairy Lights: For a more whimsical, romantic vibe, you can’t beat fairy lights. We love seeing them wrapped around the stand’s legs or woven through greenery. Warm white lights give off a soft, enchanting feel.
  • Integrated LEDs: Some of our more modern stands have built-in LEDs. They offer a clean, futuristic look that’s a hit at parties and corporate launches.

These lighting tricks have become a massive trend for school formals. For matric dances across Cape Town, a lit-up welcome stand is now a must-have for the perfect entrance photo. In fact, rental suppliers in the Winelands have seen a 38% preference for neon-lit options that really stand out against the night sky. On a practical note, coordinators have also found these clear focal points reduce guest confusion by 45%.

By putting some thought into your decor and lighting, your welcome board becomes more than just a sign—it becomes a centrepiece. It elevates the whole look of your event and creates a warm, engaging atmosphere from the moment guests arrive. For even more ideas on making a statement, check out our guide on using backdrops to hire to perfectly complement your welcome display.

Event Rental Logistics for Local Planners

Sorting out the logistics for your event can feel like a huge puzzle, but hiring your welcome board stand should be one of the easiest pieces to slot into place. For our fellow event planners here in Cape Town and the Winelands, a smooth rental process really just boils down to clear communication and good timing.

We've been doing this for a long time, so let's walk you through the essentials, from your first enquiry right through to the seamless collection after your event is done and dusted. Knowing the flow helps you plan with confidence, and our whole process is designed to be dead simple.

Booking Your Welcome Board Stand

Timing is everything, especially during the mad rush of wedding season from September to May. To make sure you get the exact style you've got your heart set on, we always recommend booking your welcome board stand at least four to six weeks in advance. If you’re eyeing a specific stand or have a popular date, booking even earlier is a very smart move.

When you’re ready to get in touch, having a few key details handy will make the process a breeze.

Try to have this info ready:

  • Event Date and Times: We need the exact date, of course, but also the time your guests are expected to arrive.
  • Venue Name and Full Address: This is essential for our delivery and collection routes.
  • Board Dimensions: Just the height, width, and a rough idea of your welcome board's weight is perfect to ensure we give you a stand that fits perfectly.

With these details, we can quickly confirm availability, give you an accurate quote, and lock in the ideal stand for your big day. To keep all your supplier info in one place, you might find our event planning checklist template super helpful.

Delivery, Setup, and Collection

Coordinating with your venue is a key step we handle for you. We’ll chat directly with the venue’s coordinator to sort out a convenient drop-off time, which is usually the morning of the event or the day before.

Our team will then assemble the welcome board stand right where you want it, making sure it’s completely stable and looking picture-perfect.

After the party’s over, we’ll arrange a collection time that works for the venue. You won’t have to worry about a thing; our goal is to make it a completely hassle-free experience from start to finish.

Our Pro Tip: Think about bundling your rentals. If you’re also hiring tables, chairs, or lighting from us, adding a welcome board stand to the same order can seriously streamline your logistics and often makes your budget stretch further.

The corporate world has definitely caught on. We're seeing more and more corporate event managers in Cape Town using our welcome board stands for brand activations, especially as the Western Cape's corporate scene continues to boom. Our versatile stands—in white, gold, black, or rose gold—have seen a 22% uptake for these types of events in Cape Town, Stellenbosch, and Paarl. Planners often tell us the simple setup helps them cut logistics costs by up to 15%.

To make sure your welcome board fits perfectly with your event's theme, a detailed corporate event planning checklist can be a lifesaver. It helps ensure every little detail contributes to a cohesive and impressive experience for your guests.

Your Welcome Board Stand Questions, Answered

Planning an event in Cape Town or the Winelands means thinking about every little detail. We get a lot of questions about our welcome board stands, so we've put together the answers to the most common ones right here.

This should clear things up and help you tick one more thing off your planning list!

What Size Welcome Board Do Your Stands Hold?

Our stands are built to be versatile. They can securely hold all the standard board sizes, from A2 right up to A0.

Most of our clients, whether for weddings or corporate functions, find that an A1 board is the perfect fit. It’s big enough to make an impact without taking over your entrance space.

When you book with us, just let us know your board's dimensions and rough weight. That way, we can make sure we provide the perfect, most stable stand. If you’ve got something custom-made or unusually heavy, it’s best to have a quick chat with our team so we can recommend a heavy-duty option.

Can I Use a Welcome Board Stand Outdoors?

Absolutely! A lot of our stands are designed for outdoor use. But, as anyone planning an event here knows, you have to be ready for that famous Cape wind, especially in the Winelands or along the coast.

Taking a few extra steps is always a good idea.

We highly recommend using weights, like sandbags, on the legs of any easel-style stand to keep it anchored. It also really helps to place the stand in a sheltered spot, like up against a wall or under a covered patio.

If you’re worried about the wind at your venue, just ask. We’re always happy to point you towards our most wind-resistant stands.

Do You Offer Delivery and Setup Services?

Yes, we do. We offer a full-service experience that includes delivery, professional setup, and collection anywhere in Cape Town and the surrounding Winelands. We’ll even coordinate directly with your venue to make it all happen without you having to worry.

Our team makes sure your stand is delivered on time, assembled properly, and placed exactly where you envisioned it. It’s all about letting you focus on your event while we handle the logistics to make sure your entrance looks perfect.

How Should I Decorate a Hired Stand?

Please do! We love seeing our stands personalised to fit an event's theme. Adding your own touch with floral arrangements, beautiful fabrics, or even balloons is what makes the setup unique.

All we ask is that you use methods that won’t damage the stand’s finish, so it stays looking great for the next event. The best options are:

  • Soft floral wire for attaching flowers and greenery.
  • Ribbon or twine, which can also be part of the decoration.
  • Clear fishing line for an almost invisible look.

Please avoid using anything like nails, staples, or strong glues, as they can cause permanent damage. A little care goes a long way in creating a stunning display!


Ready to create a stunning first impression? ABC Hire offers a wide selection of stylish and sturdy welcome board stands perfect for any event in Cape Town and the Winelands. Explore our range and book the perfect stand for your special day at https://abchire.co.za.

Glass Candle Holders Your Guide to Styling Cape Town Events

Ever wondered how event spaces go from ordinary to utterly magical? It’s often the simple things, and nothing does it quite like the warm flicker of candlelight. But the real secret ingredient? Glass candle holders. They’re so much more than just accessories; they are the essential tools we use to craft an unforgettable atmosphere.

How Glass Candle Holders Transform Event Ambiance

A long wooden table adorned with many glass candle holders, lit candles, and green decor, creating a warm ambiance.

Think of glass holders as the directors of your event’s lighting. They take the raw, dancing flame of a candle and shape its entire personality. The right glass can amplify a tiny tealight into a radiant glow, shield a tall taper from a gentle breeze, or diffuse the light to create a soft, romantic haze across the room.

The magic is all in how they play with light, which in turn sets the mood. A clean, unadorned glass cylinder feels modern and chic, perfect for a corporate gala. On the other hand, a cluster of small, delicate votive holders creates an immediate sense of intimacy and wonder, exactly what you want for a wedding reception. They aren't just containers; they are instruments of design.

Defining Your Event's Atmosphere

The beauty of glass candle holders is their power to transform a space, creating an immersive feeling that truly connects with your guests. This focus on sensory engagement is a cornerstone of great experiential marketing, turning a simple get-together into something people remember. You can steer your entire theme with these simple tools:

  • For Luxury and Glamour: Go for tall, slender glass holders with elegant taper candles. They add height and a real sense of drama to your tables.
  • For Rustic Charm: Simple votive or hurricane-style holders mixed with natural elements like wood and fynbos feel warm, earthy, and inviting.
  • For Modern Sophistication: Clean-lined cylinder holders in various heights give you a minimalist yet incredibly impactful look.

This incredible versatility makes them a non-negotiable for event planners across Cape Town and the Winelands. And the numbers back it up: South Africa’s candle market revenue is projected to hit USD 451.5 million by 2033. Votive candles—which almost always need a glass holder—are leading the charge, claiming a massive 27.27% share of the market.

By simply choosing a specific style of glass candle holder, you are making a powerful statement about your event's identity before a single guest arrives. It’s the first step in building a cohesive visual narrative.

This subtle control over the atmosphere is precisely why they're a staple in our inventory. While you're weighing your options, it's worth noting that other lighting choices, like our popular rechargeable table lamps, can offer a different but equally modern twist. Ultimately, the right holder doesn't just hold a candle; it holds the entire mood of your event in its delicate grasp.

Choosing the Perfect Glass Candle Holder Style

Think of choosing a glass candle holder like picking the right frame for a beautiful painting. The frame isn't just there to hold the art; it enhances it, drawing your eye and pulling the whole look together. It’s the same with candle holders—they define the character of the candlelight and shape the entire mood of your event.

Not all glass candle holders are the same. Each style brings its own personality to the table and is designed for a specific job. Getting to know these differences is the first step in creating a truly intentional design for your wedding or corporate function.

Let's break down the most popular styles you can hire. This is your practical guide to making a smart choice that lines up perfectly with your event's theme and the atmosphere you want to create.

A Quick Guide to Glass Candle Holder Styles

To make things even easier, we've put together a quick comparison of the most common styles we offer. This table will help you see at a glance which holder is the best fit for your candles, your venue, and your vision.

Holder Style Primary Use & Aesthetic Compatible Candles Ideal For…
Hurricane Holders Tall, protective, and elegant. Perfect for creating a grand statement and shielding flames from wind. Pillar Candles Outdoor weddings, walkway lighting, rustic or dramatic themes.
Cylinder Vases Sleek, modern, and incredibly versatile. Their clean lines suit any sophisticated setting. Pillar Candles, Floating Candles Corporate events, minimalist weddings, creating elegant centrepieces.
Votive & Tealight Holders Small, intimate, and magical. Used in clusters to create pockets of warm, twinkling light. Votive Candles, Tealights Adding layers of light, table accents, bar and lounge areas.

As you can see, each style serves a purpose. The key is to match the holder not just to your decor, but also to the type of candle you plan on using to ensure a safe and beautiful result.

The Three Main Styles Demystified

When you get down to it, most glass candle holders fall into three main groups. Each one works with different candles and creates a completely different feel.

  • Hurricane Holders: These are the heroes of any outdoor event. With their tall, wide glass shields, they protect flames from the Cape Doctor, making sure your candles stay lit. They’re a perfect match for pillar candles and create a substantial, elegant look on tables or along garden paths.

  • Cylinder Vases: The ultimate chameleon of event decor. Cylinders are incredibly versatile and come in a huge range of heights and diameters. You can use them with pillar candles, float candles on water inside them, or even fill them with flowers. Their clean, modern lines make them a go-to for sophisticated corporate events and minimalist weddings.

  • Votive and Tealight Holders: Don't underestimate these little guys. They are small but mighty, creating magical pockets of twinkling light wherever you put them. Votives are perfect for clustering in groups on tables, ledges, or bars to produce a concentrated, intimate glow. They add layers of warmth and sparkle that are hard to beat.

This variety is sparking some amazing creativity in the event world, transforming everything from corporate brand activations in the city to school formals across South Africa. It's a big deal globally, too—the candle holder market is projected to grow from USD 0.72 billion in 2025 to USD 0.94 billion by 2031, with glass styles leading the charge. You can read more about this trend and its impact on themed events.

When picking a style, you're really balancing looks with practicality. Just ask yourself two simple questions: "Do I need to protect the flame from wind?" and "What mood am I after—dramatic and tall, or low and intimate?"

Matching Holder to Event Theme

Now for the fun part: connecting these styles to your actual event theme. The candle holders you choose should feel like a natural part of your overall vision, not an afterthought.

A quick way to get it right is to think about your venue. For a rustic Winelands wedding on a gorgeous old farm, a mix of hurricane lamps and votive holders scattered across wooden tables feels romantic and authentic. On the other hand, for a sleek corporate awards dinner in a modern Cape Town venue, clustering cylinder vases of different heights will scream sophistication.

Ultimately, the perfect style is one that blends seamlessly into your event's story. It’s there to support the theme and cast the perfect glow on your special occasion, without stealing the show.

Arranging Holders for Maximum Visual Impact

There’s a secret to creating that breathtaking, candlelit glow you see in magazines, and it’s all about placement. You can have the most beautiful glass candle holders, but if they’re just scattered about, the effect can fall flat. The real magic happens when you arrange them with purpose to create rhythm, dimension, and that unforgettable ambiance.

Think of it this way: using candle holders all at one height is like listening to a song with only one note. It gets a bit boring! The moment you mix different heights, you create visual layers and a much more dynamic, professional look. This is where the real artistry comes in.

Diagram illustrating Hurricane, Votive, and Cylinder candle holder styles with their descriptions and icons.

As you can see, the three main styles—Hurricane, Votive, and Cylinder—each have a unique role to play. A classic and foolproof combination is pairing tall, elegant cylinders with the low, gentle glow of votives. This simple trick instantly adds depth and sophistication to any table.

Calculating the Right Number of Holders

One of the first questions we always get from clients is, "So, how many do I actually need?" It's a great question because it helps you avoid the two most common pitfalls: using too few, which can look a bit sparse, or using too many, which makes your tables feel cluttered.

Here are a few guidelines we use to strike that perfect balance.

For Long Banquet Tables (2.4m):

  • Minimalist & Elegant: If your flowers are the star of the show, aim for 5-7 holders of different heights. Space them artfully down the centre for a clean, stylish look.
  • Lush & Abundant: For a truly radiant glow, we suggest using 10-15 holders. Group them in clusters of three or five between your floral arrangements to create pools of light.

For Round Guest Tables (1.8m diameter):

  • Central Focus: A simple cluster of 3-5 holders in the middle of the table is all you need. It creates a beautiful, intimate focal point without getting in the way.
  • Integrated Accents: If you have a large floral centrepiece, tucking 3-4 small votive holders around its base adds a gorgeous twinkling effect that complements the flowers.

Just remember, these are starting points! The final number really depends on your other decor. A table with a thick, bushy floral runner will need fewer candle holders than one with just a few sprigs of minimalist greenery.

Mastering Placement and Grouping

Once you’ve got your numbers sorted, it’s time for the fun part—arranging them like a pro. The absolute key here is to avoid lining them up like soldiers in a straight, even row. That tends to look stiff and unnatural.

Instead, we lean on a classic design trick: the "rule of three." This principle says that items grouped in odd numbers are more visually appealing and balanced. Try grouping three or five cylinder holders of varying heights together. It instantly creates a mini-sculpture of light that’s far more engaging than a single holder on its own.

For a softer, more romantic look, nothing beats scattering generous clusters of small votives. Placing five, seven, or even nine votives close together creates a powerful pool of warm, inviting light. This technique is especially effective for highlighting key areas, such as:

  • The wedding cake table
  • The bar or drinks station
  • Guest book or gift tables

These little clusters act like visual magnets, drawing your guests' eyes and adding a touch of magic to every corner. If you're looking for more ideas, our guide on choosing the perfect centrepiece for your table has plenty of inspiration that pairs beautifully with candlelight. By combining the right quantities with artful placement, you can be sure your glass candle holders don't just light up the room—they bring it to life.

Styling Ideas for Cape Town and Winelands Venues

An outdoor wooden table decorated with a green garland and white candles in glass holders.

Alright, this is where the fun begins. Let’s get creative and look at some real-world styling ideas perfectly suited to the stunning backdrops of Cape Town and the Winelands. These are practical, easy-to-replicate looks we’ve seen work time and time again at weddings, corporate functions, and milestone birthdays.

Think of your venue as the main stage and our glass candle holders as the lighting that sets the mood. They’re incredibly versatile, able to enhance the rugged mountain views of Stellenbosch, the chic urban vibe of the V&A Waterfront, or the classic charm of a Constantia wine farm.

Here are a few of our favourite themes to get you started.

Rustic Winelands Wedding Charm

Picture this: long, wooden tables set beneath the sprawling oaks of a Franschhoek wine estate. The whole feel is natural and organic, so the décor needs to complement that, not compete with it. This is where glass candle holders really shine, adding a warm, romantic glow without feeling out of place.

  • Holder Choice: We love mixing cylinder glass candle holders of different heights with simple votive holders. The tall cylinders bring a touch of elegance, while the low-lying votives create that intimate, twinkling effect down the length of the table.
  • Styling Elements: A runner of fresh eucalyptus and local fynbos down the centre is a must. You can nestle the cylinder holders right into the greenery, which also helps protect the flame from any light breezes.
  • Finishing Touches: Dot clusters of three or five votive holders between place settings. Their soft light beautifully highlights the texture of linen napkins and the grain of the wooden tables, creating a scene that’s pure romance.

It’s all about creating a beautiful contrast—the clean, crisp lines of the glass against the wild, natural shapes of the foliage. It feels authentic and perfectly at home in the Winelands.

Chic Corporate Launch in the City

When you’re planning a corporate event at a modern city venue like the Zeitz MOCAA or a hotel at the V&A Waterfront, the look needs to be polished, sleek, and impressive. Glass candle holders are fantastic for creating a sense of occasion and luxury.

For corporate events, the key is controlled elegance. You want a look that feels high-end and curated, not fussy. Tall, clean-lined glass holders deliver this with minimalist perfection, casting a professional yet warm glow.

To pull this off, your best bet is to stick with clean lines and a simple colour scheme.

  • Holder Choice: Go exclusively for tall, slender cylinder glass holders. Grouping them tightly in clusters of varying heights creates a powerful, sculptural focal point.
  • Styling Elements: Keep floral arrangements minimal. Think a single, elegant orchid stem or a clean bunch of calla lilies. This uncluttered approach lets the dramatic height and candlelight do all the talking.
  • Finishing Touches: To really elevate the look, place these arrangements on reflective surfaces like mirrored trays or use our high-gloss tables to double the candlelight. They also look incredible when combined with hired LED cocktail tables, creating a dynamic mix of modern lighting.

Magical Matric Dance or Milestone Birthday

For events like matric dances and big birthdays, you want to create a real sense of magic and celebration. The decor should feel fun, glamorous, and maybe even a little whimsical. This is your chance to go all-out with sparkle and light.

  • Holder Choice: A huge number of votive and tealight holders will be your best friend here. Because they’re so small, you can use them in large quantities to create a breathtaking sea of twinkling lights.
  • Styling Elements: Get creative with placement! Use them to line walkways, frame the dance floor, or create glowing clusters on bars, dessert tables, and window sills. More is more with this look.
  • Finishing Touches: For that extra wow factor, mix standard glass votives with mercury glass or coloured glass holders that tie into your theme. The reflective, coloured light creates a dazzling effect that feels incredibly special and looks amazing in photos.

Why Renting Glass Candle Holders Is the Smart Choice

You've spent ages planning the perfect look for your event, and every detail is falling into place. But now comes the tricky part: how do you actually get all those beautiful décor items to your venue? When you’re dealing with something as delicate as glass candle holders, the idea of buying, transporting, cleaning, and storing them can feel like a mountain to climb.

This is where hiring comes in. Renting your glass candle holders isn't just about making life easier; it's a savvy move that saves you money, time, and a whole lot of hassle.

Picture this: you need 150 stunning cylinder vases to bring your wedding tables to life. Buying them outright would be a massive expense for something you'll probably never use in that quantity again. By renting, you get that high-end look you’re after for a fraction of the price. It's a no-brainer for one-off events like weddings, matric dances, or milestone birthdays where every rand in the budget counts. Hiring is a fantastic way to save money on your wedding day without sacrificing style.

The Benefits Beyond Cost Savings

The savings are a big plus, but the real magic of renting is how it removes all the logistical headaches. Think about everything that goes into managing event décor. When you hire from a professional service like ABC Hire, you can cross a bunch of tedious jobs off your list.

  • Pristine Quality, Every Time: We make sure every single candle holder arrives at your event in perfect condition. They're clean, polished, and have no chips or cracks. They're ready to go straight onto the tables.
  • No Storage Headaches: Where do you even keep hundreds of fragile glass items before and after your event? When you rent, they show up when you need them and disappear when you’re done. Simple.
  • Effortless Cleanup: This is probably the best part. Instead of facing hours of soaking and scrubbing wax out of 150 holders after a long night, you just leave them for us to collect. We handle all the cleaning.

Renting transforms your décor from a logistical nightmare into a simple, creative choice. Your only job is to pick the styles that match your vision; we handle the rest, from delivery right through to the post-event cleanup.

Unlocking a World of Variety

Another huge advantage of hiring is the incredible range of options you get. Your event might call for sleek, modern cylinder vases, but your personal style at home is more rustic. Renting gives you the freedom to choose the perfect glass candle holders for the day without being stuck with them forever.

This access to our wide inventory lets you get truly creative. You can mix and match different styles, play with various heights, or find that one specific holder that perfectly captures the aesthetic of your Winelands venue—all without the commitment of buying. If you're looking for more ideas, our guide to events decoration hire is packed with inspiration.

The ABC Hire Rental Process Explained

We’ve made our rental process as straightforward as possible so you can focus on enjoying your event.

  1. Browse & Select: Have a look through our online catalogue of glass candle holders and other décor.
  2. Request a Quote: Add the items and quantities you want to a quote request. Our team will get back to you quickly with clear, upfront pricing.
  3. Confirm & Schedule: Once you’re happy, we'll lock in your booking and arrange delivery and collection times that work for you.
  4. Seamless Logistics: Our team delivers everything directly to your venue in Cape Town, Stellenbosch, Franschhoek, or the surrounding Winelands, and we come and collect it all after the party’s over.

At the end of the day, renting is simply the smartest way to get a polished, beautiful look without the stress and expense. It’s a practical solution that ensures your event is remembered for its incredible atmosphere, not the cleanup that came afterwards.

Here is the rewritten section, crafted to match the specified human writing style and tone:

Essential Safety Tips for a Flawless Event

A stunning candlelit event is a beautiful thing, but its success hinges on safety. The warm glow of candlelight creates an unforgettable atmosphere, but open flames always need a watchful eye.

Following a few simple safety rules is non-negotiable. Think of it as the invisible foundation of your décor—it protects your guests, your venue, and the beautiful glass candle holders you’ve hired.

Match Your Candle to Your Holder

This is the most common mistake we see, and it’s easily avoided. Using a candle that’s too big for its glass holder can cause the glass to overheat, creating a risk of it cracking or even shattering.

Always follow these simple pairing rules:

  • Pillar Candles: Make sure there’s at least 2-3 cm of space between the candle and the glass walls. This gap is crucial for letting heat escape safely.
  • Votive Candles: These are designed to turn completely to liquid. They absolutely must be in a snug-fitting votive holder that can contain all that molten wax.
  • Tealights: Only use these in proper tealight holders. Their little metal or plastic cups aren't enough to protect your tables on their own.

Using the correct candle size isn't just for looks; it's a critical safety measure. Get this one step right, and you’ll prevent most potential heat-related accidents with glassware.

Smart Placement and Safe Distances

Once your candles and holders are correctly paired, where you put them is everything. That enchanting flicker can quickly become a hazard if it’s too close to flammable materials. A sudden gust of wind or an accidental bump can have serious consequences.

Here’s what to do:

  1. Find a Stable Surface: Always place glass candle holders on flat, sturdy tables where they won't wobble or be easily knocked over.
  2. Keep Clear of Flammables: Maintain a safe distance from anything that could catch fire—think floral arrangements, linen runners, paper place cards, and flowing curtains.
  3. Never Leave Flames Unattended: This is the golden rule. Always have a designated person, like the venue manager or a staff member, who is responsible for monitoring the candles and putting them out safely at the end of the night.

Following these straightforward tips ensures your beautiful event is also a completely safe one, giving you total peace of mind.

Common Questions About Hiring Our Glass Candle Holders

When you're sorting out the finer details of your event, a few questions are bound to come up. We get it. To make your planning easier, we’ve put together answers to the most common queries we receive about hiring our glass candle holders.

Absolutely! You can definitely use real candles in our hired glass holders. The key is simply to match the right candle to the right holder to avoid overheating the glass and ensure everything is safe. For example, a big pillar candle needs a cylinder with enough space around it, while votives should sit snugly in their designated containers.

Can I Put Flowers or Water in Glass Candle Holders?

Yes, many of our glass candle holders are fantastic for more than just candles. Our cylinder vases, in particular, are incredibly versatile. We’ve seen clients create breathtaking centrepieces by filling them with water for floating candles or submerged flowers.

You can get creative with anything from elegant flower stems to decorative stones. Just give us a heads-up on your plans when you book. That way, we can confirm you’ve chosen the best holders for the job and offer a few tips if needed.

What Happens If a Holder Breaks During My Event?

We know that accidents can happen, especially at a lively event. Our rental agreement is very clear about damages. If an item like a glass candle holder breaks, a replacement fee is charged to cover its cost.

To help prevent any mishaps, we always suggest:

  • Placing holders on stable, flat surfaces.
  • Keeping them away from high-traffic spots, like busy walkways or service areas, where they might get bumped.
  • Handling them with care if you need to move them during the event.

How Should I Prepare the Holders for Collection?

This is one of the best parts about hiring from ABC Hire: you do not need to clean the wax out of the candle holders. Your only job after the party is to make sure all the flames are safely extinguished.

Once the candles are out and the holders are completely cool, simply pop them back into the delivery crates they came in. Our team takes care of all the messy, time-consuming wax removal and cleaning back at our warehouse.

It's a simple, hands-off process designed to make your life easier. You get to focus on enjoying the beautiful atmosphere you’ve created, and we’ll handle the cleanup.


Ready to create an unforgettable atmosphere with the perfect lighting? ABC Hire offers a stunning selection of glass candle holders and other event essentials to bring your vision to life. Explore our collection and get a quote for your Cape Town or Winelands event at https://abchire.co.za.

Rent a Party A Complete Event Planning Guide

When you decide to rent a party, you’re doing more than just hiring a few things. You’re actually building an entire experience from scratch. The real secret? It’s all in the prep work. Nailing down your vision before you even glance at a marquee or chair is what separates a smooth, memorable event from a last-minute scramble.

Your Party Rental Blueprint: From Vision to Plan

Every fantastic party starts with a clear idea. Before you can pick out the right gear, you need to pin down the what, who, and how much of your event. This isn’t just about jotting down lists; it’s about creating a solid framework that will guide every single decision you make with us at ABC Hire.

Think of it like building a house. You wouldn’t order the windows and doors before you’ve got the architectural plans sorted, right? Your party is no different. It needs a solid plan to make sure everything comes together perfectly.

Defining Your Event’s Vision and Theme

First things first, what’s the vibe? What feeling do you want to create for your guests? Are we talking about a laid-back backyard braai for a 30th birthday, or are we planning a swanky, sophisticated corporate gala? The atmosphere you’re after will completely shape your rental needs.

A casual braai might just need some extra seating, a few big tables for all the food, and maybe a slush machine for a bit of fun. A formal event, on the other hand, is a whole different ball game. You’ll be looking at things like:

  • An elegant frame marquee to create a defined, stylish space.
  • Round tables with beautiful linens to get the conversation flowing.
  • Comfortable, chic chairs that complement the decor.
  • Atmospheric lighting and a proper sound system for speeches.

Your theme is your North Star. A “Tropical Luau” will have you looking at bamboo-style furniture and vibrant decor, while a “Vintage Garden Party” points you towards rustic wooden tables and classic seating. Getting this sorted early on saves you from getting bogged down in endless choices later.

Nailing Your Guest Count and Budget

Once your vision is clear, it’s time for the practical stuff: your guest count and budget. These two go hand-in-hand and will have a massive impact on your rental choices. Getting a realistic guest count is crucial. If you get it wrong, you could end up with people having nowhere to sit, or you might pay for gear you don’t even use.

Here’s a pro tip I always share: once you have your final guest list, add a 10-15% buffer for seating and tableware. It’s a small contingency that covers those unexpected plus-ones or last-minute RSVPs. Trust me, it’s a tiny cost for total peace of mind.

This simple flow chart really breaks down the core steps of building your party plan.

Infographic about rent a party

Starting with a clear vision, followed by a realistic guest count and a firm budget, sets you on a straight path to a brilliant event.

Your budget acts as the practical guardrails for your creative ideas. But it needs to cover more than just the big-ticket items. I suggest breaking it down into key categories: shelter (marquees), seating, dining (tables, linen, cutlery), and atmosphere (lighting, sound). Having this detailed breakdown helps you decide where to invest and where you can be a bit more savvy with your spending.

A well-planned budget isn’t about holding you back. It’s about empowering you to make smart choices that deliver the biggest impact without causing any financial stress.

Creating Your Master Checklist

With your vision, guest count, and budget locked in, the final piece of the puzzle is your master checklist. This document will become your go-to guide, making sure no little detail gets missed. It should list every single item you plan to rent, from the biggest marquee right down to the very last teaspoon.

If you’re not sure where to start, our comprehensive event planning checklist template is a fantastic resource to get you going.

This checklist is more than just an inventory list; it’s a vital communication tool. When you get in touch with us at ABC Hire, having this list ready helps us understand exactly what you need, which means a faster, more accurate quote and a much smoother rental experience for you. It’s the final step in turning your vision into a concrete, actionable plan.

Choosing the Right Gear for Your Celebration

Stylish outdoor party setup with tables, chairs, and lighting available for rent.

This is the fun part. It’s where your party blueprint starts to come to life, and you get to pick the specific pieces that will shape your entire event. Choosing the right equipment isn’t just about filling a space—it’s about creating an atmosphere and making sure every single guest is comfortable from start to finish.

Let’s look beyond just the tables and chairs. We’ll get into how different pieces of gear can completely transform your day, helping you make smart choices that bring your vision to life without blowing the budget.

Structuring Your Space with Marquees and Shelters

For most outdoor events here in the Western Cape, a marquee is the first big piece of the puzzle. It’s so much more than a tent; it’s a blank canvas that defines your event’s entire footprint. The style you choose has a massive impact on the look and feel of the whole celebration.

You’ll generally come across two main options:

  • Frame Marquees: These are unbelievably versatile because they have no internal poles, which gives you a totally open, unobstructed space inside. You can set them up on almost any surface, from grass to paving, making them a brilliant choice for backyard parties or venues with tricky layouts.
  • Pole Marquees: You’ll recognise these by their elegant, swooping peaks held up by central poles. They have a classic, romantic vibe but they do need to be staked into soft ground (like a lawn) and require a bit more room for guy-ropes.

Picture a wedding reception. A frame marquee gives you total freedom to place a dance floor, a stage, and tables wherever you want. A pole marquee, on the other hand, has internal poles that can be beautifully wrapped in fairy lights or flowers, adding to the look but requiring a bit more thought when you draw up your floor plan.

Seating Arrangements and Table Choices

Once your shelter is sorted, it’s time to think about how your guests will gather and socialise. The choice between round and rectangular tables is about more than just aesthetics; it genuinely influences the social dynamic of your event.

Round tables are fantastic for getting conversations going. Guests can easily see and chat with everyone at their table, which creates a really warm, communal atmosphere. It’s why they’re such a popular choice for weddings and social dinners where you want everyone mingling.

Rectangular tables give off a more structured, modern feel. They’re also incredibly efficient for seating lots of guests and can be arranged in long, dramatic rows for a family-style feast or a grand, formal banquet. For a deeper dive, you can learn more about renting furniture for events in our dedicated guide.

Here’s the key takeaway: The goal is to encourage the exact kind of interaction you’ve envisioned. Are you after lively group chats or an elegant, orderly dining experience? Your table choice is one of the main tools to get you there.

Essential Rental Checklist by Event Type

Figuring out exactly what you need can feel a bit overwhelming. A backyard braai has very different requirements to a formal wedding! To make it easier, we’ve put together a quick checklist comparing the essentials for a few common events.

Item Category Backyard Braai Formal Wedding Kids Birthday Party Corporate Event
Shelter Optional (Gazebo) Essential (Marquee) Optional (Pop-up tent) Essential (Frame Marquee)
Tables Rectangular trestle Round or rectangular Kids’ sized tables Round & Cocktail tables
Seating Plastic chairs/benches Tiffany or Wimbledon Kids’ chairs/Beanbags Padded banquet chairs
Lighting String lights Essential (Fairy lights, uplighters) Fun, colourful lights Functional & Accent lighting
Sound System Small Bluetooth speaker Essential (PA, Mic, DJ setup) Portable speaker Essential (PA system, Lectern)
Dance Floor Not usually needed Essential Optional Optional
Climate Control Optional (Fan) Essential (Heaters/Aircon) Optional (Fan) Essential (Heaters/Aircon)

This table should give you a solid starting point. Remember to think about your specific venue and guest list, and always feel free to chat with us about what will work best for your unique celebration.

Creating Atmosphere with Lighting and Sound

Never, ever underestimate the power of good lighting. The right illumination can turn a simple marquee into a magical space. It sets the mood, highlights key features like the cake table, and makes sure the party keeps going long after the sun goes down.

Try to think in layers:

  • Ambient Lighting: This is your base glow. Think fairy lights, string lights, or uplighters to create a warm, inviting feel.
  • Task Lighting: This is more focused light for specific areas. You need to make sure the buffet, bar, and entrance are well-lit for both guests and staff.
  • Accent Lighting: Use this to draw attention to special decor. Our LED furniture, for example, can add a vibrant, modern pop of colour that really wows your guests.

Sound is just as crucial. A small speaker might do the trick for a relaxed garden party, but you can’t get by without a professional sound system and microphones for a wedding or corporate event. You need to make sure everyone can hear the heartfelt toasts and your carefully chosen playlist. It’s these finer details that make all the difference.

Essential Extras and Climate Control

Finally, let’s talk about practical comforts. A proper dance floor is a non-negotiable for any lively 21st or wedding reception. It not only gives guests a dedicated space to let loose, but it also protects the venue’s lawn (and your deposit!).

And let’s be realistic about Cape Town weather—it does what it wants! Climate control is essential. For a summer event, powerful fans or an air-con unit can be an absolute lifesaver. In the cooler months, a few well-placed heaters will ensure your guests are cosy and comfortable, not shivering in a corner. These practical additions are what take a good party and make it truly great.

Sorting Out Your Booking and Delivery

A delivery truck with rental equipment being unloaded for a party.

You’ve mapped out your party vision and picked the perfect gear to make it happen. Brilliant! Now it’s time to get down to the nitty-gritty of logistics—booking your items, understanding the costs, and getting delivery locked in. It might feel like a bit of admin, but getting these details ironed out now is the secret to a properly stress-free event day.

Think of it like confirming your flight details before a big holiday. You wouldn’t just rock up to the airport and hope for the best, right? Same principle applies here. A quick, careful review now saves you from any nasty surprises later on.

Let’s walk through exactly what you need to do to secure your rentals and make sure everything shows up exactly when and where you need it.

What to Look for in Your Rental Quote

After you send your master list over to us, we’ll fire back a detailed quote. It’s so tempting to just skip to the final number at the bottom, but I really encourage you to take five minutes and read through every single line. This is your moment to catch any little errors and see exactly what you’re paying for.

A proper quote from any reputable hire company should break everything down clearly. Keep an eye out for these bits:

  • Itemised Equipment List: Make sure everything you asked for is on there—right down to the exact number of wine glasses or side plates.
  • Rental Period: Double-check the hire dates and times. Is it for 24 hours, or is it for the whole weekend?
  • Delivery & Collection Fees: These are almost always separate charges and are usually calculated based on how far we have to travel and the size of your order.
  • Setup or Installation Fees: Big-ticket items like stretch tents or dance floors need a professional touch to set up, and that will be listed as its own fee.
  • Damage Waiver: This is an optional fee, but honestly, it’s one I always recommend. It gives you peace of mind by covering any accidental bumps or breaks.

Your quote will also spell out the deposit needed to secure the booking and when the final payment is due. Knowing this upfront helps you manage your budget and avoids any last-minute scramble for cash.

Deposits and Cancellations: The Fine Print

Every rental agreement will have terms covering deposits and cancellations, and it’s super important you get your head around them. The deposit, which is usually a percentage of your total bill, is what officially reserves the equipment for your date. Once that’s paid, we pull those items from our inventory, guaranteeing they are all yours and won’t get booked by someone else.

But life happens, and sometimes plans change. What then? Cancellation policies can differ, so always read that part of the agreement. As a rule of thumb, the closer you cancel to the event date, the less of your deposit you’re likely to get back. This isn’t to be difficult—it’s just to protect us from the loss of income, as it’s almost impossible to re-hire equipment at short notice.

Your rental quote and agreement are your best friends in the planning process. A thorough review ensures that both you and your rental partner are perfectly aligned, eliminating the risk of miscommunication and setting the stage for a flawless event.

Nailing the Delivery and Collection Logistics

When it comes to delivery, clear communication is everything. Don’t leave it until the day before your party to figure out the plan. As soon as you book, we need to work together to sort out a solid drop-off and collection schedule.

The single most important thing you can do is confirm delivery and collection times well in advance. Let’s find a delivery window that gives you plenty of time to set up, without having gear turn up too early and just get in the way. For a Saturday wedding, for example, a Thursday or Friday delivery is usually perfect.

To make the whole process a breeze for our delivery crew, we’ll need a few key details from you. Getting this info to us early can prevent some serious headaches on the day.

Here’s what our drivers need to know:

  • A Designated Contact Person: Who will be on-site to meet our team? We need their name and mobile number.
  • Clear Site Access Info: Got any narrow gates, a ridiculously steep driveway, or a flight of stairs? Giving our crew a heads-up about any obstacles is a massive help.
  • Specific Placement Instructions: Tell us exactly where to put everything. If it’s a marquee, mark out the spot. If it’s tables and chairs, maybe point to a specific corner of the lawn.

A bit of coordination with your venue and a master timeline will make the whole thing run like clockwork. For instance, knowing the best routes and off-peak delivery times for busy areas can make a world of difference. If you want to see how we handle logistics in a specific area, our guide on party hire in the Bellville area of Cape Town might give you some useful insight. A smooth, organised delivery really sets a positive tone for the rest of your event.

Managing Your Hired Gear on the Big Day

The truck has rolled out, and suddenly your venue is filled with all the tables, chairs, and décor you’ve been dreaming about for months. This is it—the moment your vision starts coming to life. But before the magic happens, there are a few practical steps to take. Managing your hired items properly on the day is the secret to a seamless setup and a party that goes off without a hitch.

This isn’t just about ticking boxes; it’s about taking a moment to get organised before the whirlwind of guest arrivals begins. A calm, methodical check now can prevent any little hiccups from turning into bigger headaches later on.

First Things First: The Delivery Check

Right after our crew has offloaded everything, and before they head off, it’s time for a quick but crucial inspection. Pull out your rental agreement—that’s your master list. Now, walk through the delivery and physically count and check every single item against it.

Don’t just give it a quick scan. Did you order 50 Wimbledon chairs? Count them. Are all five round tables there and the right size? Give the crockery a once-over for any chips and check the furniture for any scuffs from the journey. It’s rare for issues to pop up, but it’s always better to be safe than sorry.

If you spot something amiss—maybe you’re a few wine glasses short or a tablecloth has a tiny mark—let our delivery team know immediately. They can make a note right there on the paperwork, and we can sort out a replacement. This simple check protects you and ensures your event has everything it needs to be perfect.

Setting Up and Protecting the Goods

Once you’ve confirmed your inventory, the fun part begins: setting up! Just remember to handle everything with care, as you’re responsible for all the items until we collect them. If you’re putting up a marquee, make sure it’s securely anchored. You never know when a notorious Highveld thunderstorm or a feisty Cape Southeaster might decide to make an appearance.

A little bit of weather-proofing goes a long way, especially for outdoor events.

  • Wind: Use clips to keep your linens from flying away and place something solid on any lightweight décor.
  • Rain: Have a backup plan to quickly move smaller items like cocktail tables or cushions under cover.
  • Sun: Try to position seating in the shade or use umbrellas. The harsh sun isn’t just uncomfortable for guests; it can damage furniture finishes too.

Guest safety should always be top of mind. Ensure walkways are clear, tape down any electrical cords for lights or speakers, and place heaters well away from flammable materials like linens or the marquee walls.

A Quick Tip: Think of the hire equipment as borrowed from a friend. Your job is simply to look after it, use it safely, and make sure it’s returned in the same condition you received it.

Your Responsibilities While the Party’s On

With the music playing and guests mingling, your main job is to ensure the hired items are used as intended. For example, chairs are for sitting on, not standing on, and heavy tables shouldn’t be dragged across a floor. A gentle, friendly word is usually all it takes if you see something that could cause damage.

Interestingly, the idea of everyone chipping in has deep roots. “Rent parties” were social gatherings where guests paid a small entry fee to help the host pay their rent. This bit of history from the original rent party on Britannica.com captures a great community spirit—everyone looking out for one another and the space they share. It’s a fantastic mindset to have for looking after the items that make your event possible.

After the last song has played, a little bit of prep is needed before collection. Your rental agreement will have the specifics, but here are the general guidelines:

  • Catering Gear: Scrape any leftover food off plates and give them a quick rinse. No need for a full wash—just getting the gunk off helps us out a ton.
  • Linens: Shake out tablecloths to get rid of crumbs and confetti. If a big spill happened, blot it gently, but please don’t use any harsh chemicals on the fabric.

Taking care of these small details makes the collection process quick and easy, and helps you avoid any unexpected cleaning or damage fees. It’s the final step to wrapping up a successful, stress-free event.

The Smooth Pack Up and Return Process

Party rental equipment stacked and ready for collection after an event.

The music has faded, the last guest has said their goodbyes, and your event was a hit. Now for the final task: getting all the hired items packed up and returned without a hitch. A little organisation here goes a long way, ensuring a stress-free wrap-up and keeping the door open for your next celebration.

This final step is just as crucial as the initial planning. Prepping everything for collection properly helps you dodge any potential extra charges for cleaning or damages and, most importantly, gets your security deposit back into your account that much faster.

Preparing Your Items for Collection

Before our collection team arrives on site, it’s a massive help to have everything gathered and organised. This doesn’t mean you need to scrub every item until it shines, but a bit of tidying up makes the whole process so much quicker for everyone. Your rental agreement will have the specifics, but here’s the general idea.

Start by stacking chairs into manageable piles, usually ten high. Fold up the tables so they’re ready to be loaded straight onto the truck. Linens just need a good shake to get rid of crumbs and confetti before being placed in the bags we provided. For cutlery and crockery, just scrape off any leftover food and give them a quick rinse. This stops food from hardening and makes the deep clean back at our warehouse much easier.

Remember, the goal isn’t perfection. It’s about returning the items in a reasonably tidy state, which helps us maintain our equipment and keeps costs down for everyone.

This simple act of pre-packing means our crew can work efficiently when they arrive, respecting your time and the venue’s schedule.

Conducting the Final Inventory Check

Just before our truck pulls up, take a few minutes to do one last walkthrough with your rental agreement in hand. This is your final chance to make sure everything is accounted for. Check that every single item—from the big marquee parts down to the very last teaspoon—is present and grouped together.

If you spot something missing, have a quick look around. It’s amazing how often a stray side plate or a few glasses turn up under a table or behind a pot plant! Finding these lost items before our team arrives can save you from a replacement fee.

Once you’re happy that everything’s there, group all the items in a single, accessible spot. Ideally, this should be the same place where we dropped everything off, as it really streamlines the collection and sign-off.

The Collection and Final Sign-Off

When our collection team gets there, they’ll do their own inventory check against the delivery note. It’s a great idea for you or a designated contact to be there for this. It allows you to confirm everything together and sort out any discrepancies right there on the spot.

Once the count is complete and everything is loaded, you’ll be asked for a final sign-off, which is simply a document confirming that we’ve collected all the items.

The party rental industry in South Africa is a key player in a booming global market. South Africa’s buzzing event scene and focus on sustainable, budget-friendly solutions are a big part of this growth. You can dive deeper into these global party rental market trends to see how the industry is evolving.

After collection, our team inspects everything back at the warehouse for any damage beyond normal wear and tear. As long as it all looks good, your security deposit is processed for return, marking the successful end to your event hire.

Your Party Rental Questions, Answered

Planning an event is a big job, and it’s only natural to have a few questions pop up along the way. We get it! To put your mind at ease, we’ve put together a few of the most common queries we hear from clients. Think of this as your go-to guide for a smooth, stress-free rental experience.

What’s a Damage Waiver and Do I Really Need It?

Think of the damage waiver as your event’s safety net. It’s a small, optional fee you can add to your order that covers you for accidental wear and tear. A guest accidentally chips a glass, or a chair gets a scuff mark during the festivities – it happens!

While it isn’t compulsory, we highly recommend it. For a tiny fraction of the cost, you get complete peace of mind, knowing that a minor mishap won’t turn into a hefty bill for a full replacement. It lets you and your guests relax and focus on what matters: celebrating.

How Far in Advance Should I Book Everything?

The moment you’ve locked in your date and venue, it’s time to book your rentals. That’s the golden rule, especially if your event falls during a popular time like the summer holidays or a long weekend here in South Africa.

Believe me, our most sought-after items – like stretch tents and certain styles of chairs – can be booked out months in advance.

For smaller parties, giving us a call 2-4 weeks beforehand is usually fine. But if you’re planning something bigger, like a wedding or a corporate function, we’d suggest booking 3-6 months ahead. This way, you’re guaranteed to get exactly what you want.

Booking early isn’t just about availability. It gives you the breathing room to tweak your order as your plans take shape.

Can I Change My Order After I’ve Booked?

Absolutely! Plans change, and guest lists have a life of their own – we completely understand. You can add items or increase your numbers right up until a few days before delivery, as long as we have the stock available.

Need to reduce your numbers? We can usually sort that out for you up to a certain point before the event. Just have a quick look at your rental agreement for the specifics, as major reductions very close to the date might impact your deposit. The best thing to do is just give us a shout as soon as you know, and we’ll work it out together.

What Happens if the Weather Turns Nasty?

Ah, the classic Cape Town weather question! If you’ve hired one of our marquees, you’re already in a good spot. They’re built to handle wind and rain, keeping everyone cosy and dry. Adding side walls is also a brilliant move for extra protection against a pesky downpour.

For all other equipment, it’s up to you to keep it safe from the elements. If a storm suddenly rolls in, things like upholstered couches, cushions, and any electrical gear need to be moved undercover immediately. A solid “Plan B” for weather is a non-negotiable for any outdoor event.

Here’s a quick mental checklist for a gloomy forecast:

  • Secure the small stuff: Make sure tablecloths are clipped down and any light decorations are weighed.
  • Have a shelter spot: Know where you can quickly move smaller items if the heavens open.
  • Think about climate control: Heaters are a lifesaver on chilly days, and fans can make all the difference when it gets humid.

A bit of planning means that even our unpredictable weather won’t spoil your celebration. Chat with your venue and our team, and we’ll help you build a backup plan that keeps the party going strong.


Ready to create an unforgettable event without the stress? Let ABC Hire provide the perfect furniture and equipment to bring your vision to life. Explore our extensive range and get a quote today at https://abchire.co.za.

Decor Hire in Cape Town A Practical Guide

So, you're planning an event in Cape Town? Brilliant. But you know that the real magic, the thing that turns a nice venue into a breathtaking space, often comes down to the decor. This is where hiring comes in – it’s a far smarter and more cost-effective way to get your hands on high-quality, on-trend items without the pain of buying and storing it all yourself.

Your Guide to Decor Hire in Cape Town

Couple at a beautifully decorated wedding reception with fairy lights and elegant table settings in Cape Town.

Let's be honest, trying to create a polished, cohesive look for a wedding, corporate launch, or a big birthday bash is a massive task. Imagine sourcing, buying, and then figuring out where to keep everything from lounge furniture to hundreds of delicate centrepieces. It’s a logistical nightmare. That's why professional decor hire is such a game-changer for anyone putting together an event in the Mother City.

When you hire, you get access to huge, carefully curated collections that you could never own personally. It’s the secret to making sure every single element, from the chairs your guests sit on to the lighting that sets the mood, works together perfectly.

Whether you’re dreaming of a rustic celebration in the winelands or a slick, modern cocktail party in the city bowl, a good hire company gives you all the building blocks you need.

Think of this guide as your personal roadmap. We’ll walk you through the whole process, making it simple and taking the stress out of it.

What This Guide Covers

We’re going to cover everything you need to know to choose and manage your event rentals with confidence. You'll learn how to:

  • Nail Down Your Vision: First, we'll help you create a clear concept and a practical checklist so you know exactly what to look for.
  • Navigate the Cape Town Market: We'll dive into what makes the local decor scene unique and, crucially, how to budget for it.
  • Choose the Right Partner: This is all about finding and vetting the suppliers who can actually bring your creative ideas to life.
  • Handle the Day-Of Logistics: We'll get into the nitty-gritty of ensuring a smooth setup and breakdown process from start to finish.

A well-chosen piece of decor does more than just fill a space; it creates a feeling. For instance, the right lighting can instantly craft an intimate and magical atmosphere. To see what we mean, check out our guide on how a simple fairy light curtain can transform your venue.

By the time you're done, you'll have the practical know-how to make choices that truly count, turning a standard event into an experience people won't forget.

Defining Your Event Vision and Needs

A detailed mood board for a Cape Town event, featuring fabric swatches, floral arrangements, and images of rustic furniture.

Before you even think about flipping through catalogues, let's talk about the most important first step: getting that fuzzy idea in your head down on paper. A solid, clear vision is the absolute foundation of a stunning event. It’s what makes sure every single choice, from the forks to the furniture, feels intentional and pulls together perfectly.

Without this groundwork, you can easily end up with a collection of nice things that just don't quite work together, missing the exact feeling you were hoping to create for your guests.

A brilliant place to start is with a good old-fashioned mood board. Platforms like Pinterest are fantastic for this. Gather images that really speak to you – don't just pin other events! Think bigger. Pin textures, colour palettes you love, and even architectural styles that catch your eye. This visual guide becomes a powerful tool when you start talking to a company for decor hire in Cape Town.

From Mood Board to Checklist

Once you’ve got a collection of images, you can start narrowing things down. Ask yourself some key questions. What's the very first impression you want your guests to have when they walk in? Are you going for a laid-back, boho vibe for a windswept beach wedding, or is it a sleek, sophisticated feel for a corporate gala in the city? Always think about how your decor can enhance your venue, not clash with it.

This thought process will naturally guide you toward making a detailed checklist. Breaking it all down into categories makes the whole thing feel much less overwhelming and helps ensure no little details get missed.

  • Large Furniture: Think about creating different zones within your space. Do you need a comfy lounge area with sofas and coffee tables for guests to relax? Or maybe a scattering of cocktail tables to encourage mingling?
  • Table Settings: This is where the magic happens! We're talking everything from tablecloths and runners to the right crockery, cutlery, and glassware. These details make a huge impact on the overall feel.
  • Lighting and Ambience: What mood are you trying to set? This could mean a dramatic chandelier, strings of romantic fairy lights, or subtle uplighting to add a touch of drama.
  • Accent Pieces: These are your finishing touches. Rugs to define a space, beautiful vases, custom signage, and maybe a unique backdrop for photos.

Your checklist is more than just a shopping list—it's your secret weapon for clear communication. A well-organised list helps a decor hire company instantly get what you're after, give you a spot-on quote, and even suggest cool items you might not have thought of.

Getting this clarity sorted out right at the beginning saves a massive amount of time and helps avoid any nasty budget surprises down the line. It means you can walk into meetings with vendors feeling confident, knowing exactly what you need to bring your incredible vision to life.

Understanding the Cape Town Decor Hire Market

The decor hire scene in Cape Town is every bit as vibrant and creative as the city itself. Forget standard, cookie-cutter rental items; this is a seriously competitive market, absolutely brimming with high-quality, inventive options that truly capture the city’s unique mix of natural beauty and urban chic.

Getting your head around this landscape is the first real step in planning your event. You’ll quickly notice a strong emphasis on locally crafted and sustainable pieces, with many suppliers championing artisans from across the Western Cape. This focus on local talent often sits right alongside stunning collections of luxury, high-end designs imported from Europe.

What does this mean for you? An incredible range of choices. You could be looking at rustic wooden tables perfect for a winelands wedding one minute, and sleek, minimalist furniture for a corporate launch in the CBD the next.

Navigating Local Styles and Suppliers

This diversity has a real impact on everything from what’s available to how things are priced. Cape Town is a global hub for tourism and design, so the demand for premium decor is always high. It's one of South Africa’s top cities for interior design, and its status as a hotspot for luxury events keeps the best rental pieces in constant circulation. You can explore more on the local market trends to get a feel for this dynamic.

Knowing this puts you in a much stronger position when you start chatting with suppliers. You can set a realistic budget and truly appreciate the quality and artistry behind the items you’re hiring. It helps you ask the right questions about where an item comes from or what style it fits, making sure your choices line up perfectly with your event's vision.

The real magic of the Cape Town market is the freedom to mix and match. You can easily pair a locally made, sustainable centrepiece with high-end European glassware. The result? A look that feels both authentic to the region and undeniably elegant.

This visual guide breaks down how to pick a vendor based on what matters most for your event, whether that’s budget, style, or something else entirely.

Infographic decision tree for choosing a decor hire vendor in Cape Town based on sustainability, style, and budget.

As the infographic shows, the most effective first move is simply to define your priorities. Figuring out if you’re driven by sustainability, luxury, or your budget is the quickest way to narrow down the options in this wonderfully diverse market.

How to Find and Vet the Right Decor Supplier

Finding the perfect creative partner for your event goes way beyond a quick Google search. While it's a decent place to start, the truly great companies for decor hire in Cape Town are often found through word-of-mouth and industry connections.

Your first port of call should always be your venue. Ask for their list of preferred or recommended suppliers. These are the teams they trust and have worked with time and time again, which is a massive vote of confidence in their reliability and professionalism.

Another brilliant tool is Instagram. Forget polished website portfolios for a moment and search for hashtags like #CapeTownEvents or #CapeTownWeddings. You'll get a real, unfiltered look at a company's work in action at actual functions, which often tells a more honest story.

Digging Deeper Than the Portfolio

Once you've got a shortlist of potential suppliers, the real work begins. A stunning portfolio is one thing, but you need to know about the service that comes with it. You're not just hiring items; you're hiring a team you can depend on when the pressure is on.

Here are a few non-negotiables to investigate:

  • Scour the Reviews: Don't just glance at the star rating. Dive into the actual reviews on Google and Facebook. Are people consistently raving about their punctuality and can-do attitude? Or are there worrying patterns of last-minute problems or poor communication?
  • Talk About Insurance: Any professional, reputable company will have liability insurance. It’s a simple question to ask, and it protects everyone involved if something unexpected happens on the day.
  • Get Clear on Policies: What happens if an item gets damaged? How flexible are they with last-minute additions or changes to your order? Getting clarity on these points upfront can save you a world of stress down the line.

Choosing a supplier is one of the most critical decisions you'll make for your event. For a deeper dive into this, our guide on the benefits of renting furniture for events has some great insights that apply to all types of decor hire.

Making the Final Choice

The event decor scene in Cape Town is buzzing, thanks to South Africa’s booming hospitality market. This means the competition is fierce, and the standards are high. Top-tier companies like Urban Tonic and Scape Events cater to a sophisticated clientele, pushing the whole industry to deliver exceptional quality and service. You can learn more about the growing event services market in South Africa to understand the landscape.

To cut through the noise and make a confident decision, a little organisation goes a long way. I always recommend creating a simple comparison checklist to evaluate your top choices side-by-side.

Decor Hire Company Comparison Checklist

Use this checklist to evaluate and compare decor hire companies in Cape Town based on key service and quality indicators.

Evaluation Criteria Company A Company B Company C
Inventory Style & Quality
Pricing Transparency
Responsiveness & Communication
Positive Online Reviews
Insurance Confirmed
Clear Damage/Cancellation Policy
Delivery & Setup Fees
Overall Professional Vibe

This structured approach helps you look past the beautiful photos and choose a partner who truly has the reliability, experience, and creative vision your event deserves.

Managing Logistics for a Seamless Event Day

Event staff coordinating the placement of decor items in a large venue in Cape Town.

You can have the most stunning vision for your event, but it's the behind-the-scenes logistics that truly make it shine. A perfectly executed event day is often the result of decisions made weeks in advance, which is why clear, constant communication with your decor hire company is non-negotiable.

Get everything locked down well ahead of time. Finalise that contract, confirm delivery slots, and get it all in writing. It's also a smart move to loop your venue in on the plan, letting them know the delivery window and any specific setup instructions. This one simple bit of coordination can prevent massive headaches later on.

A Floor Plan Is Your Best Friend

One of the most powerful tools for a smooth setup is a simple floor plan. Don't worry, this doesn't need to be some professional architectural drawing. A basic sketch showing the room's layout is all you need.

Mark out exactly where the big-ticket items go—the lounge pocket, the gift table, that big floral installation. Make it visual.

A visual guide takes all the guesswork out of it for the setup crew. It means they can arrive, get straight to work, and place everything precisely where you pictured it, even if you’re tied up elsewhere.

Preparing for the Unexpected

Let's be real: even with meticulous planning, things can go sideways. An item might show up with a tiny scratch, or the venue might spring a last-minute change on you. The secret isn't avoiding issues—it's having a solid plan for when they pop up.

Designate a single point of contact. Whether it's you, your event planner, or a trusted friend, have one person who liaises with the decor team. This stops conflicting messages in their tracks and keeps communication clean.

And for outdoor events in the Cape, the weather is always the wild card. Always chat about a backup plan for wind or rain. For example, our guide to Cape Town umbrella hire has some great solutions for unpredictable weather.

A well-organised approach to setup and breakdown is what frees you up to actually enjoy the event and focus on your guests.

Of course, here is the rewritten section, crafted to sound completely human-written and match the provided style examples.


Your Decor Hire Questions, Answered

As you get closer to your event date, a few questions about the decor details are bound to pop up. It’s completely normal! To put your mind at ease, we’ve put together a quick guide with answers to the most common things people ask us about decor hire in Cape Town.

How Far in Advance Should I Book?

This is probably the number one question we get. For the best selection, we always recommend finalising your decor choices three to six months in advance. This is especially true if your event is during Cape Town’s peak season from October to March. Booking early means you get your first pick of our inventory before someone else does.

Do I Need to Pay a Security Deposit?

Yes, a refundable security deposit is a standard part of the process for any reputable hire company. Think of it as a safety net that covers any potential damages. Once we collect the items and confirm everything is in its original condition, you get the deposit back in full. It’s usually a percentage of your total hire cost.

What About Delivery and Custom Requests?

Delivery fees are another key detail. These are always calculated separately from the item hire cost. The final amount really depends on how far we need to travel to your venue, the size of your order, and how much setup is involved. We’ll always give you a detailed quote that breaks everything down so there are no surprises.

And what if you want something a bit different? While we can’t permanently change our hire items, we love working with clients to create a unique look. We can often:

  • Source specific linen colours to perfectly match your theme.
  • Work with our florist partners on bespoke centrepieces.
  • Suggest creative ways to combine furniture and create a custom lounge pocket.

The South African decor scene is thriving, with furniture hire making up a huge chunk of the USD 5.9 billion market in 2024. This means Cape Town suppliers like us can offer an incredible range of items, from big statement pieces to all the little extras. If you're interested, you can read the full research on South African decor market trends to see what's popular right now.


Ready to bring your Cape Town event vision to life? Explore the huge collection at ABC Hire, and let’s create an unforgettable atmosphere together. Visit us at https://abchire.co.za to get started.

A Guide to Catering Equipment for Hire

When you’re in the thick of event planning, the list of decisions feels endless. But let’s be honest, few things make or break an event like the catering setup. Going the route of catering equipment for hire is one of the smartest moves you can make. It gives you access to professional-grade gear without the eye-watering cost of buying it all outright. Forget about storage, maintenance, and watching your investment lose value—hiring just makes more sense.

Why Hiring Catering Equipment Is a Smarter Choice

Professional catering equipment setup for an outdoor event

Whether you’re pulling together a sleek corporate launch in Sandton or a dreamy wedding in the Cape Winelands, your budget and logistics are always front and centre. The “hire vs. buy” debate for catering equipment comes up every time, and honestly, the case for hiring is incredibly strong.

Keep Your Finances Flexible and Your Risk Low

The most obvious win is financial. Buying commercial-grade ovens, chafing dishes, and mobile refrigeration units costs a small fortune. That’s cash tied up in equipment that could be making a real difference elsewhere, like in your marketing or elevating the guest experience.

By choosing catering equipment for hire, you turn a massive capital expense into a simple, manageable operational cost. This way, you can get your hands on top-tier, specialised gear for a fraction of the purchase price, fitting it neatly into your event budget. There’s no scary long-term commitment and zero risk of being stuck with equipment that’s old news in a year.

“Hiring allows you to scale your ambition without scaling your liabilities. You can execute a high-end gala one weekend and a rustic outdoor festival the next, all with the perfect equipment and without owning a single piece of it.”

Ditch the Headaches of Ownership

Owning gear isn’t just about the initial price tag; it comes with a whole set of hidden chores. You need a secure place to store everything, and space costs money. On top of that, commercial equipment needs regular, professional servicing to keep it safe and working correctly—another cost that just keeps coming.

Hiring lets you sidestep all of that. A professional hire company takes care of the storage, cleaning, and maintenance. You get gear that’s been professionally looked after, PAT tested for electrical safety, and is ready to go the moment it arrives. It’s a hands-off approach that frees you up to focus on what you do best: running a flawless event.

In South Africa, the catering equipment rental market is buzzing, right alongside our vibrant events and hospitality industry. More and more, caterers are choosing to hire so they can use the latest tech without the massive price tag. It’s this kind of flexibility that helps them stay competitive as event styles and guest expectations constantly change. You can dive deeper into these catering equipment rental trends and their financial benefits.

Defining Your Event Needs Before You Hire

A chef preparing food in a well-organised temporary kitchen setup

Before you even start browsing a rental catalogue, the most important thing you can do is map out the reality of your event. A little bit of planning upfront saves a world of last-minute panic and makes sure you only spend money on equipment you’ll actually use. It’s this strategic thinking that separates a smooth operation from a chaotic one.

Start with the heart of your event: the menu. Are you planning a relaxed, buffet-style harvest table, a formal plated dinner, or maybe some interactive food stations? Your answer changes everything. A buffet needs chafing dishes and plenty of serving utensils, whereas a plated meal requires plate warmers and a slick, organised plating area.

Then, think about how much cooking will happen on-site. If you’re just finishing and plating pre-cooked meals, your needs will be pretty simple. But if you’re cooking an entire meal from scratch in a marquee, you’re going to need a full field kitchen. This is a critical distinction to make when you start looking at catering equipment for hire.

Assessing Your Venue’s Capabilities

Every venue is different. A Stellenbosch wine farm has a completely different set of challenges to a modern Cape Town loft. Never assume anything! Get a checklist together and investigate the specifics before you commit to any rentals.

  • Power Supply: Find out exactly how many power outlets are available and where they are. The crucial question is about the available amperage—you need to know you won’t overload the circuits with high-draw equipment like convection ovens or deep fryers.
  • Water Access: Where are the taps? Is there a proper scullery or wash-up area, or will you need to bring in portable sinks and water bowsers?
  • Space and Layout: Get out the tape measure and figure out the exact dimensions of your kitchen or prep space. You need to know if that large combination oven will actually fit through the door and if there’s a logical flow for staff to move between cooking, plating, and serving.
  • Ventilation: This is an absolute non-negotiable, especially for any gas-powered cooking gear. Make sure the area has proper airflow or extraction so your team can work safely.

A classic mistake is hiring powerful equipment that a venue simply can’t handle. Always match your rental list to the venue’s infrastructure, not just your culinary dreams.

Thinking through these practical details first helps you build a precise list. It ensures that every piece of catering equipment for hire is a necessary tool that helps you pull off your vision flawlessly.

Right, you’ve got the big picture sorted for your event. Now it’s time to get into the nitty-gritty: matching the right equipment to your menu and venue. This is where the magic really happens, turning your plan into a smooth, functioning operation on the day.

Think of it like this: you wouldn’t bring a spit braai to a fancy plated dinner, would you? Each piece of gear has a job. A casual outdoor event needs that braai, some carving stations, and maybe rustic serving platters. A formal affair, on the other hand, is all about high-performance convection ovens, plate warmers, and elegant chinaware. Getting this right is the difference between a seamless service and a logistical headache.

Aligning Gear with Your Culinary Vision

Your menu is the roadmap, and the equipment is the vehicle that gets you there. Before you even start browsing catering equipment for hire, you need to walk through your entire food service process, from the first chop to the final plate.

  • Prep Work: Are you doing a lot of prep on-site? If so, you’ll need the basics covered: stainless steel tables, chopping boards, and a good set of professional knives.
  • The Cooking Method: How are you actually cooking the food? This is the big one. Your needs will change drastically depending on whether you’re frying, baking, grilling, or boiling. This will point you towards deep fryers, combination ovens, gas grills, or large stockpots.
  • Holding and Serving: This is absolutely critical. Food has to be served at the right temperature, no exceptions. Our guide on choosing the right catering food warmers is a great resource, breaking down everything from chafing dishes for a buffet to insulated food carriers for getting meals from A to B piping hot.

Don’t Forget the Venue Check

This is a classic rookie mistake we see all the time: hiring powerful equipment that the venue’s infrastructure simply can’t handle. Before you finalise anything, you must check what the venue can support.

Find out the available amperage for high-draw items like big ovens and fryers. The last thing you want is to trip the power in the middle of service. If you’re using gas cookers, confirm the ventilation is up to scratch to keep your team safe. It’s a non-negotiable step.

The initial cost of buying is massive. Unless you’re running events back-to-back, hiring is easily the most budget-friendly option.

Pro Tip: Get out a measuring tape. Seriously. Measure the doorways, lifts, and corridors at your venue. That amazing mobile walk-in fridge is completely useless if you can’t physically get it into the kitchen. This one simple check can save you from an absolute disaster on the day.

Getting the Hire Process Right

Okay, you’ve done the hard work and figured out exactly what you need. Now comes the part where planning meets reality: the rental process itself. This stage is all about logistics, and while it’s not complicated, a bit of attention to detail goes a long way in avoiding any last-minute panics or unexpected costs.

Your first move is to get a detailed quote. Don’t be shy here; be specific about every single item and the quantities you need. When that quote lands in your inbox, think of it as your event’s blueprint. A good hire company will itemise everything, but it’s on you to double-check what’s actually covered in the price. It’s often the things beyond the equipment that catch people out.

Don’t Skip the Fine Print

That rental agreement is your best friend. It’s the document that lays out all the rules of the game for both you and the hire company. It’s tempting to just give it a quick scan, but trust me, you need to understand every clause before you put your name on it.

Here are a few things I always tell clients to look for:

  • Delivery and Collection Fees: Are these baked into the price, or will they be an extra line item? Also, confirm the delivery window and make sure it works with your venue’s access times. There’s nothing worse than having a truck arrive when the gates are locked.
  • Setup and Takedown: If you’re hiring something complex like a full field kitchen, some companies will offer to set it up. Is this part of the service, or is it an add-on you need to budget for?
  • Cleaning Policy: This one is huge. Most places will expect you to return items scraped and rinsed. If you don’t, you could be hit with some pretty steep cleaning fees. Know the policy upfront.

A classic rookie mistake is assuming delivery includes setup. Always ask the question: “Will your team just be dropping the equipment off, or will they help place it?” Clarifying this can save you an incredible amount of heavy lifting on the day.

Final Checks and Getting in Sync

The moment the equipment arrives is go-time. Before you sign that delivery note, do a thorough check. Make sure everything on your order is actually there and, more importantly, that it’s all in good working order. Plug in anything with a cord and test any moving parts while the delivery team is still on-site.

Juggling these logistics is a real skill, especially when you’re also coordinating furniture, decor, and everything else. For more on that, our guide on renting furniture for events has some great tips that are just as useful for equipment hire.

Finally, get clear on the insurance and damage waiver policies. Accidents can and do happen, and knowing who’s responsible for what gives you massive peace of mind. There’s a reason the global rental market is booming. This trend is a massive boost for South Africa’s hospitality sector, giving event planners like us the agility we need. You can dive deeper into the growth of the catering equipment rental market to see just how big this shift is.

Getting It Done On The Day

The truck has rolled out, and all your hired gear is on site. This is the moment where all that planning turns into real-time action. A smooth, seamless service from here on out really boils down to how you manage the equipment.

First things first: do one last function test. Yes, you checked everything on delivery, but now is the time to be absolutely certain before the first guest walks in. Fire up the ovens, check the temperature controls on the Bain Marie, and make sure the gas connections for the fryers are tight. This is your final chance to spot a problem and use that emergency number your supplier gave you.

Next, get your team briefed. You can’t just assume everyone knows their way around a high-tech combination oven or a massive coffee percolator. A quick five-minute rundown on the key pieces of equipment can prevent misuse, accidental damage, and, most importantly, delays in service. It keeps your team working confidently and efficiently.

The Post-Event Wind-Down

After the last guest has said their goodbyes, the final bit of work with your catering equipment for hire begins. How you manage the cleanup and return process is super important—it can directly affect your final invoice and your relationship with the hire company.

Start by following the cleaning guidelines in your rental agreement. Usually, this means:

  • Scraping off all the food scraps from plates and platters.
  • Emptying any liquids left in glasses or urns.
  • Giving cooking surfaces a quick wipe-down.

Putting in this little bit of effort can genuinely save you from being hit with extra cleaning fees, and those can add up fast.

Before you pack a single thing away, grab your delivery note and do a final inventory check. Trust me, it’s a whole lot easier to find a missing pair of serving tongs on-site than to get a call saying they’re gone after the collection team has already left.

Finally, get everything back into its proper crates and containers. Packing things away correctly doesn’t just make the collection process a breeze; it also massively cuts down the risk of anything getting broken on the way back.

For a complete guide to keeping every detail in check, our event planning checklist template can be an absolute lifesaver. This organised approach helps you close out the event like a pro, avoiding surprise charges and paving the way for a great partnership with your hire company for your next event.

Your Catering Equipment Hire Questions, Answered

When you’re deep in the weeds of event planning, a few questions about catering equipment are bound to pop up. Getting them sorted early on saves you from any nasty surprises down the line. We get it, and we’ve heard it all before, so let’s tackle the most common queries we get from planners.

How Far in Advance Should I Book?

Honestly, as soon as you have your date and venue confirmed, get your booking in. Here in South Africa, peak season—think summer weddings and big holidays—gets crazy. To be safe, lock in your gear 3-6 months in advance.

If you’re planning a smaller get-together or an off-season event, you can usually get away with 4-6 weeks’ notice. But booking early always means you get your first choice of equipment before someone else snaps it up.

What if Something Breaks Down During the Event?

This is a totally valid concern, and any professional hire company will have a plan. You should always be given an emergency contact for exactly this reason. Before you sign anything, ask what their process is for on-site malfunctions.

Most companies will try to troubleshoot with you over the phone first. If that doesn’t work, they should be ready to send out a technician or a replacement item. It’s also smart to be crystal clear on who is liable for what—a genuine equipment failure versus damage from misuse.

Always ask about the cleaning policy before you commit. It’s a simple question that can save you a surprising amount of money and a major headache after the event.

Do I Have to Clean Everything Before it Goes Back?

This really comes down to the fine print in your rental agreement. The standard expectation is that you’ll scrape leftover food off plates, empty all the glasses, and give surfaces a quick wipe-down.

Some companies will offer a full cleaning service for an extra fee, which can be a lifesaver. Others might even include it in the price. Just make sure you know what’s expected of you.

What are the Most Common Things People Forget to Hire?

It happens to the best of us! You’re so focused on the big-ticket items like ovens and fridges that the little things slip through the cracks. This is where a good old-fashioned checklist becomes your best friend.

We see the same items missed time and time again:

  • The small stuff: Can openers, extra cutting boards, serving tongs, and even salt and pepper shakers for the tables.
  • Power supplies: You can never have enough extension cords and multi-plugs, especially if your event is in a marquee.
  • Waste management: Don’t forget to hire enough bins and buy plenty of bin liners for both the kitchen and your guests.

Thinking through these details beforehand is what separates a good event from a great one. It’s all about a smooth, stress-free execution on the day.


Ready to make sure your next event is perfectly equipped? The team at ABC Hire has the quality catering equipment and hands-on experience to help. Explore our extensive range of hire options and get a quote today!

📍 Cape Town + Winelands