
A fairy light curtain is so much more than just a string of lights; it’s one of the most effective tools I’ve seen for completely transforming an event space in minutes. With just one simple piece of decor, you can instantly create a magical, warm, and unforgettable atmosphere, turning any plain wall into a show-stopping backdrop.
Creating an Unforgettable Atmosphere with Fairy Lights
Let’s be honest, very few decorations can alter a space as quickly and dramatically as a wall of light. A cascade of warm, twinkling lights is an instant atmosphere creator, making it a bit of a secret weapon for event designers and party hosts across Cape Town.
Forget generic decor; this is about crafting an experience.
The Visual Impact on Event Spaces
The real magic of a fairy light curtain is its versatility. It can be the star of the show or a subtle supporting element that elevates everything else around it.
I’ve seen them used in so many creative ways:
- Wedding Receptions: Imagine a curtain of lights behind the main table, casting a romantic glow on the happy couple. It creates a dreamy, soft-focus background that looks absolutely incredible in photos.
- Corporate Events: For a more professional setting, a sleek, cool-white light curtain can frame a stage or create a sophisticated focal point behind a registration desk. It adds a touch of class without being distracting.
- Birthday Parties: A vibrant fairy light curtain can turn a plain wall into a fantastic photo booth backdrop, encouraging guests to snap and share memories all night. This works especially well when you pair it with other fun rentals. You can get some more ideas in our guide on hiring a cotton candy machine.
A single wall of lights can make a room feel warmer, more intimate, and infinitely more special. It’s often the difference between a simple gathering and a truly memorable occasion.
A Growing Trend in South Africa
This love for atmospheric lighting is a trend that’s really taking off. While specific data on fairy light curtains is hard to come by for the South African market, the demand for decorative, energy-efficient lighting solutions is clearly on the rise.
We’re seeing a huge shift towards more aesthetically pleasing event and home decor. The LED market, which includes these beautiful light curtains, is benefiting massively from this. It’s all about creating a vibe, and these lights deliver every time.
Choosing the Right Fairy Light Curtain for Your Vision
This is where the magic really starts to happen. Picking the perfect fairy light curtain is the first step in bringing your creative vision to life. Get this right, and you set the entire mood for the event. Get it wrong, and it can feel a little… off. It’s about more than just brightness; it’s about matching the light’s personality to your theme and venue.
Light Colour: The Mood-Setter
Think of it like choosing a paint colour for a room.
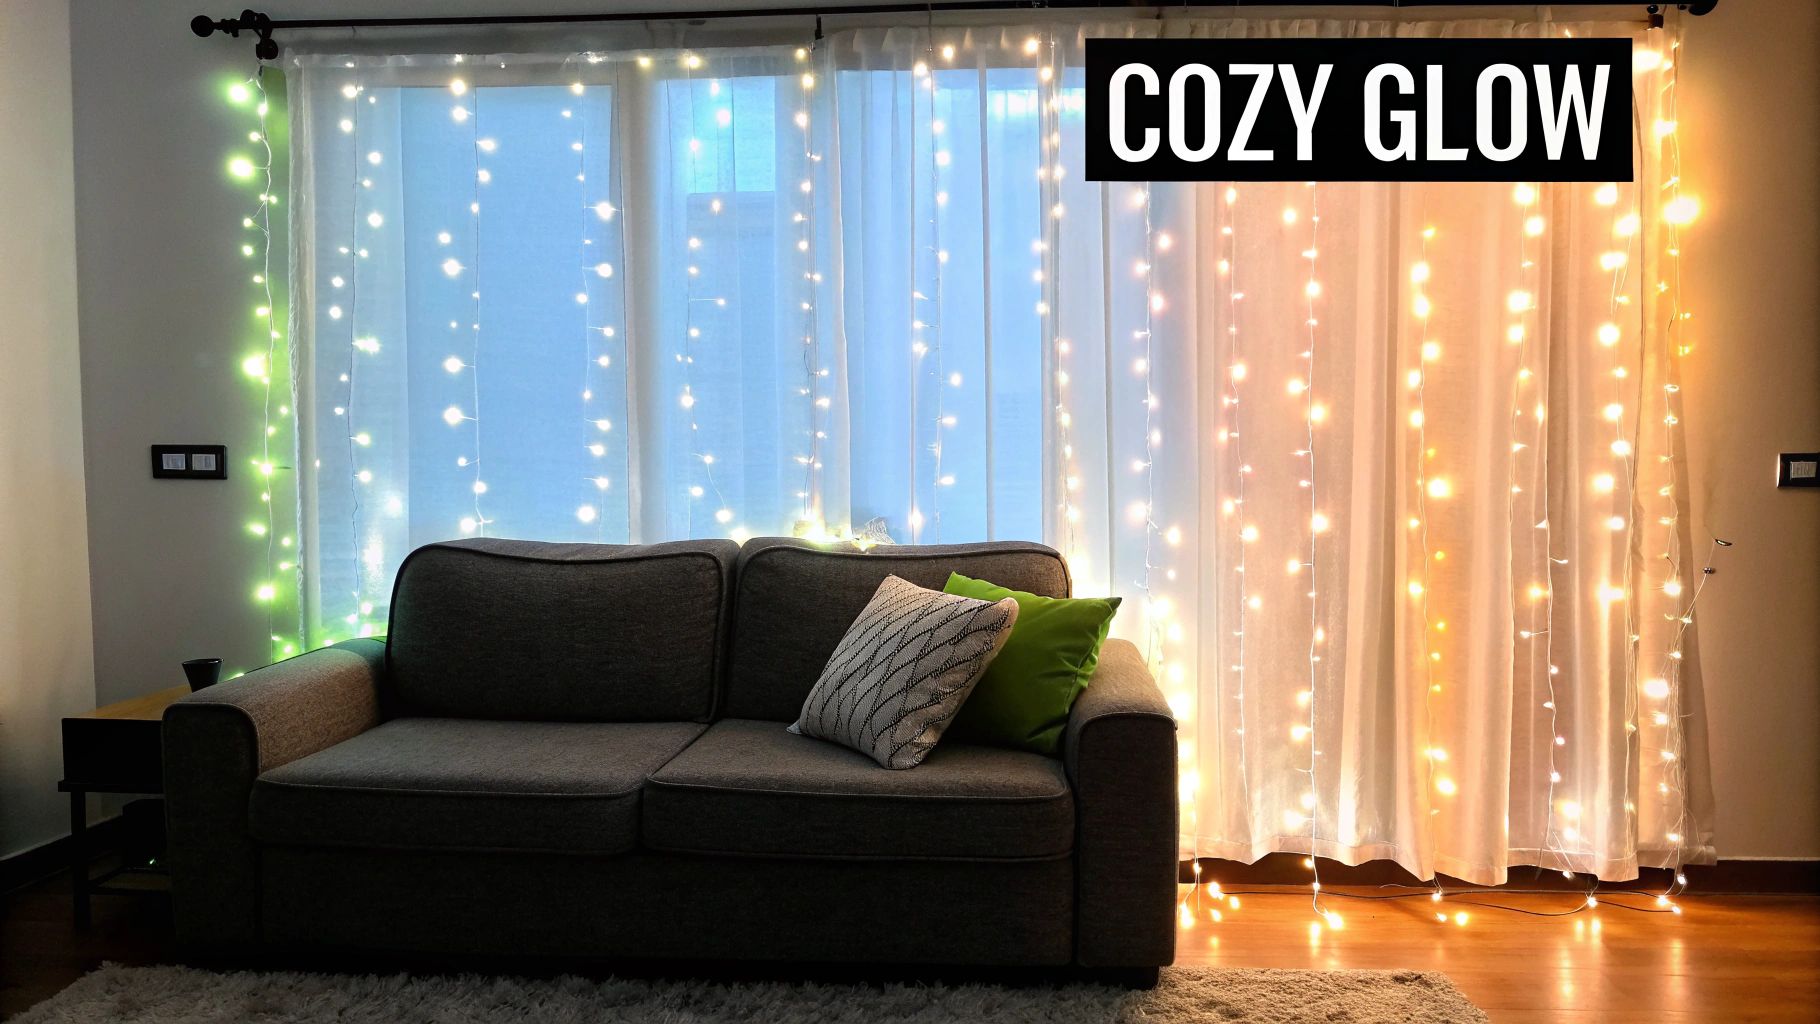
Warm white lights give off that soft, yellowish glow that just feels cosy and romantic. They’re my go-to for rustic barn weddings, intimate anniversary dinners, or any event where you want people to feel instantly welcome and relaxed.
On the other hand, cool white lights are crisp, modern, and vibrant. These are brilliant for corporate functions, slick birthday parties, or when you’re going for that stunning winter wonderland effect.
Don’t underestimate the power of colour temperature. The choice between warm and cool white will fundamentally alter the mood of your space and how it appears in photographs.
Deciding on a Power Source
The practical side of things can’t be ignored, and your venue’s layout will pretty much decide this for you. Each power option has its pros and cons, so have a good think about where you’ll be setting up.
Here’s a quick rundown of what I’ve learned from experience:
- Plug-In: This is your most reliable bet for consistent, long-lasting brightness. Perfect for indoor events where you have plenty of wall sockets. You can set them up and forget about them, knowing they won’t dim halfway through the speeches.
- Battery-Operated: Absolute lifesavers for venues with tricky power situations. Think remote gardens, historic buildings with protected walls, or anywhere you want to avoid a mess of extension cords. They give you total freedom to place lights anywhere.
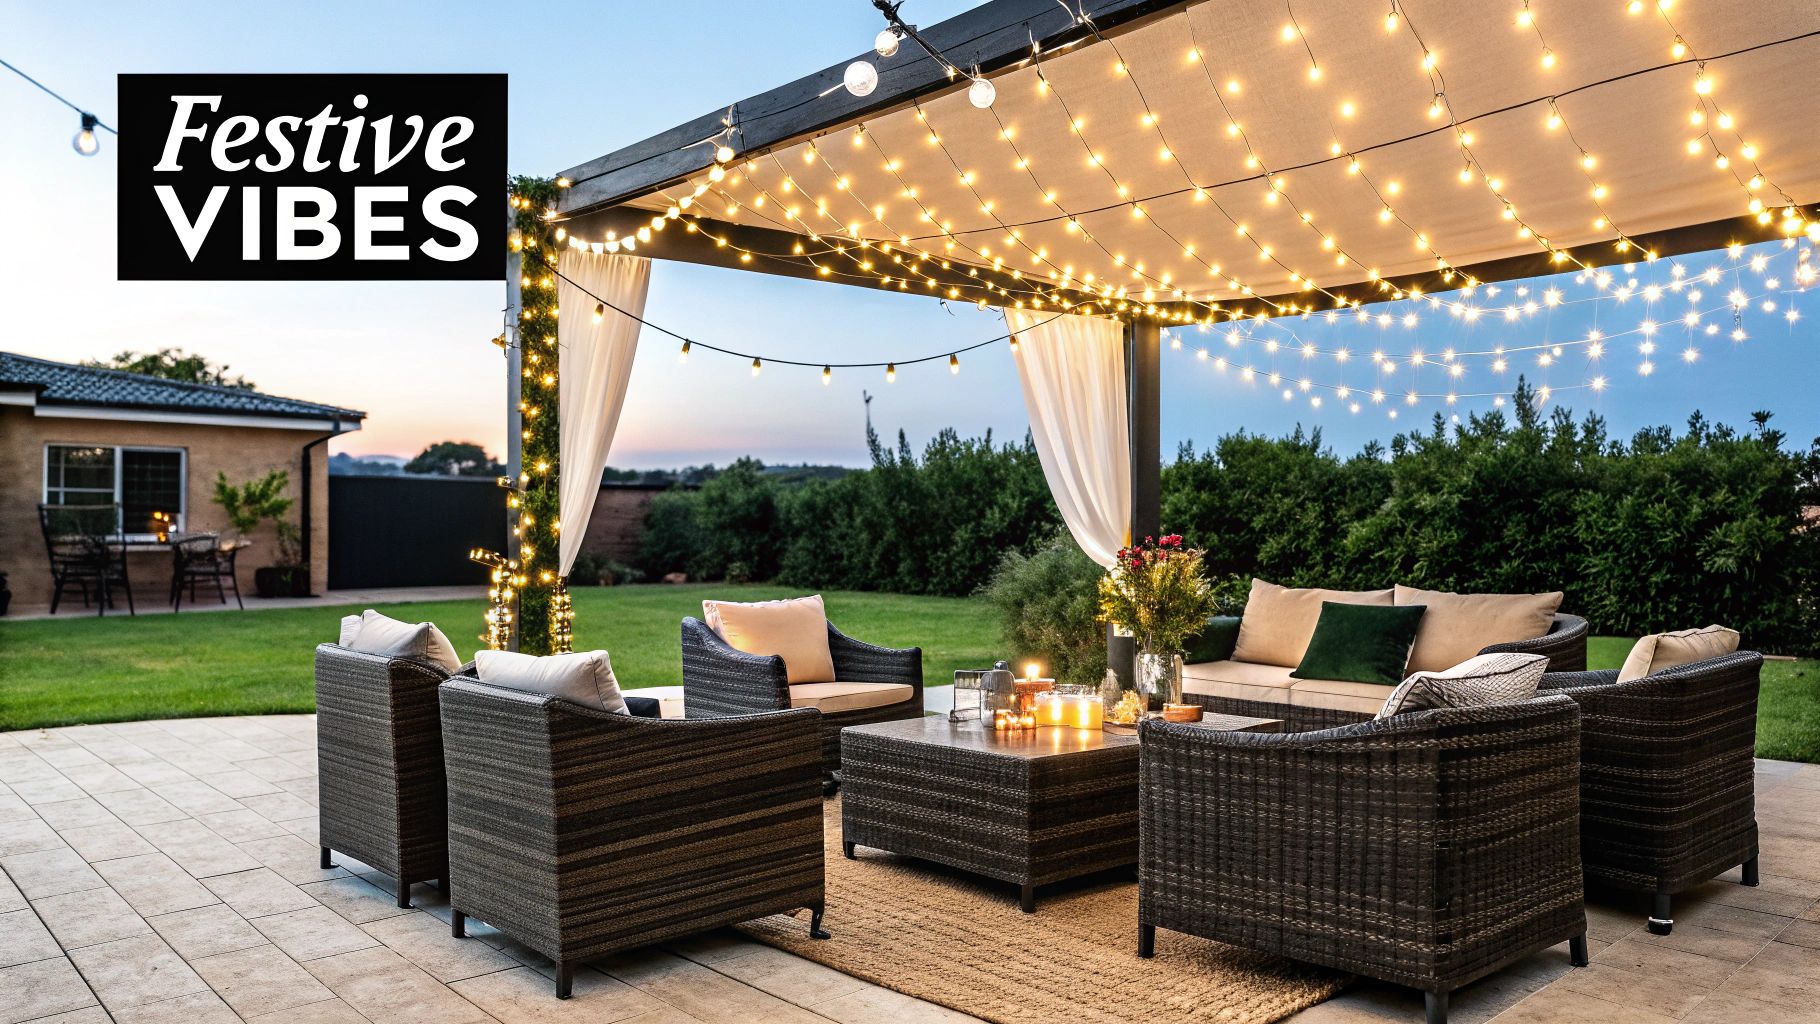
- Solar-Powered: A fantastic, eco-friendly choice for outdoor events that start in the day and drift into the evening, like a garden party or a beach celebration. They look incredible alongside other outdoor rentals, like the ones in our guide to Cape Town umbrella hire.
To help you decide at a glance, here’s a simple comparison of the features.
Fairy Light Curtain Feature Comparison
Use this table to quickly compare key features and decide which type of fairy light curtain is best for your event.
| Feature | Plug-In | Battery-Operated | Solar-Powered |
|---|---|---|---|
| Best For | Indoor events, long durations | Tricky venues, outdoor spaces | Outdoor day-to-night events |
| Brightness | Strongest & most consistent | Can dim as batteries weaken | Varies with sun exposure |
| Portability | Limited by cord length | Highly portable, no cords | Portable, needs sun access |
| Eco-Friendly | Standard energy use | Depends on battery type | High |
| Setup | Needs nearby power outlets | Easiest & most flexible | Needs placement in sunlight |
Ultimately, the best choice really hinges on your specific venue and how you plan to use the lights throughout your event.
Style and Design Considerations
Beyond the technical stuff, the actual design of the curtain plays a huge part in the final look.
A uniform drop style, where every strand is the same length, gives you a very clean, polished backdrop. It’s fantastic for creating a solid wall of light behind a main table or for framing a stage with a sleek, modern feel.
If you’re after something a bit more whimsical and organic, an icicle-style curtain is perfect. The staggered, varying lengths add a touch of relaxed, bohemian charm. I love using these to create a dreamy, starry-night effect.
It’s no surprise that these lights have become so popular. The global LED curtain lights market was valued at a massive USD 2.17 billion in 2024 and is only expected to keep growing. It just goes to show how much people value beautiful, energy-efficient lighting for their events and homes. You can read more about the growth of the LED curtain lights market on Expert Market Research if you’re interested in the trends.
How to Hang Your Fairy Light Curtain Like a Pro
Right, this is where the magic really starts to happen. Getting the installation right is the key to that polished, professional look, and it saves you from the nightmare of tangled wires and wonky strands. Let’s go through the tools and tricks that seasoned event planners swear by.
First off, get your toolkit ready. You don’t need a huge box of gear, just a few essentials that make all the difference. For most indoor walls, especially at venues where you can’t leave a mark, damage-free adhesive hooks are your absolute best friend. If you’re working with a more rustic vibe—think exposed beams or wooden frames—a handful of clear zip ties or small nails will do the trick. And a measuring tape? Non-negotiable for getting your spacing perfect.
Preparing Your Space for Installation
Before you even think about unwrapping those lights, take a second to prep your surface. Give the wall or window frame a quick wipe down to get rid of any dust. This is a crucial step if you’re using adhesive hooks, as it helps them get a proper grip that’ll last the whole event.
Next, measure the width of the space you want to cover. Then, unroll your fairy light curtain on the floor, making sure to keep the main horizontal wire separate from the vertical strands. Trust me on this one—this simple move prevents a tangled mess and makes the whole process about ten times easier. It’s a small detail that saves you a massive headache.
This basic workflow is your secret to a quick, clean setup. This little infographic breaks down the core steps for a handy visual guide.

Thinking about it as measure, mount, and hang really simplifies things and helps make sure you don’t miss a step.
Mounting Techniques for Different Surfaces
The surface you’re working with will completely change your game plan. You wouldn’t tackle a painted wall the same way you would a delicate window frame.
- Painted Drywall: This is what you’ll run into most of the time. Use clear, removable adhesive hooks and space them evenly across the top. Make sure you follow the instructions on the packet, especially the bit about waiting before you hang anything, to get a really strong bond.
- Window Frames: Small, clear hooks work a charm here too. You could also use clear adhesive tape for a super discreet look, just securing the main wire along the top of the frame.
- Exposed Beams or Archways: This is where zip ties are a game-changer. They’re strong, practically invisible from a distance, and won’t damage the structure.
- Behind Sheer Fabric: For that soft, dreamy glow, hang your fairy light curtain first, then drape a layer of tulle or organza over it. Use a separate set of hooks or pins to secure the fabric.
Here’s a pro tip: always start hanging from the end closest to your power source. This way, you know for sure that your cord will reach the socket without having to stretch the lights awkwardly or scramble for an extension lead at the last minute.
By picking the right tools and matching your technique to the surface, you’ll guarantee an installation that’s both stunning and secure. A well-hung fairy light curtain looks intentional and elegant, lifting the whole atmosphere of your event from simply decorated to truly magical. Getting this part right sets the stage for everything else.
Creative Styling Techniques for a Breathtaking Display

Right, so your fairy light curtain is up and secure. That’s the groundwork done. But just hanging the lights is like setting the stage; the real magic happens when you start styling. This is where we go beyond the basics and add those creative touches that turn a simple wall of light into an unforgettable centrepiece.
The secret is all about playing with depth and texture. A single layer of lights is pretty, sure, but when you start combining it with other elements, you get that rich, professional look everyone wants. It’s the difference between a nice decoration and a truly immersive experience for your guests.
Layering with Fabrics for a Dreamy Effect
One of the most effective tricks in the book has to be layering your fairy lights with sheer fabrics. Think tulle, organza, or chiffon. These materials catch the light in the most beautiful way, diffusing it to create a soft, ethereal glow that’s incredibly romantic and looks amazing in photos.
Here’s how to nail this look:
- Hang the lights first: Get your curtain installed right up against the wall or backdrop.
- Drape the fabric over the top: Use a separate rod or another set of hooks to hang a panel of sheer fabric just a few centimetres in front of the lights.
- Let it hang loose: Don’t pull the fabric taut. You want it to drape naturally, creating soft folds. A slightly gathered look always works best.
We see this done all the time for weddings and engagement parties. It instantly adds a layer of sophistication and romance to any venue.
Weaving in Greenery and Florals
If you’re aiming for a more organic, bohemian, or rustic theme, you have to bring in some natural elements. Weaving greenery (real or faux) and floral garlands through the strands of your light curtain adds incredible texture and a touch of natural beauty.
Picture a wedding reception with a warm white fairy light curtain as the backdrop for the main table. By artfully weaving some eucalyptus garlands and a few clusters of white roses along the top and down the sides, you create a stunning focal point that pulls the whole room’s decor together. Simple, but so effective.
Pro Tip: Less is often more. The goal here is to complement the lights, not completely cover them. A few well-placed garlands will have a much bigger impact than a dense wall of foliage. You want those lights to twinkle through the gaps for that truly magical effect.
The demand for creative lighting is exploding globally. While specific numbers for the South African market are hard to come by, the smart curtain fairy light market hit a global size of USD 1.21 billion in 2024. That just shows how much people value these kinds of creative lighting options for their events. You can dig deeper into the growth of the smart lighting market on Growth Market Reports.
Creating Thematic Focal Points
Don’t just think of your fairy light curtain as a background—make it the main attraction! By being strategic with where you place and how you style it, you can highlight specific areas and create a genuine ‘wow’ moment for your guests.
For instance, you could:
- Frame a Dessert Table: Make your cake or sweet treats the undisputed star by placing a shimmering light curtain behind them. It naturally draws everyone’s eyes and creates a picture-perfect spot.
- Design a “Starry Night” Ceiling: For indoor events with high ceilings, hanging multiple curtains overhead can create the illusion of a sparkling night sky. This works especially well in marquees, which you can read more about in our guide on hiring a gazebo.
- Build a Grand Entrance: Drape lights around an entryway or arch to welcome guests with an immediate sense of occasion and magic from the moment they arrive.
Right, so you’ve done the hard work, stepped back to admire your masterpiece, and… something’s not quite right. A whole section is dark, or it looks a bit wonky. Don’t stress! This happens to everyone, even us pros.
Think of this as your setup first-aid kit. Most of the little hiccups you’ll run into when hanging a fairy light curtain are surprisingly easy to fix. Let’s tackle some of the most common issues so you can get that perfect glow.
What to Do When a Section of Lights Is Out
It’s the moment that makes your heart sink. You’ve got the curtain hung perfectly, you plug it in, and one long, lonely strand refuses to light up. Before you start thinking the whole set is a dud, take a deep breath and check a couple of things.
First, follow that dark strand all the way up to where it meets the main horizontal wire. Sometimes, during the excitement of unboxing and hanging, one of these little connections gets pulled loose. Give it a gentle but firm push back into place – often, that’s all it needs. If that doesn’t do the trick, have a quick look along the wire itself for any obvious pinches or damage.
- Check the Connection: Make sure the base of the non-working strand is pushed securely into the main wire.
- Inspect the Wire: Scan for any little breaks or damage in the thin copper wire.
- Swap Power Sources: It’s worth a shot! Try a different plug point or fresh batteries just to rule out a power issue.
Fixing Unevenly Spaced Strands
You’ve got them up, but the spacing is all over the place. One gap is wide, the next is narrow, and the whole thing just looks messy. You absolutely do not have to take it all down and start from scratch.
This is an easy one. Most fairy light curtains are designed so you can gently slide the vertical strands along the main horizontal wire. Just unhook the main wire from its mounting points, and manually shuffle the strands left or right until they look perfectly spaced. If you’re a perfectionist, grab a tape measure to get the gap between each strand spot on.
A tiny adjustment here makes all the difference between something that looks DIY and a truly professional installation. Taking a few extra minutes to get the spacing just right is a small effort that pays off big time.
Safely Hiding Cords and Wires
Nothing ruins the magic of a floating wall of light faster than a tangled mess of extension cords snaking across the floor. The goal is to make the lights look effortless, and a huge part of that illusion is hiding how they get their power.
Clear or white adhesive clips are your best friend here. Use them to run the power cord neatly along a skirting board, down a corner, or behind a door frame where no one will see it. If you’re setting up near furniture, even better – just tuck the cord behind a couch or under a rug. For events, we always use gaffer tape that matches the floor colour. It keeps the wires flat, prevents a tripping hazard, and keeps the whole look clean and polished. Get the cords out of sight, and all the attention will stay right where you want it: on your beautiful fairy light curtain.
Your Fairy Light Curtain Questions, Answered
Let’s quickly run through some of the questions we get all the time about using fairy light curtains for events. Getting these details sorted will help you finalise your plans with confidence, knowing your setup will be every bit as magical as you’ve pictured.
How Long Does It Take to Set Up a Fairy Light Curtain?
This can change depending on your setup, but a good rule of thumb for a standard 3×3 metre curtain is to budget around 30-45 minutes. That gives you plenty of time to carefully get the lights untangled, measure and place your hooks properly, and hang the curtain without rushing.
If you’re getting a bit more creative by layering them with fabric or weaving in some florals, you’ll probably want to set aside closer to an hour. The real key here is patience—rushing is when things get tangled and you end up with uneven spacing.
Can I Use Them Outdoors?
Absolutely, but you have to be smart about it and pick the right lights. Not all fairy light curtains are made to brave the great outdoors. If you’re planning an event outside, it’s essential to look for lights with an IP rating (like IP44 or higher), which tells you they’re protected against water splashes.
For an outdoor setup, think about these options:
- Battery-operated curtains are fantastic for flexibility, saving you the headache of finding an outdoor plug point.
- Solar-powered lights are a brilliant, eco-friendly choice, especially for events that kick off in the afternoon and run into the evening.
- If you go with a plug-in model, double-check that the plug and any extension cords are also rated for outdoor use and kept safe from moisture.
Choosing a fairy light curtain specifically designed for outdoor use isn’t just about making sure they work; it’s a critical safety step. Always read the product specs before you hang any electrical decor outside.
What Is the Best Way to Store a Fairy Light Curtain After Use?
Storing them properly is the secret to avoiding a tangled mess next time. The biggest mistake you can make is to just bunch them up and chuck them in a box—you’ll be greeted by a frustrating knot when you pull them out again.
Instead, grab a piece of sturdy cardboard or even a plastic coat hanger. Start by neatly wrapping the main horizontal wire around your cardboard or hanger. After that, carefully wrap each vertical strand on its own or in small, easy-to-manage bundles. This keeps everything organised and ready to go for your next event.
Can a Fairy Light Curtain Damage Walls?
This is a huge concern, especially when you’re in a hired venue. The great news is, with the right tools, you can hang your lights without leaving so much as a scratch. For most painted walls, your best friends are damage-free, removable adhesive hooks.
These hooks are made to hold a surprising amount of weight and then peel off cleanly without ripping the paint. Just make sure you follow the instructions on the packet for putting them up and taking them down—especially the part about letting the adhesive set before you hang anything. A little bit of prep work will keep the venue’s walls looking perfect.
Ready to create a truly magical atmosphere at your next event? ABC Hire offers a stunning range of lighting and decor rentals to bring your vision to life.
Explore our collection and book your rentals today at https://abchire.co.za.